Actions - Overview
SmartIQ Actions incorporate the ability to pass eForm data and generated documents to third-party systems, data stores or trigger specific events based on business rules. SmartIQ includes several Actions that covers the majority of everyday tasks.
If for any reason the required event is not covered by the Out of the Box Actions, please check our Ecosystem.
Here a simple guide that explains how to add and configure Actions in SmartIQ.
Adding an Action to a Project
-
Create or open an existing project in Design.
-
Ensure 'Action' is available in the toolbox.
- There are two ways to add an action to your project.
- Click 'Action' and drag onto the Finish page in the 'Question set'.
- Select 'Finish' in the 'Question set' and double click 'Action' in the Toolbox.
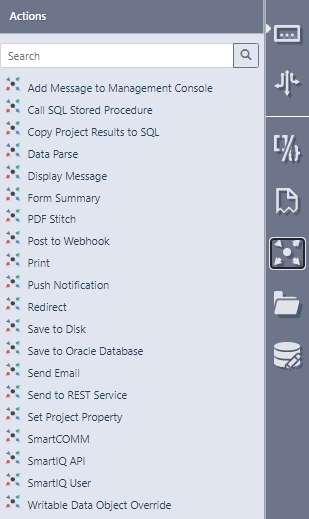
- The 'Select Action' window will display.

- By default, SmartIQ adds the following actions:
- Add Message to Management Console
- Call SQL Stored Procedure
- Copy Project Results to SQL
- Data Parse
- Data Store Delete Selected Rows Action
- Display Message
- Form Summary
- PDF Stitch
- Post to Webhook
- Push Notification
- Redirect
- Save to Disk
- Save to Oracle Database
- Send Email
- Sent to REST Service
- Set Project Property
- SmartCOMM
- SmartIQ API
- SmartIQ User
- Writable Data Object Overrride
-
Drag and drop an action from the list on the Finish page.
-
The action you selected will now be added to the 'Finish' page. The added action can now be configured by adding the parameters in Design.

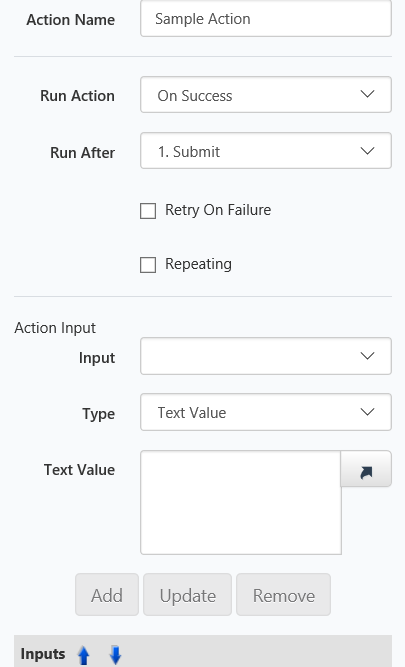
Retry On FailureClicking "Retry On Failure" checkbox allows user to specify the number of retries and wait between retries
Note:
Actions can only be added to the 'Finish' page in the design window, an action can also be added to a transition in a workflow. (refer to How to add actions to workflow transitions article).
You can have more than one of the same action type on the Finish Page of a project.
If your action is a Finish action (it was added to the 'Finish' page), the form will always finish before that action runs. If the form is expected to finish when the call is successful, a run action button can be used. For more information see Run Action Button.
Because Actions run after the project answers have been saved, Actions cannot be used in workflow transitions to update project properties.
How to Add Actions to Workflow Transitions
Actions can be added to transitions in a workflow, for this you will need to know how SmartIQ Workflow works. For more information see Workflows.
-
Open a project with a valid workflow in design.
-
Open an SmartIQ workflow via the workflow button.
-
Select a transition.
-
Click the Actions Button.
-
The Actions list will pop up.
-
Drag and drop the action you would like to add to the transition, we are using the 'Redirect' action as an example.
-
The action will now be added in between the state that transition was going to.
-
Click to select the 'Redirect' action.
-
The Redirect properties pane will now display on the right screen.
- Once configured, this action will occur on transition from 'Start' to the 'Start 1' state.
Nested Actions
SmartIQ allows for the creation of nested actions which can reference the output value of the parent action. A nested action can reference that newly created ID and run another action. An action can only be the child of another action if the parent is a repeater.
The following example shows how to create a simple save to disk action nested with an email action. The goal is to save files to different disk locations and nesting an email action to it which sends email notifications containing the location to different users.
-
Create a repeating section ‘File Saver’ with a text field for entering the document save location and a multiple choice for deciding whether to send email notification or not
-
Create a repeating section ‘Email Sender’ (which appears based on the selection for the multiple choice question) within the repeating section ‘File Saver’ with a text field for entering the email addresses of the receivers.
- Add a ‘Save to Disk’ action and set the following properties
NoteWhen adding a nested action, the parent action needs to be a valid repeating action.
-
Drag and drop a new action to the parent action, set it as ‘Send Email’ and click OK
-
Click YES on the opened dialog box
The ‘Send Email’ action will be nested on the ‘Save to Disk’ action as per the following image.
- Set the following properties for the ‘Send Email’ action
- Set the condition for which the nested action should be activated and save the project
Here, the condition will be set in a way that the email will be send only if the document is properly saved in the specified location
Testing Nested Actions
- Open the project and enter the values.
- Click Next and then Generate Document.
The results will be the following:
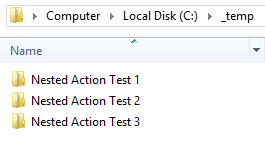
a. The folders Nested Action Test 1, Nested Action Test 2 and Nested Action Test 3 will be created if it’s not already present in the ‘C:_temp’ folder and the generated documents will be saved in the 3 folders

b. If the folders are created and documents are saved in their respective locations, then emails containing the file locations will be sent to the respective email addresses mentioned in the respective folder sections.
Triggering Document Generation with Actions
You can trigger generated documents on your action(s). This is useful for those situations when specific actions generate specific documents.
This example will demonstrate how to set up a project that has two generated documents. Doc 1 will be linked to an 'email' action while Doc2 will be linked to a 'print' action.
-
In Design create a new project
-
Add another Word template (Actions > Add Template)
-
Change the name of both document templates to Doc1 and Doc2
-
Add an email action to the Finish page (refer to Add an Action to a Project how-to article)
-
Configure the email action (refer to Send to Email Action how-to article)
-
Add a Print action to the Finish page (refer to Send to Print how-to article)
-
Select the 'Send Email' action and select the 'Documents' tab on the right hand of the screen
-
Within the 'Action Documents' screen select the 'Custom' option and from the 'Document' drop-down menu select 'Doc1' then click 'Add.'
-
Select the 'Print' action and select the 'Documents' tab on the right hand of the screen
-
Within the 'Action Documents' screen, select the 'Custom' option and from the 'Document' dropdown menu select 'Doc2' then click 'Add'.
Once the project has been run (generated) in Produce, Doc1 and Attachment_1 will be sent to the email address configured in the email action. Doc2 will be sent to the printer configured in the Print action.
Designers can specify the order of documents.
Choose Format of Action Documents
Action documents can now have different formats In Design. There used to be a Document drop-down list (for more information see Related Links below) which can generate documents on your action/s. Now, a ‘Format’ drop-down list has been introduced to select a format for the action documents
There are different formats available for the type of document selected. If the format selected is Default/None, the document will be generated in the default format selected in the publish options in Manage. By choosing other formats, the documents are generated accordingly to the selected format, for example, Microsoft Word Docx/Docm.
For a document of type File Selection Question/item, the format drop-down function will be disabled as it is no longer applicable.
For both a word and PowerPoint template, the populated formats are similar to the ones on Manage -> Publish project page.
Once a document and format are selected, the List view will display both of these in two separate columns as shown in the following screenshot. A selected document and format cannot be selected more than once, in that case, the ‘Add’ button will get disabled.
When the project is executed in Produce and if specific documents have been selected, the document will only be sent to the action in that format.
Note:The action document format works for both Project Level Actions and Transition Actions.
'Run/Show Action When' Option for Actions
A new attribute ‘Run/Show Action When’ has been added for actions, this allows the user to specify if and when they would like the action to run or show.
This option can be found in the properties tab of the action:
| Always | If this option is selected, the action will run at all times. |
|---|---|
| Never | If this option is selected, the action will never be executed. |
| On Generation Failure | If this option is selected, the action will only run when a generation error occurs. |
| On Generation Success | If this option is selected, the action will run when no generation errors occur when the form is generated. |
Run After Option
Once a form is submitted for a workflow transition or completion, SmartIQ will perform a set of tasks in a specific order. Designers now can specify when exactly an Action will be triggered, changing the behavior of it. Here a complete definition
- Submit: Run as early as possible after the user submits the form
- Document Generation: Run after documents are created, still happens even if there are no templates in the project
- Workflow Assignment (only available when the action is added in a workflow transition): Run after the workflow has been assigned to the next user/group, only available on transition actions. Will run before workflow escalations have been set up and also before transition emails have been sent.
- Finish: Run after everything else, this is the default.
Action Run After options
See the Workflow Transitions section for a detailed discussion of what each stage of the workflow generation process entails.
Action Result Types
An action will return a result as described below. If the result is a failure, an error message will be available in Manage on the Management screen. These result types can be referenced and used as conditions.
Action results:
- Success – the action ran successfully without error.
- Fail – the action ran and returned an error.
- NotRun – if conditions set on the action prevented it from running, it will return this result.
Action results can be used to control logic in subsequent actions. For example, an email action can be configured to execute in the event of failure.
Dynamically Assign Groups to Users with User Action
Problem
Need to dynamically create a user and assign multiple groups via the SmartIQ user action. The group names are coming from a multiple row data source so it will be one string with a pipe delimiter separating each value e.g. GroupA|GroupB|GroupC. Because the groups need to be 1 per line this will not work as the action will be looking for ‘GroupA|GroupB|GroupC’ group name which won’t exist.
Solution
Add a replace formula that breaks the string and separates the selected group on each line via an ASCII code.
=Replace([q37.GroupName], “|”, chr(10))Then Reference the formula to the Groups attribute.
This will bring the string into the Groups attribute as 1 per line.
Referencing Action Response(s)
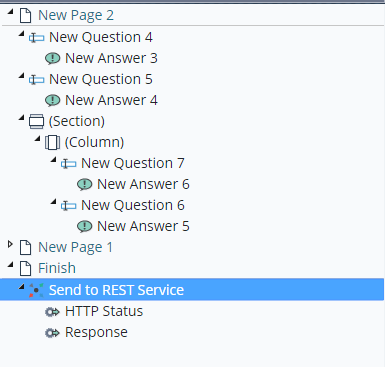
For those actions that contain outputs, these will appear as a expandable set of outputs in the tree view of Design. These can be referenced directly much like any other variable and answer using the Reference picker.

Example action outputs for Send to REST service, which are the HTTP Status and Response.
Additionally, they can also be referenced directly using the [Action.Output] notation. In the example above, the REST service response can be referenced as [Send to REST Service.Response].
Updated 9 months ago
