Configuring SmartIQ SAML Settings
At a minimum, the SmartIQ installation should have Forms Authentication to verify user identities as well as applying authorization based on their groups, roles and permissions.
Prerequisites
-
An existing SmartIQ environment installed with default Forms Authentication.
-
A SAML 2.0 provider with an Identity Provider (Idp) configured to:
- Return a group memberships as an assertion attribute (e.g. IsMemberOf) (mandatory to ensure at least one user can be added to a SmartIQ Administrator Role after the switch to SAML) within the SAML assertion
- Return profile information such as first and last name (Optional)
Refer to Okta and Azure Active Directory for configuration settings.
- Service Providers for both SmartIQ Manage and SmartIQ Produce whereby:
- The response is configured to be sent via HTTP-POST to:
http://yourserver/Manage/account/samlauthenticateorhttp://yourserver/Produce/account/samlauthenticaterespectively - The HTTP-POST response is signed.
- A meaningful name is given to the Service Providers (usually Produce and Manage)
- A certificate either installed on the SmartIQ web server or uploaded as file that can be used to check the SAML response signature (i.e. the certificate used by the IdP to sign the response).
- A user configured in the SAML 2.0 provider for testing that is a member of at least one known group.
- For single logout service, the Service Provider should have the Single Logout Service response configured to be sent via HTTP-POST to:
http://yourserver/Manage/Account/SamlLogoutorhttp://yourserver/Produce/Account/SamlLogoutrespectively
- The response is configured to be sent via HTTP-POST to:
SAML Authentication in Multi-Tenant Environments
To allow navigation to a specific tenancy and to authenticate using SAML instead of forms authentication:
-
When navigating to a specific form, SmartIQ is able to determine the tenancy of that form and will, therefore, use the authentication method defined by that tenancy.
-
A TenantId may be used to specify what tenancy to log in to if navigation to the Produce home page is required. The produce homepage in this situation will be the normal home page with
/b/<tenantid>appended to the URL.
For example, if Produce is normally http://IQtransform.com, then a specific tenancy can be navigated to at http://IQtransform/b/12345, where the tenant id is 12345.
Once a SAML Produce instance is navigated to, a cookie will be stored on that computer and will remember that SAML login is preferred when accessing that instance of SmartIQ. In this situation, in the unlikely situation where forms authentication is desired, the SAML tenancy must be logged out and cookies cleared.
SmartIQ Configuration
Step 1 - Identify a SAML Administrator Group
When the first user (usually a server administrator) attempts to access SmartIQ via SAML Authentication, SmartIQ needs to assign permissions to an External Group so they can access appropriate functions. If this step is not completed, user will not be able to administer anything post authentication.
Step 2 - Enable and Configure SAML
-
Open the SmartIQ Manage application and log in as an Administrator with Change settings permission.
-
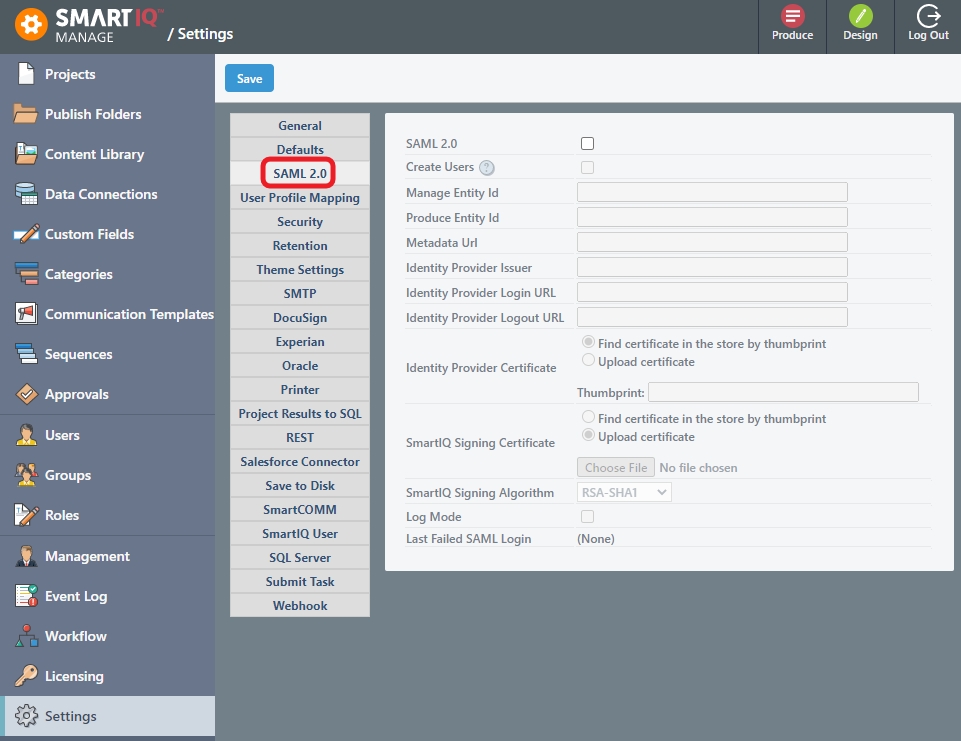
Click Settings > SAML 2.0.

- Provide the necessary information. Refer to Okta and Azure Active Directory for configuration and settings.
Setting | Description |
|---|---|
SAML 2.0 | Provides the option to use SAML 2.0 |
Create Users | Provides the option to create a user in the SmartIQ platform. If unchecked, the user must already exist in SmartIQ to be able to login. |
Manage Entity Id | The Entity Id of the Manage Service Provider. For example,
Note: Do this twice as the Manage Entity Id needs to be different from the Produce Entity Id. |
Produce Entity Id | The Entity Id of the Produce Service Provider. For example,
|
Metadata URL | Enables reading information about the requirements of the service from this URL.
|
Identity Provider Issuer | The Issuer ID of the Identity Provider. For example,
|
Identity Provider Login URL | The URL of the Single Sign on Service URL that SmartIQ will make the HTTP-Post Request to. For example,
|
Identity Provider Logout URL | The URL of the Single Sign on Service that SmartIQ will make a logout request to. This value is optional. To use a logout service, you must also supply the SmartIQ Signing Certificate. For example, |
Identity Provider Certificate | The certificate SmartIQ will use to check the signature received in the HTTP-POST Response. A certificate can be installed in the server and referenced by a thumbprint or uploaded directly to the application.
|
SmartIQ Signing Certificate | The certificate SmartIQ will use to create the signature for the logout request. A certificate can be installed on the server and referenced by a thumbprint (preferred) or uploaded directly to the application (not recommended as this requires the private key to be included without the password). |
SmartIQ Signing Algorithm | Provides a selection of hashing methods for the SAML logout request. |
Log Mode | Enables capturing a more verbose description of all events during a SAML authentication (i.e. success and fail). |
Last Failed SAML Login | Displays the last failed message, if logging has been turned on. |
Step 3 - User Profile Mapping
As attributes specified in a SAML response are arbitrary, it is necessary to map particular user profile fields to the values provided in the SAML response.
-
Open the SmartIQ Manage application and log in as an Administrator with Change settings permission.
-
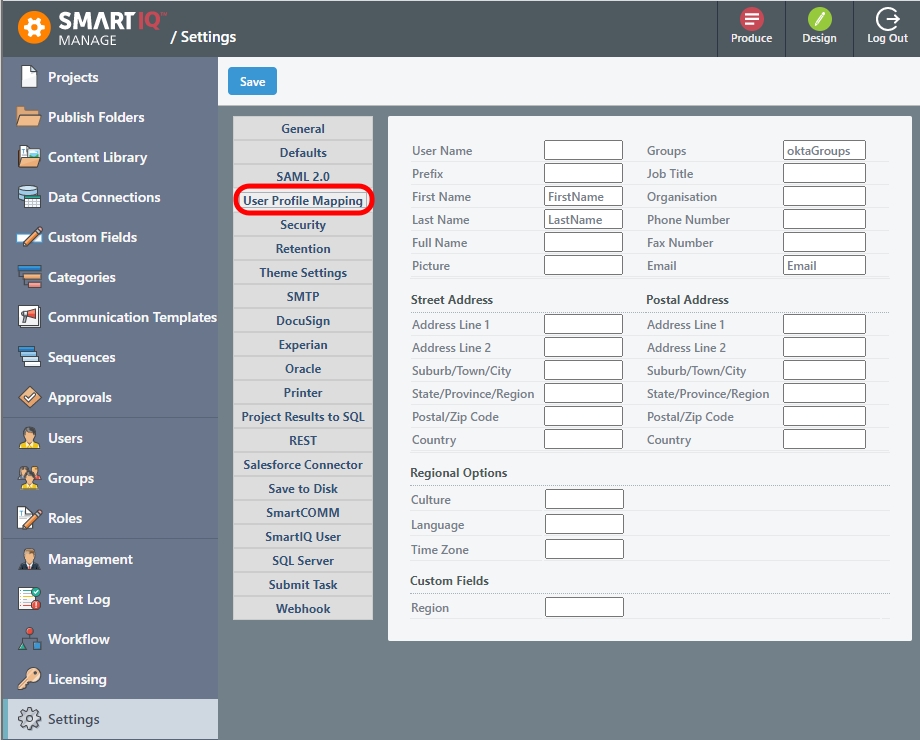
Click Settings > User Profile Mapping.
-
Provide at least the name of the attribute where the user’s Group Memberships are specified. Optionally specify any other user fields.

Available User Profile Mapping Fields:
Setting | Description |
|---|---|
User Name | A field to use for the SmartIQ Username if the default SAML ‘NameID’ element does not contain a meaningful value. This is a required field. For example, use the email address. |
Groups | The element to look for the user’s group Memberships. |
Prefix, Job Title, Organization, | Regular fields |
Culture | A culture code to use for example en-AU, zh-CN, es, etc |
Language | A language to use must be supported by SmartIQ. Possible values:
|
Time Zone | An appropriate user time zone. Possible Values:
|
- Click Save.
Step 4 - Test
-
Close all browsers to ensure any existing SmartIQ sessions are removed.
-
Open a new browser and navigate to SmartIQ Manage or Produce.
SmartIQ will create a SAML session as per the configured settings. If logging in for the first time, the Identity Provider's Login screen should appear or, if you already have an existing session, you should be redirected to the Produce or Manage Home page.
Updated 9 months ago
