Getting Started - Overview
Overview
The Email action grants designers the ability to send email through their projects.
Action Attributes
Attribute | Description |
|---|---|
Address BCC | Emails can be blind carbon copied to this email address |
Address CC | Emails can be carbon copied to this email address |
Address From | Emails will appear to have originated from this address |
Address From Display Name | Emails will display this name to the sender |
Address To | Emails will be sent to this email address (Add one Address To attribute per Recipient) |
Email Body | This will populate the body of the email |
Mht Body Document | Emails can include one of the output documents in the form of HTML by inserting the name of the document in this Attribute. Note: Some filters classify MHT body emails as junk and should be avoided where possible |
Reply To | Emails can be configured to have a return address to which replies to the message will go to. |
Sanitise Content | Boolean value that determines if action strips unknown HTML. Use "true" or "false" (defaults to "true") |
Subject Line | This will be the subject of the email |
Using.mht Body Document as an Email template
- Select the Send Email Action in Design.
- Select the Body Document (Mht/Html) Action input and provide the Word Template name.
- Open the Action Documents panel.
- Select Custom.
- In the Document drop down menu, select the Word Document to be used as a
.mhttemplate. - In the Format drop down, select MIME HTML File (mht).
TroubleshootingIf you include constant value placeholders such as [ProjectLink] or [ProjectUrl] in the Word Document used to generate the mht file, you may find these are not correctly rendered when the project is run. This is an issue in Word where the spellchecker flags these as incorrectly spelt words (red squiggly line under the word) and this flagging in the saved file interferes with the placeholder replacement on document generation. To fix this problem, either disable spellchecking in Word before saving your document, or select the affected placeholders and right click and choose the Ignore All option from the spellchecking menu, then re save the file.
Required AttributesAddress From, Address To, Email Body and Subject Line are all required for the action to successfully run.
NoteThe "To", "CC", and "BCC" address parameters can be comma-separated lists of addresses, if desired. This can be combined with the join() function to allow a data-driven set of email recipients.
Description
To add an email action:
- Add an Action to the Finish Page
- Select the Send Email action from the Type drop-down list and press OK
- The Send Email action will now be added to the finish page of your project.
- Select the Send Email action on the finish page
- Ensure that the Properties tab is selected
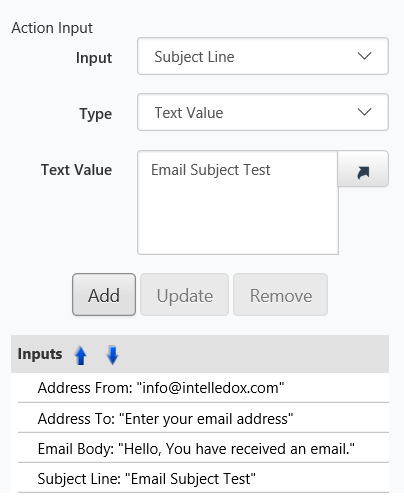
- Under the Action Attribute section, select an Attribute to assign a value to
- After selecting an Attribute, select a Type
The following are possible attribute types for the Send Email action:
- Answer Value - The value of an Attribute can be populated from the answer field of a Question such as a User Prompt, Variable, etc.
- Data Question - The value of an Attribute can be populated from the data fields within a Data Source
- Text Value - The value of an Attribute can be set to a fixed, predetermined value. Note: Question references are supported within Text Value answers.
- Each Attribute must be added one at a time by selecting the Attribute, selecting a Type, setting or selecting a corresponding Text Value / Question and Answer, and then pressing the Add button
- The properties tab should resemble below

- Conditions may also be set on the Send Email action through the Conditions tab (refer to Defining Conditions article)
- To add a custom document from the project to be sent through the Send Email action, select the Documents tab
- Select the Custom radio button
- Select the Document that needs to be part of the email from the drop down list, and press Add
- Repeat Steps 12 and 13 for multiple document attachments.
NoteBy default, all documents that are part of the project are included in the email.
Send to Email Action - Failing
When the following error is received after Doc Gen:

Check the Management Console within Infiniti Manage, for error messages that may assist you in troubleshooting the email failure.
Basic errors can be rectified by simply supplying mandatory Action Attributes in Design that are missing. You will receive errors such as:

In other cases, you may have set up your Action correctly within Design, but there might be some environmental issues that are causing your Email Action to fail:

As you can see, this error does not specify that the error is within your Infiniti Action, it is simply stating that the: Send Email Action has failed, due to: “Failure sending mail”; this is, in fact, the error returned by the service being used to send the email.
In this case, if you have access to the appropriate Server, check that the SMTP services are set up correctly. See Installing SMTP service for further information.
Updated 9 months ago
