Manage - Left Panel Menu Items Overview
The left panel is the heart of Manage. The different menu items present in the left panel helps the user to perform all the administrative activities. The different menu items are as follows:
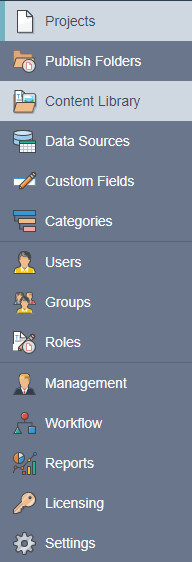
Projects
When the user clicks on the Projects menu item in the left panel, they will see the different folders currently present in Infiniti. When the user clicks on a particular folder, the corresponding projects present inside that folder will be displayed.
For example, in the below screenshot, we have a folder Dashboard in Infiniti and when we click on the Dashboard folder, we see the four different projects inside this Dashboard folder.
When you choose a project from the Projects list, if the project is of type Fragment Page/Fragment Portion, there is a button on the button bar as 'Projects'. Clicking this button, a user can view the list of projects that use the selected fragment. The projects from the list can be edited or not based on the same logic that is applied to the project list page which checks for user permission on the content folder.
The additional features provided under this Projects menu item includes:
- New Folder: To create a new folder.
- Edit Folder: To edit an existing folder.
- Delete Folder: To delete an existing folder.
- Import: To import an Infiniti project.
Publish Folders
When the user clicks on the Publish Foldersmenu item in the left panel, they will see the different published folders currently present in Infiniti. When the user clicks on a particular folder, the corresponding projects present inside that folder will be displayed.
The different projects published inside these publish folders projects can be accessed by the user in Produce.
For example, in the below screenshot, we have a two folders Dashboard and Guest in Infiniti and when we click on the Dashboard folder, we see the four different projects published inside this Dashboard folder.
When the user navigates to Produce, these name of the Publish Folders acts as the heading under which the different projects are shown.
For example, in the below screenshot you can see the heading as Dashboard which is the name of the Publish folder and under this, you can see the four projects which were published inside this folder in Infiniti.
The additional features provided under this Publish Folders menu item includes:
- New Folder: To create a new publish folder.
- Edit Folder: To edit an existing publish folder.
- Publish Project: To publish an Infiniti project so that it is accessible to the end user from Produce.
InfoOnly published projects are accessible in Produce.
Content Library
Content Library acts a repository of contents in Infiniti. The content of the content library is accessible in the Infiniti Forms via Content Library question type. Infiniti supports four types of content items which are as follows:
- (All)
- (All - Unapproved)
- Image
- Text
- Document Fragment
- Attachment
When you click on the Content Library menu item in the left panel, they will see the different content library folders currently present in Infiniti. When the user clicks on a particular content library folder, they will see the different content items which are present inside that folder.
For example, in the below screenshot, we have a content library folder Dashboard in Infiniti and when we click on this Dashboard folder, we see an attachment content item present inside this Dashboard folder.
The additional features provided under this Content Library menu item includes:
- New Folder: To create a new content library folder.
- Edit Folder: To edit an existing content library folder.
- Delete Folder: To delete an existing content library folder.
- New Content Item: To create a new content item.
- Delete Selected Item: To delete an existing content item.
Folders can be arranged in a tree-like structure.
InfoThis option would be visible when you have a valid Content Library licence key.
Data Sources
This is the place in Infiniti where you configure the connections to the external data sources which can be used in populating data in the forms and generated documents output. Infiniti supports the following OOB data sources:
- OLEDB
- SQL Server
- CSV
- ODBC
- RSS Feed
- Web Service
- XML
- Infiniti
- JSON
- REST
Custom Fields

-
Fill in the title.
-
Choose the location:
Contact
Group Address
User
Response Metadata -
Choose the type of field:
Text
Date
Image -
Set the filed length.
Categories
Click the New Category button.
Type in the name of the new category.
Users

Clicking the Export button will allow you to export all User information to a .csv file.
Selecting a username will take you to their profile screen.
Groups
The Groups section will show all existing groups.
Clicking on the New Group button will take you to a menu where you can create a new group.
- Type in a group name.
- Choose the role:
- End User
- Global Administrator
- Workflow Administrator
You can set the permissions level for the Role name: See the Roles section below:
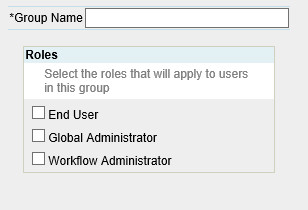
Options for setting up your group

Emails can be sent to a dedicated “Group” email address by entering a valid email address in the “Email” field and/or be sent to each group members email address individually by checking the “Email Individual Group Members” checkbox.
Roles
In the roles section, you can create roles that work for your organization. Create the Role Name, then select from the list of permission that this role should have.
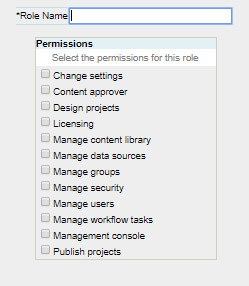
Custom roles can be created to set the security level for a user. When creating a new role there are various permissions that can be attached to that role. Each permission has its own role which is detailed below:
Change settings | This option allows the user to modify the settings of the Infiniti site. When this permission is set to a user, that user will be able to see the settings menu in manage and can modify them. These permissions are best set for a role that only needs the ability to modify settings in manage. |
Content approver | This option allows the user to approve changes to the content items in the content library. This role only applies when “Enable Content Approval” is enabled in settings.
|
Design projects | This option allows the user to create projects in design as well as publishing those projects to folders. This permission is best set for a role that only needs the ability to run Infiniti design application. |
Licensing | This option grants permission to modify your Infiniti's licensing configuration. |
Manage Content Library | This option allows the user to add and delete content library items. When this permission is set to a user, that user will be able to see the content library menu. This permission is best set for roles that need the ability to manage the content library. |
Manage data sources | This option allows the user to create, edit or delete data sources. When this permission is set to a user, that user will be able to see the data sources menu. This permission is best set for a role that needs the ability to modify the data sources. |
Manage Groups | This option allows the user to create, edit or delete groups. When this permission is set to a user, that user will be able to see the Groups menu. This permission is best set for a role that needs the ability to modify the groups in manage. |
Manage Security | This option allows the user to create, edit or delete Roles which can be used to set the security for users. When this permission is set to a user, that user will be able to see the Roles menu. This permission is best set for a role that needs the ability to modify roles. |
Manage Users | This option allows the user to manage the users for the environment. When this permission is set to a user, that user will be able to access the Users menu. This permission is best set for a role that needs the ability to manage the users for the Infiniti environment. |
Manage Workflow Tasks | This option allows the user to manage the workflow tasks for the Intelledox Infiniti environment. This is where you can view all workflow tasks as well as terminating and reassigning those tasks. This permission is best for a role that needs to manage the workflow. |
Management Console | This option allows the user to view the management console. This permission is best set for a role that needs the ability to view the management logs in manage. |
Publish Projects | This option allows the user to manage folder access and publish projects. This permission is best set for a role that needs the ability to manage the folder access and can edit projects. |
Management

Workflow

Note:This option would be visible when you have a valid Workflow license key.
Workflows - View complete Task History for each transition
Proceed to the Manage->Workflow screen. Following each workflow task, there is an option that allows the task's history to be viewed. A column is available with a history icon:
See screenshot below:

Click on this icon to display the Task History screen
See screenshot below:

The following information is now available for each transition of each task:
- State
- Date Created
- Assigned To: (Group name / Full User name / Username)
- Date Completed
Reports

Licensing
The licensing section is the overview of what licensing your company holds. In order to add new licenses, you need your Tenancy Key. Use the Copy to Clipboard button to copy your key and send it to your IX representative if new modules are needed.
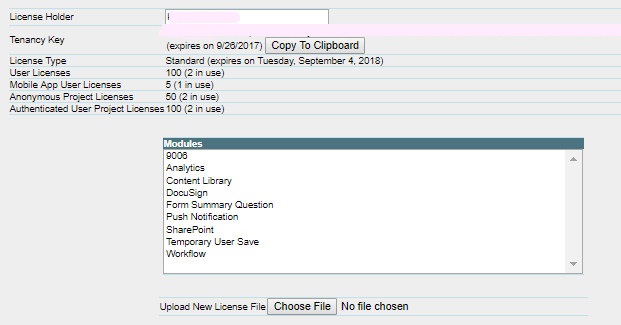
From this page you can tell the following information at a glance:
License Type
User Licenses: how many you have/how many are in use.
Mobile App User Licenses: how many you have/how many are in use.
Anonymous Project Licenses: how many you have/how many are in use.
Authenticated User Project Licenses: how many you have/how many are in use.
You can also view what Modules you currently have in place.Need section about what's in what version in all Release Notes.
Demo and Test Licenses
If you have a demonstration or test license, there will be a message at the top of any form in Produce indicating it is for "demonstration" or "test" purposes only. There will also be a stamp on generated documents.

Availability:
- Excel
- JSON
- PDF generations
- PowerPoint
- Text
- Word
- XML
NoteFor all Microsoft outputs, the resulting document will be read only.
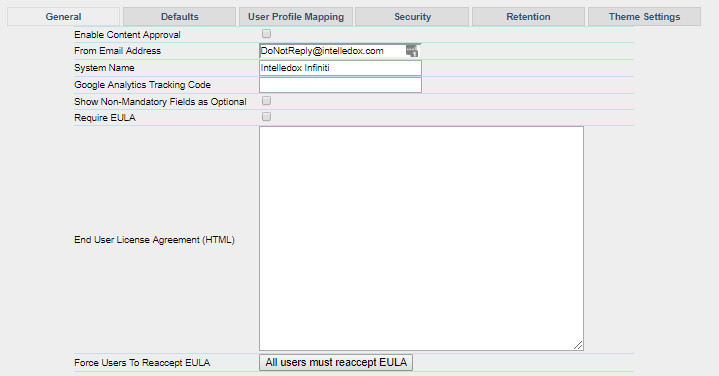
Settings
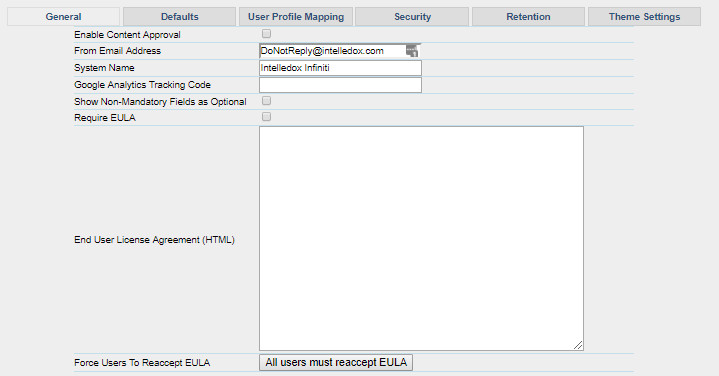
General Tab
Defaults Tab

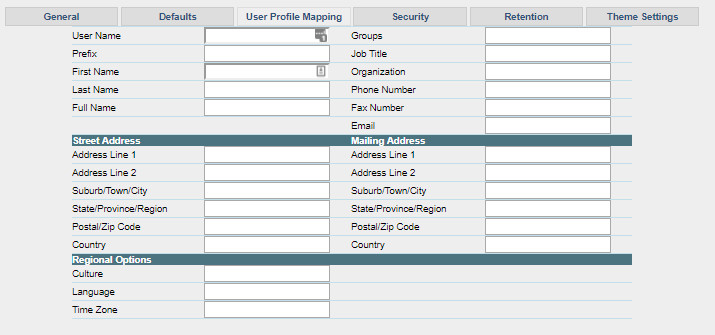
User Profile Mapping Tab
Security Tab
Password Settings
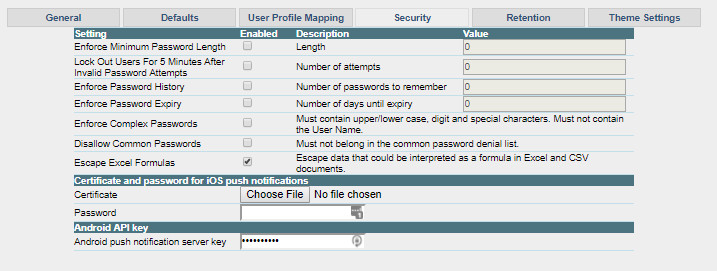
Infiniti provides several password settings for improving security. Different password settings are:
- Enforce Minimum Password Length – Sets the minimum length requirement for passwords.
- Lock Out Users For 5 Minutes After Invalid Password Attempts – Prevents users from logging in for 5 minutes after a number of invalid password inputs.
- Enforce Password History – Enables storing a certain number of passwords to prevent password reuse.
- Enforce Password Expiry – Enables password expiry and request password change after a certain number of days.
- Enforce Complex Passwords – Ensures that the password contains upper/lower case, digit, and special characters.Password must not contain a username and any other similar combinations of username(note that it is available from 8.5.0.25 onwards).
Retention Tab

Keep Workflow History Checkbox
By default, Infiniti keeps a record of users responses in its database. While useful for reporting and tracking, it can be inappropriate when dealing with business processes that capture sensitive information.
The “Keep Workflow History” option, when unchecked, will delete any information captured within a workflow upon its completion.
The option can be switched on or off by browsing to Manage>Settings and entering the Retention Tab.
Theme Settings Tab
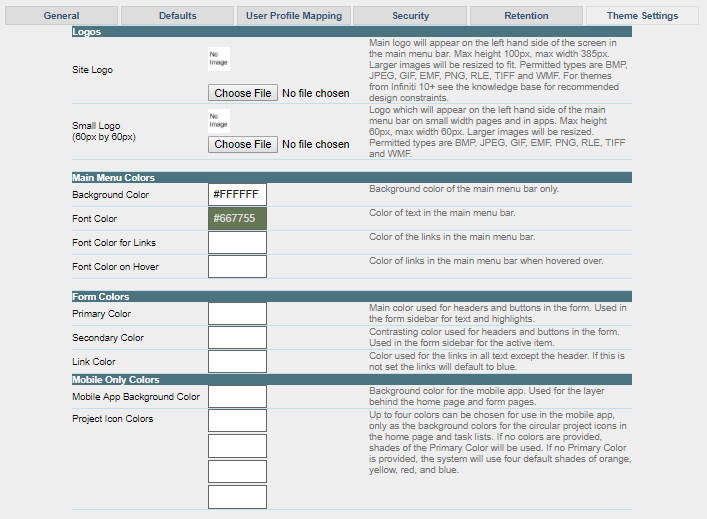
To see how to use these settings see Infiniti Theme Settings.
Updated 9 months ago
