Project - Create an advanced project
Part 1 - Creating a fragment
In this exercise, we will be building an On-boarding form that anyone starting work at a new company would use.
This guide assumes you have already completed the Creating your first Infiniti project and understand the fundamentals of Infiniti.
The first part of the guide will get you to build a fragment.
What is a fragment?
A fragment is similar to a normal project except it cannot run by itself and must be placed inside other projects to work.
Why is this useful?
If you have multiple projects which have portions similar or the exact same layout, a fragment can be made to replace the need for recreating that similar layout multiple times. Fragments also allow multiple people to work on different parts of a project at the same time.
Creating our first fragment
- In Manage click Design and click Create New Project.
- In the New Infiniti Project Window, choose Fragment Portion for Project Type. Call the New Project Name: Fp_PersonalInformation, and click No document. Click OK.
Note:For fragment naming conventions, Fragment Pages should start with ‘FP’ and Fragment Portions should start with ‘Fp’.
The project will look different.
As you can see there are 3 fields. Inputs, Layout, and Outputs:
- Inputs allow data outside of the fragment to be pushed in. We will not be focusing on Inputs in this fragment.
- Layout is where all your questions are placed.
- Output is where you collect the data to use elsewhere in the project hosting the fragment.
Create the layout to look like this. We will be adding extra variables to each question later.

- After you have created all the questions and have named them appropriately, we will be adding extra settings for each field.
- First Name: Click the answer and change the Document Format to Uppercase First Letter (+-).
- Last Name: Click the answer and change the Document Format to Uppercase First Letter (+-).
- State: For every answer, change the Value to whatever the state is called.
- State variable: In the answer formula, type in Concat([q3]). Concat concatenates a question getting all the active values in the selected question.
- If State’s question Id is not q3, then change it to whatever State’s question Id is.
- Address: Click the answer and change the Document Format to Propercase (+-+-)
- Post Code: Click the column which Post Code is in and change the Column Properties to Width: 150 Pixel.
- Click on Post Code and in the Properties tab chance the Character Limit to 4. In the Validation Tab change the Type to Regular Expression. In the Expression, type in ^[0-9]{4} and add the message Must only contain 4 numbers” like the image below.
Note:The Expression ^[0-9]{4} Makes it so that it only accepts exactly 4 numbers. The reason why we use this expression instead of changing the data type to numbers in the Properties tab is that the Numbers Data Type only takes numbers as a value, instead of a string. This means values with zero at the start will the next value that isn’t zero. An example would be 0123 is the same as 123.
Home Phone | Click on Home Phone and in the Properties tab change the Character Limit to 10. In the Validation Tab change the Type to Regular Expression. In the Expression, type in ^[0-9]{8,10} and add the message “Must only contain 8 to 10 numbers”. |
Mobile Phone | Click on Mobile Phone and in the Properties tab change the Character Limit to 10. In the Validation Tab change the Type to Regular Expression. In the Expression, type in ^[0-9]{10} and add the message “Must only contain 10 numbers”. |
Click on Email and in the Properties tab change the Data Type to Email. In the Watermark type in “[email protected]”. |
Now that we have configured the questions in a way we want them to we are now going to add some outputs.
Drag and drop an Output into the Question Set. Click it and in the Output Name type in First Name. In Question chose First Name and in Answer choose firstname. Do this in a similar fashion for every question except for State, use State variable instead.
Click Save and exit out.
Testing our Fragment
Now that we have created our fragment we should test it out to see if everything is working correctly. Fragments cannot be published because they cannot run by themselves.
Create a new Project and call it testing_fragment.
Drag and drop a Fragment into the Question set and choose Fp_PersonalInformation.
Click save and publish this project. Run the project on produce and you will see your fragment in action.
Go back to testing_fragment. Click on edit template and add these placeholders into your empty document.
{{firstname}} {{lastname}} {{state}} {{address}} {{postcode}} {{homephone}} {{mobilephone}} {{email}}Save the word document and then the project. Click the placeholders tab and drag and drop the placeholders to the output which fits them the most. Click save after this is done.
Run the project once again in produce and fill out all the questions. Submit the form and download the document. You will see all the values you inputted into the document.
Congratulations you have just created a working fragment. We will be using the fragment later.
The fragment dynamically updates in every project it is in. So, it is important to not be careless changing the fragment when it is being used in multiple projects.
Part 2 - Creating a data source
Note:A Content Library Data Connector license is required as a prerequisite.
Onboarding Form Creation
The second part of the project will get you to create your own data source, host it using the ContentLibraryDataConnector Connection type.
Creating our Data Source
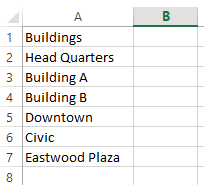
Open up Excel and make a basic worksheet. In A1, type in Buildings. In A2, type in Head Quarters. In A3 to A7 and below type whatever building names you want.
Your Excel worksheet should look something like this:
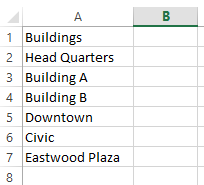
Once you have entered the building name click save and change Save as type: to CSV (Comma delimited). If you do not have that option choose any of the CSV options.
Change the File name to Buildings and click Save.
Exit out of excel and go to Infiniti Manage.
In Manage, click on Content Library and click New Content Item. Choose Attachment and change the name to Buildings. In the Upload New attachment, click browse and select the file you just made ‘Buildings.csv”. Click save and go to Data Sources.
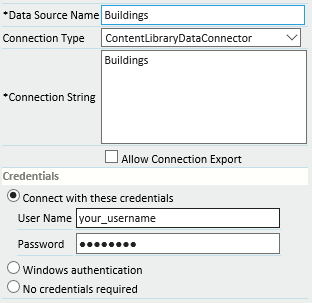
Click on New Data Source
Change the Data Source Name to Buildings. Change the Connection Type to ContentLibraryDataConnector.
Change to Connection String to Buildings. With the ContentLibraryDataConnector Connection Type, the Connection string to connect a data source is just the name of the CSV file in the Content Library that you want to use.
Click Connect with these credentials and type in your User Name and Password.
Click Test Connection and if you get Connection successful click Save.
Click on Data Objects and then New Data Object. In both Data Object and Display Name, type in Building. Click Save and in the Available Key Fields, click Add All. You should only have one key field. Click Save and go to Projects.
Now that we have set up our Data Source we should test to see if it works.
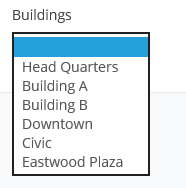
In Projects, click on testing_fragment and click Design App. Add a Data Source question to the page and call it Buildings. Make sure the data source is visible and that the Data Source, Table/View, Display Field and the Value field all have Buildings selected. Click on the answer in the data source and set to Data Field to Buildings.
Save the Project and run it in Produce. Underneath the Fragment you made previous you should be able to see your data source in action.
Part 3 - Creating a fragment page
In this third part of the project, we will be building an On-boarding form that anyone starting work at a new company would use.
This guide assumes you have already completed the Creating an Infiniti project - Quick-start guide project and understand the fundamentals of Infiniti.
In this section, we will be building another fragment.
Creating our Fragment
In Infiniti Manage, click Design App and then click Create a new project. Call this project FP_AdminApproval. Change the Project Type of Fragment Page and choose No Document. Click OK.
You may notice that the layout is replaced with New Page 1, this is because we are creating an entire page as our fragment.
At the end, your Fragments question layout should look like this:
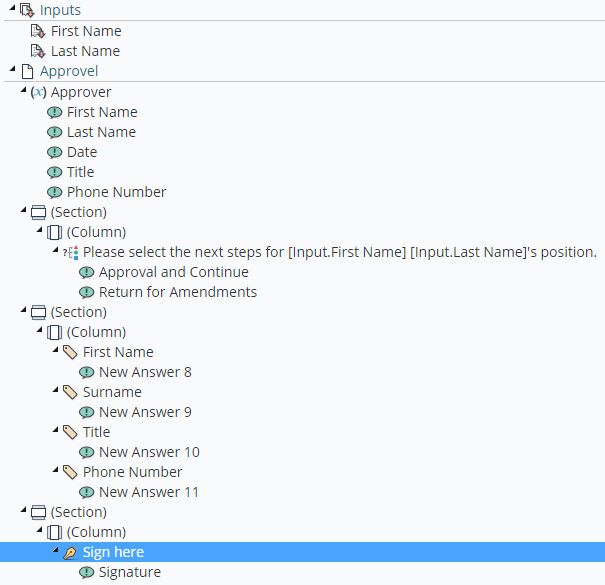

Drag an Input down and call it First Name. Drag another Input down and call it Last Name. Rename New Page 1 to Approval.
Add a Variable Question and call it Approver. Give Approver 5 answers. Call them First Name, Last Name, Date, Title and Phone Number. Change the variables on each answer in the same order to: User First Name, User Last Name, Date, User Title and User Phone Number.
Add a Section and a column and place a multiple choice question underneath. Change the Question Text to “Please select the next steps for [Input.First Name] [Input.Last Name]’s position.”
The [Input.First Name] will take whatever data is received from First Name in the Inputs section.
Make sure the multiple choice question has 2 answers. Add these values to each of them.
1
Answer Name: Approve and Continue
Display Text: Approve and Continue
Value: accepted
2
Answer Name: Return for Amendments
Display Text: Return for Amendments
Value: declined
Add another Section and call it Approver. Add a column and add 4 labels. Call them First Name, Surname, Title and Phone Number.
In the Label Text, use and on click the Variable Question, Approver, answers that match the names of the labels. The Label Text should look like [q1.1]. Make sure these labels are visible.
Add another section. Call this section Signature go to the Conditions tab. For Question: select “Please select the next steps for [Input.First Name]…” and change the answer to Approve and continue. Click add.
Add a column the section we just added.
Add an Ink question and call it Sign here. Change the Text Position to Left. Tick Allow background upload. Add the Help Text “Use your touch device or mouse to sign in the space provided”. Click on the answer and change the name to Signature. Change the image properties to Max Height 100 Pixels and Max Width to 300 Pixels. Go back to the Ink question and click the Conditions tab. Change Question: to Signature Options and Answer: Sign on-screen. Click Add.
Add another Section and column and add a Text Field and change the Question Text to “Please explain why the form needs to be amended”. In the Properties tab, change the Text Rows to 6.
Click the Section we just added and go to the conditions tab. In the Question: choose “Please select the next steps for [Input.First Name]…” and make the answer “Return for Amendments”. Click Add.
Drag 5 outputs into the Output section and call them Signature_sign, Accepted and Declined and Amend:
1.For Signature_sign make the question Sign here and add its answer.
2.For Accepted, make the question, ‘Please select the next steps… and make the answer Approve and Continue’.
3.For Declined, make the question, ‘Please select the next steps… and make the answer Return for Amendments’.
4.For Amend, make the question, ‘Please explain why the form needs to be amended and add its answer’.
Save.
We have just created our second fragment. Now that we have created both fragments we can start working on the actual On-boarding form.
Part 4 - Parallel workflow
On-boarding Form Creation
In this exercise, we will be building an On-boarding form that anyone starting work at a new company would use.
In the final part of the project, we will be attaching our fragments together to create the On-boarding form.
Create a new project and call it On-boarding and select no document.
Employee Page
- Click New Page 1 and call it Employee.
- Drag a fragment underneath the page and select Fp_personalInformation as your project. This is the first fragment we made.
- Add a section, a column and add a multiple choice question. Call the question ‘Access pass Required’ and make the display type: Toggle Button. Give it two answers. Yes and No.
- Create another section and select placeholder as the repeating option. Make the maximum 6. In Conditions make it so that the section is only active if Access pass required has yes selected.
- Add a column under the repeating section and then a Data Source. Make the Data Source, Table/View/ Display Field and Value field all equal Buildings. Click the answer and change the Data Field to Buildings and the Data Convert to Text.
- Add a text field underneath it and call it “Reason why an access pass is required”.
Terms of Agreement Page
- Add a new page and call it Terms of Agreement.
- Add a section, column (call it Working Week) and a multiple choice question. Call the multiple choice question ‘Working Hours’, change the display type to Drop-down List and give to 4 answers which are called 8.30am – 5.00pm, 9.00am – 5.30pm, 8.30am – 1.00pm and 12.30pm – 5.30pm.
- Add another multiple choice question and call it Salary Payment. Give it 2 answers called Direct Debit and Check.
- Add a text field and call it Contract Date, change the data type to Date and call the answer Date. Add another text field and call it Start Date, change the data type to date and call the answer Start_date. For Start Date go to validation, select Greater than or Equals to and type in today() into the expression field and click add.
- Add another multiple choice question, call it ‘Type’. Add 3 answers and call them Full Time, Part Time and Fixed Term.
- Add a Numeric and call it Hours Per Week. Call the answer Hours Per Week also. The Numeric acts as a slider where you can choose your number assuming it is within the minimum and maximum.
- Add a Text field and call it Fixed Term End Date and change the data type to Date. In conditions, make sure it is only active if Type: Fixed Term is selected and make the validation so that it is greater or equal to today (refer to a previous step).
- Add two multiple choice questions. Call them ‘Week Start’ and ‘Week End’ and change the display type to Drop-down List. Make sure both have 7 answers and name the answers after each day of the week. Mon-Sun.
- Add another column and call it Details and Location.
- Add a text field, call it Annual Salary and change the data type to Currency.
- Add a multiple choice question and call it ‘Office’. Change the data type to drop-down List and give it the answers Sydney, Melbourne, and Canberra.
- Add another multiple choice question, call it ‘Department’ and change the Display Direction to Horizontal. Give it the answers Admin, Sales and HR.
- Add 3 text fields called Account Name, BSB and Account Number. In conditions make it so that all of them are only active if Salary Payment: Direct Debit has been chosen. In BSB change the character limit to 6 and give the watermark 02 6238.
IT Page
- Add a new page and call it New Employee IT Requisition.
- Add a multiple choice question, call it ‘Select the IT products/systems required by this employee’. Change the selection type to Multiple Answers and the Display Type to Toggle Button. Add 4 answers and call them Network Login, Mobile Phone, Laptop/Desktop PC and Tablet.
- Add a section and a column and then add a Tab Group. Make sure Accordion is checked and then add 4 tabs inside the tab group. Call them ‘Network Login Setup’, ‘Select the type of mobile phone’, ‘Laptop/Desktop PC Setup’, ‘Tablet Setup’.
- For each tab, set the conditions so they are only active when the related answer is selected from the ‘Select the It products/systems required by this employee’ question. Example: if Tablet Setup is active if Tablet has been selected.
- In the Network Login Setup tab, add 2 text fields called New Login and New Email. For New Email, change the Data Type to email.
- In the Select the type of Mobile Phone tab, add a multiple choice question, call it ‘Select the type of mobile phone’, change the display direction to horizontal and give it 4 answers called iPhone 5S (iOS 7), iPhone 5C (iOS 7), Samsung Galaxy S5 (Android) and Nokia Lumia (WP8).
- In the Select the type of Laptop/Desktop PC Setup tab, add a multiple choice question, call it ‘Select the type of Laptop/Desktop PC’, change the display direction to horizontal and give it 4 answers called Dell Desktop (Windows 8.1), Dell Laptop (Windows 8.1), MacBook Air (MacOS) and MacBook Pro (MacOS)
- In the Select the type of Tablet Setup tab add a multiple choice question, call it ‘Select the type of tablet’, change the display direction to horizontal and give it 3 answers called Microsoft Surface Pro (Windows 8.1), IPad Air (iOS 7) and Samsung Galaxy Tab (Android).
Fragments
- Add 2 Fragments below the Page New Employee IT Requisition (not in it).
- For both of them choose FP_AdminApproval.
- Rename the first one to HR and the other to CEO.
- In the inputs for both of them, make the input for First Name: [Fragment.Fp_personallnformation.First Name][Fragment.Fp_personallnformation.First Name]. And the Last Name: [Fragment.Fp_personallnformation.Last Name][Fragment.Fp_personallnformation.Last Name].
- We are referencing the outputs made by our first fragments to change what information is displayed in the HR and the CEO fragment.
Workflow
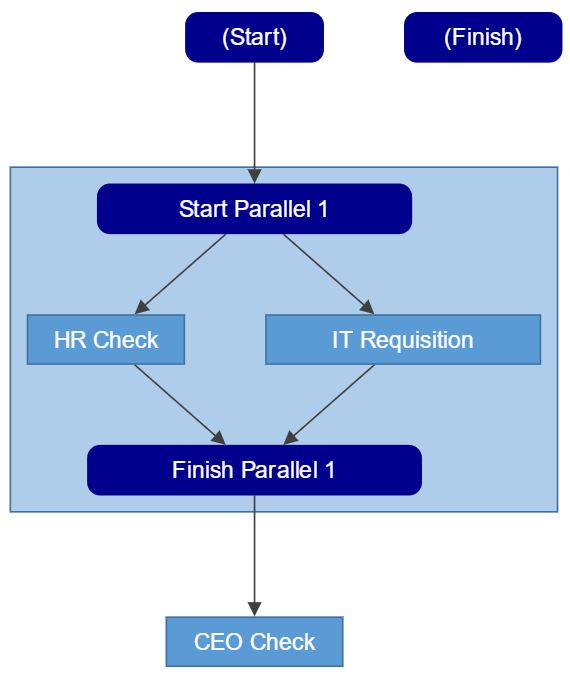
- Go to workflow and click Add Parallel Section.
- Add 2 states under that Parallel Section. Call the States ‘IT Requisition’ and ‘HR Check’.
- Click on (Start) and add another state called ‘CEO Check’. Click on (Start) and add a transition between (Start) and HR Check and (Start) and IT Requisition. Under Assignments, set the User or Group to yourself. We are sending it to ourselves so we can see what each state looks like after we are done.
- On HR Check and IT Requisition add a transition to CEO Check.
- On HR Check and CEO Check add a transition to (Start) and make sure Parallel Exit is selected for HR Check.
- On CEO Check, add a transition to (Finish).
Explanation to the work flow.
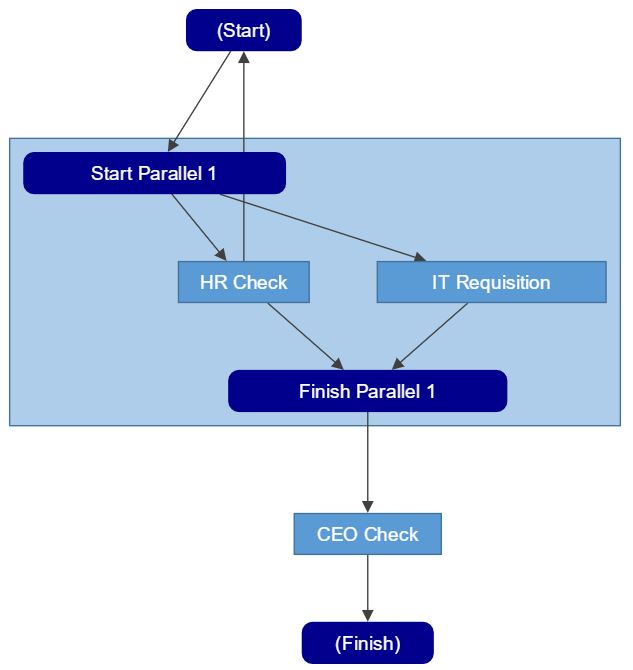
We are using parallel workflow, a new feature in V9. Parallel workflow allows multiple states to be completable at the same time. So instead of relying on one state to be completed in order to complete the next step, you can have it so that both steps can be completed at that the same time.
The way we are using this in this project is with the IT Requisition and the HR Check, allowing both steps to be completed without having to wait on the other. You may have also seen the Priority Parallel Exit checkbox. When the checkbox is clicked, it allows that transition to immediately go to the next state in the workflow, skipping the other steps in the parallel workflow. When the checkbox is not clicked, you must wait until all states have been completed before going out of the parallel workflow. We are using this the option in this project to let the HR Check immediately send the workflow back to the start if it chooses.
We have to add conditions to the transitions however for this to make sense as to why we are doing this.
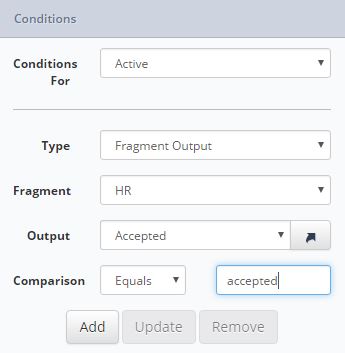
- Click on the transition which goes from HR Check to CEO Check. Click on Conditions and change the type to Fragment Output. Make the Fragment: HR and the output Accepted, and the Comparison: Equals ‘accepted’.
- Now click on the transition which goes from HR Check to (Start). Make it so that it is only active when HR fragment’s declined output is equal to ‘declined’.
- Click on the transition between CEO Check and (Finish). Make it so that it is only active when CEO’s fragment’s Accepted equals ‘accepted’. For CEO Check to (Start), make it so that it is only active when CEO’s fragment’s Declined equals ‘declined’.
State Conditioning
Now that we have completed our workflow, we need to make the form different based on what state the workflow is at.
- Exit workflow and click on the employee page and go to the conditions tab. Change Conditions For: to Editable and change the type to state. Make the Comparison: Equals (Start) and click add. Do this for the Terms of Agreement page also.
- On the new Employee IT Requisition page, change the Conditions For: to Visible, change the Type to State and make the Comparison Not Equal To (Start). And Make so that it is only editable when the State is equal to IT Requisition.
- On the HR fragment, only make it visible if the State is equal to HR Check or CEO Check, and that it is only editable when the State is equal to HR Check.
- On the CEO fragment, make it only visible if the State is equal to CEO Check
All the steps have been completed and we now have a functional On-boarding form. If you want to do more with this project you can set up the transition so it can go specifically to the HR, IT departments and the CEO and you can link all the question answers to a related document. Now publish the project and see how it runs.
Updated 9 months ago
