Create a leave request form - Advanced
Overview
In this exercise, we will be creating a Leave Request form that employees of a company would use.
This guide assumes you have already gone through SmartIQ Certification Training and have an understanding of how SmartIQ works and functions.
In the guide we will be learning how to:
- Use a CSV data source in the content library
- Reference previous rows inside of a repeating section
- Store, manipulate, and use values in variable formulas
- Use Bootstrap HTML to improve the user experience
Part 1: Creating the Data Source
Before we begin we will need to create a data source.
- Open up Microsoft Excel and fill in the following:

Note:The Unique ID column will serve as the row ID for the data source. It is important that each data source has a row where each value is unique. This avoids any of the sorting methods confusing certain rows with other rows.
The Employee column will hold the employee’s name while the Sick Leave, Long-service, and Annual Leave columns will hold the number of days the employees have stored up. We will be using these values later.

- Once the values are in, click save and save the file as a .csv
In this case, we will call it Employee_Leave_Data.csv
- After the file is saved, upload it to the content library as an attachment. Call the file ‘Employee Leave Data’.
- Click Data Sources and click on New Data Source.
- Fill in the following:
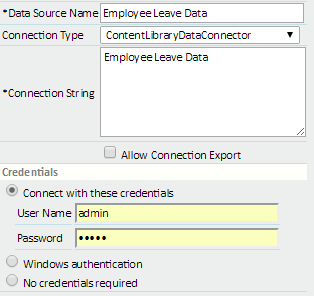
Data Source Name is the name that will appear in Design. This can be anything as long as it is a unique name.
Note:Connection Type determines how we will be connecting to the data source. In this case, we will be directly connecting to it via CSV.
Connection String is where we connect to the file. The syntax for connecting to a ContentLibraryDataConnector question type is simply just the name of the item you want to connect to in the Content Library.
- In order to connect to a CSV you will have to connect via a working Username and Password. In this case, just use your own.
- Click Save and then Test Connection.
- If you get a blue ribbon above with the text “Connection successful”, click Data Objects. If you receive a red ribbon, look at the error message and work out what went wrong.
- Click New Data Objects.
- Type in a Data Object Name and Display Name. Call them both Employee Data.
Note:With certain connection types of the Data Object Name / Definition will need to have a specific value to pick up data, in the case of connecting through the content library, there is no such requirement. These names can be anything you want.
- In the filter field box, click Add All.

- Click Save.
We have just created a data source and have connected it to SmartIQ, In the next part, we will create the project.
Part 2: Creating the project
- Open up Design and click on Create new project.
- Call the project “Leave Request”
- Rename “New Page 1” to “Applying for Leave”.
- Drop a section onto the Page and then drag a Data Source inside that section.
- Set the Question Properties of the Data Source to:
Data Source: Employee Leave Data
Table/View: Employee Data
Display Field: Employee
Unique Field: Unique ID
- Give the data source 4 answers and set the data field of those answers to:
- Employee, Sick Leave, Annual Leave, and Long Term.
This should now look like the following.

- Add another Section onto the Page below the original Section and then put a Label inside it.
- Call this label ‘Leave Balance’ and add the following in the label text.
Sick Leave: [q1.Sick Leave]
Annual Leave: [q1.Annual Leave]
Long-Term Leave: [q1.Long Service]
This label will make sure the user is able to see a number of days of each leave type the employee has stored up.
- Create a new Section below the rest of the sections.
- Inside the Section Properties, select Repeating
- Add a Multiple Choice Question and call it “Leave Type”. Change the display direction to 2 Column.
- Add the following answers with the following names and values:
- Sick Leave, Long Service Leave, Annual Leave, and Unpaid Leave.
- Add a variable below the multiple choice and call it ‘Concat Leave Type’ and the Answer ‘Concat’.
- Inside the answer type in the formula concat([q3]). [q3] should be the Multiple Choice question we just inserted. If this is not the case, then use the tool and select Leave Type for the correct question ID.
Note:Concat will concatenate all active answers inside Leave Type. Because only one value can be selected in the multiple choice, the variables value will be equal to whatever was selected inside the multiple choice.
- Add a new column and put it below the previous column
- Add a Variable inside the new column and call it ‘Date Variable’
- Call the Answer “Today” and type in the formula “=today()”.
- This will make the variable be equal to today’s date.
- Add a Text Field below this variable and call it ‘Date Start’ and the answer to ‘Date Start Answer’. Change the Data Type to Date and select Weekdays Only.
- Add another column and add a Text Field inside that column. Call the Text Field “Date End” and the answer to ‘Date End Answer’. Change the Data Type to Date and Select Weekdays Only.
Now that we have our 2 Text Fields we can start implementing some validation.
- Click on Date Start, and enter the Validation Tab by clicking this symbol.
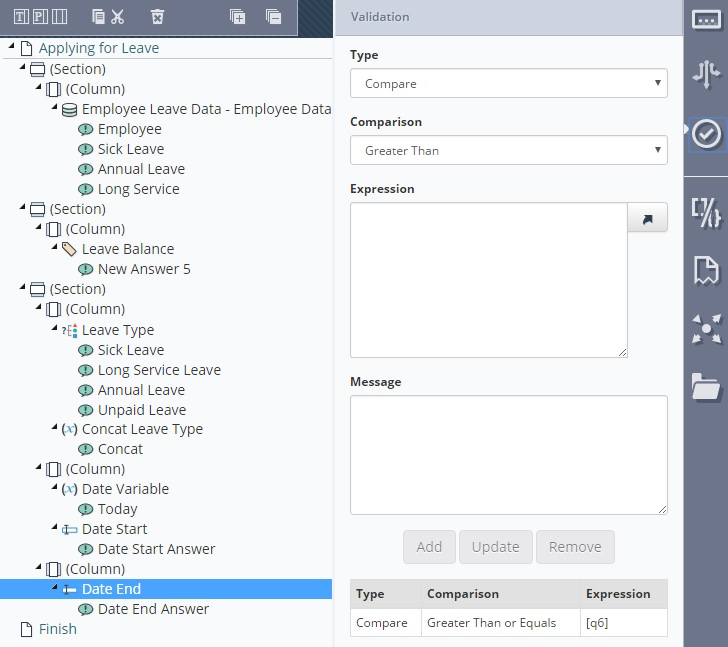
- In Validation. Set the Type to Compare, Comparison to ‘Greater Than’ use the tool to click on Date Variable – Today and then click add. This should appear in a box below.

- On Date End, Enter the Validation and make the Comparison to be Greater Than or Equals ‘Date Start’.
Your project should look similar to the image below.
- Save, Publish and Run the project.
NoteWhile the validation works well for a single row, it makes no sense for Date Start to accept a date a date which earlier than the Date End of the previous Row.
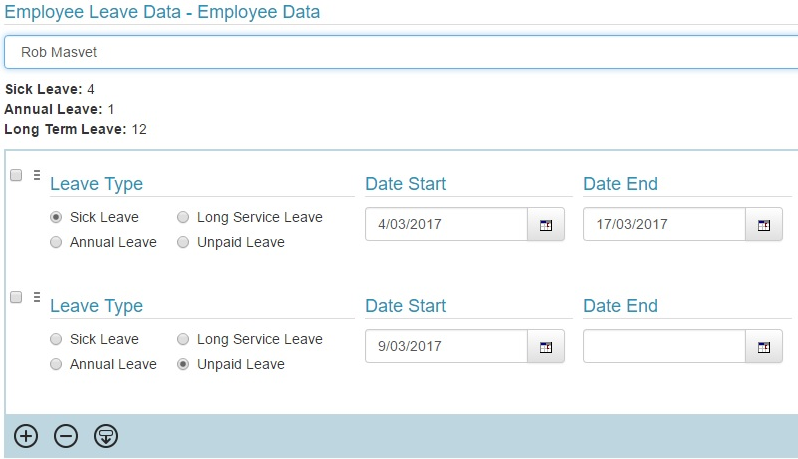
There is a way to reference the previous row, however.
- Go Back to design and add an answer to Date Variable and call it Previous End Date.
- Inside the Formula type in concat([Previous.q7]). Q7, in this case, is End Date.
- Inside of Date Starts Validation tab, add Validation that makes sure Date Start is Greater Than Previous End Date.
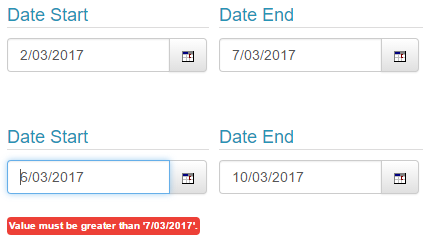
Date Start must now have a date after the previous row’s Date End.
Now that we have the Date validation sorted the next step is to focus on the amount of Sick, Long Service, and Annual Leave the users have left.
Part 3: Validating Leave with Formulas
-
Under Date End, insert a Variable question, call it Math Variable, call the Answer “Additional Day”.
-
Add the following formula. IsNotEqual([q7], “”).
This formula asks if Date End [q7] is not equal to nothing, then it returns a value of 1. If the value does equal nothing than the value returned is 0.
-
Add another Answer and call it “Date Difference”. In the Formula of Date Difference type in “=SUM(DateDiff(6, [q6], [q7])+[q8.15])
In this formula [q6] represents Date Start, [q7] represents Date End and [q8.15] represents Additional Day.
The DateDiff() function will calculate the difference between two different dates. It has the Syntax of DateDiff(1, x, y).
X and Y are the 2 different date variables you want to compare.
Note:The number will determine what difference we want to look at between two dates. For Example, “0” will calculate the difference in years between two dates while “6” will calculate the difference in Weekdays between 2 dates. So a DateDiff Formula of “=DateDiff(0, [q1], [q2]), with [q1] being 01/01/1996 and [q2] being 02/08/1999 will equal 3.
If you would like to learn more about the DateDiff function, see Formulas.
- Create 4 more answers called: Sick Leave Counter, Long Service Leave Counter, Annual Leave Counter, and Unpaid Leave Counter.
- Add the following Formula to Sick Leave Counter: iif(IsEqual([q4.10], “Sick Leave”), [q8.16], 0)
With [q4.10] representing Concat Leave Type – Concat and [q8.16] representing Answer Math Variable – Date Difference.
What this formula does, is ask if the concatenated version of Leave Type is Equal to “Sick Leave”. If it is equal, then Sick Leave Counter’s value is equal to Date Difference’s value. If not the value is equal to 0.
- Provide the following formula for the appropriate formula:
iif(IsEqual([q4.10], “Long Service Leave”), [q8.16], 0)
iif(IsEqual([q4.10], “Annual Leave”), [q8.16], 0)
iif(IsEqual([q4.10], “Unpaid Leave”), [q8.16], 0)
- Add another column at the end of the section and then add a label.
- Call the label “Days in use”, change the Text Position to Top and change the Label Text to [q8.16] or whatever represents Math Date Difference – Date Difference.
- Outside and below the section, insert a variable question and call it Day Counter.
- Call the first answer “Total”. In Total, we are going to add all the days used in each row.
- Add the following formula to Total.
- SUM(q8.16). With [q8.16] representing Math Variable – Date Difference.
- Add 3 more answers and call them “Sick Leave Total”, “Long Service Leave Total” and “Annual Leave Total”.
Each of them will have a formula similar to this.
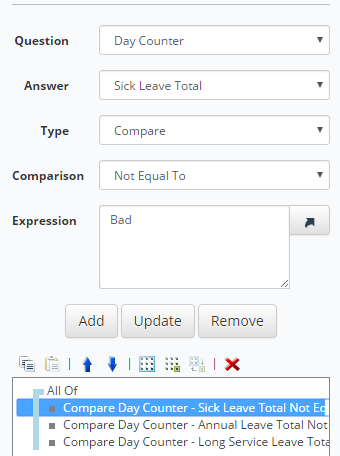
iif(IsGreaterThan(SUM([q8.17]), [q1.Sick Leave]), "Bad", [q1.Sick Leave]-SUM([q8.17]))Keep in mind that [q8.17] represents Math Variable – Sick Leave Counter.
What this formula does is check if the SUM of all the sick leave days is greater than the amount of sick leave the user has. If this is true we get the value of “Bad”. If this is false we get the value of the amount of sick leave the user has minus the amount of sick leave they are using.
- Add a similar formula to Long Service Leave Total and Annual Leave Total. The formulas should look similar to this:
iif(IsGreaterThan(SUM([q8.18]), [q1.Long Service]), "Bad", [q1.Long Service]-SUM([q8.18]))
iif(IsGreaterThan(SUM([q8.19]), [q1.Annual Leave]), "Bad", [q1.Annual Leave]-SUM([q8.19]))
- Add a label below and call it Total Days Used. Change the label text to
- Total Days: [q10.22]
With [q10.22] representing Day Counter – Total.
- Add a Validator question below Total Days Used.
- Add the following validation. Do the same for Annual Leave Total and Long Service Leave Total.
- Click Save and run the project.
You will see that if the user uses up too many days of a certain type of leave an error will pop up. We can make this error message more obvious, however.
Part 4: Using Bootstrap and HTML for a better user experience
Validation works after the user has tried to select a new page in the project. Sometimes it can be frustrating to fill out a page only to find out that you have made a mistake somewhere and need to correct it. Fortunately, there is a way to let the user know they have made a mistake the second they click off to another question.
SmartIQ has access to Bootstrap classes in HTML to make the project look prettier or make certain information standout more in different ways. In this case, we are going to be using the “wrn” class to let people know they have made a mistake. The output will look like so:

- Underneath Date Start, add a Variable Question and call it Warning. Call the Answer “Warning” as well.
- Add a formula that checks if Date Start is greater than Previous End Date.
Your formula should look like: IsGreaterThan([q6], [q5.14]) This will produce a 1 or 0 value depending on if Date Start is a later date than the Previous Date End.
- Add a Label underneath “Warning” and call it “Warning Date”. Inside the label, text click on Source code.
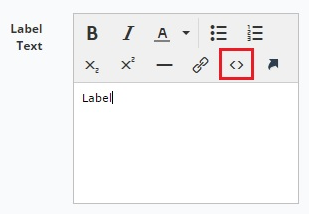
- Inside the source code we are going to all the following:
- In the label, conditions make it so that the label is only active if Warning – Warning is equal to 0 and Date Start’s is not equal to nothing.

The label will now pop up with a warning anytime the Date Start’s date is less than or equal to the previous rows Date End. This will alert the user if they made a mistake right away.
- Below the Validator add 3 Labels and call them Sick Leave Error, Annual Leave Error, Long Service Leave Error.
- In Sick Leave Error label, go to Conditions and make it so that the label will only be active if Day Counter – Sick Leave Total is equal to “Bad”.
- Do this for the other labels but to the appropriate variable.
- In the source of the label text add the following:
Sick Leave Error:
Annual Leave Error:
Long Service Leave Error:
- Change the Validator’s error message from “Error on Page” to “Please fix the errors below”
- Save and run the project.
You will notice if you use more days in a certain type of leave than the user has an error message will pop up at the bottom of the screen.
Note:There are many other bootstrap classes which can be used to enhance a project in SmartIQ. If you would like to learn more about it click here
Part 5: Adding the document
A document has already been provided to speed up the process. If for any reason you do not have the document, please create a document which looks roughly like this. (The below section can be copy and pasted into a new document)
Leave Request
User: {{Current User}}
Original Balance
Sick Leave | Annual Leave | Long Term Leave |
|---|---|---|
{{Original_SickLeaveTotal}} | {{Original_AnnualLeave}} | {{Original_LongTermLeave}} |
New Balance
Sick Leave | Annual Leave | Long Term Leave |
|---|---|---|
{{New_SickLeaveTotal}} | {{New_AnnualLeave}} | {{New_LongTermLeave}} |
Leave Journey
Leave Type | Start Date | End Date | Days Total |
|---|---|---|---|
{{Leave_Type}} | {{Start_Date}} | {{End_Date}} | {{Days}} |
Before we upload the document we will want to add a bookmark for the repeating section.
- Click on the left side {{Leave_Type}}. Enter the Insert Tab, click Links and then click on Bookmark.
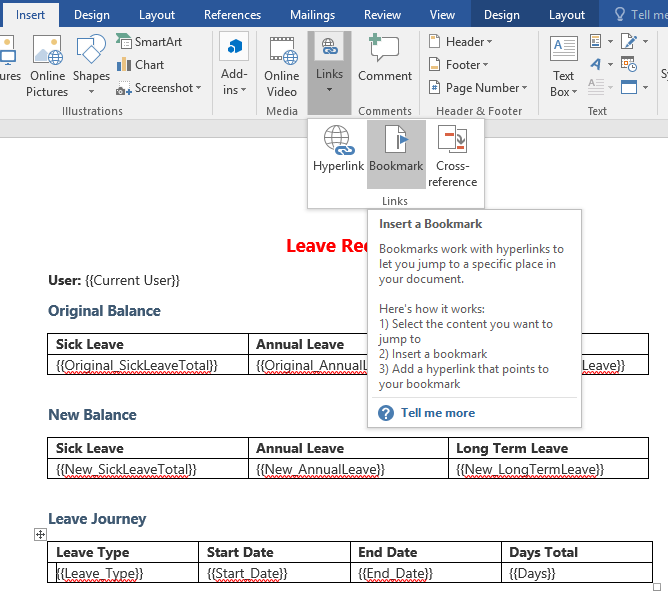
- Add a bookmark and call it Repeating_Leave.
- Save the document and call it Leave Request if the document doesn’t already have a name.
- After the changes to the document have been made, drag a Template question onto the question set and select the Leave Request to upload it.
- Click on the placeholder tab and assign the placeholders to the following areas on the page below
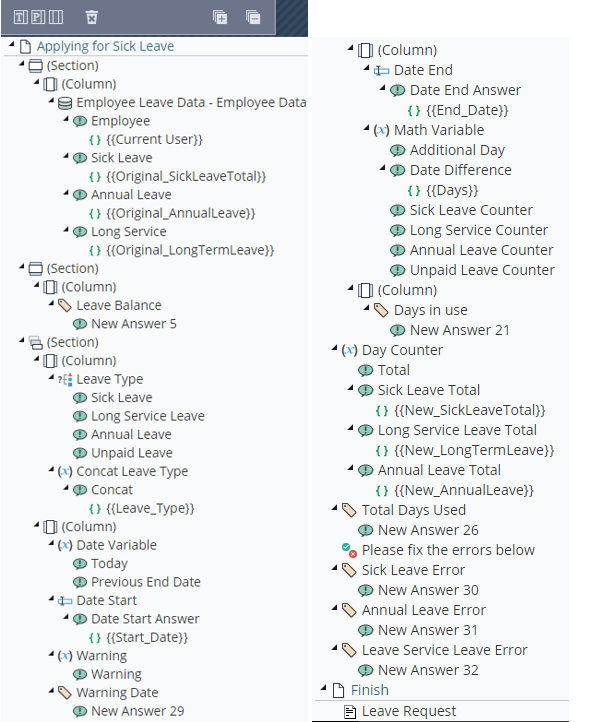
- Click on the repeating section and in Repeat Content select Placeholder.
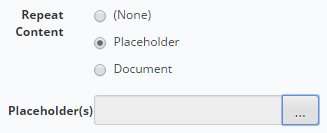
- Click the ‘…’ box and a popup window will appear.
- In Placeholder sick the drop-down menu and select Repeating_Leave. Click Add and then OK.
- In the Date Start Answer and Date End Answer change the Document Format to Short Date.
- Save and Run the project.
When you complete the project a document will be created that contains the data you put into the form.output will you answers you inputted into the document.
Updated 9 months ago
