
DocuSign Connector
Overview
Organizations spend billions of dollars on technology solutions to automate their processes, the final step in those processes, the creation of the document and final transaction, is surprisingly still stuck in the past.
When documents need to be signed, inefficient processes like printing, faxing, scanning, overnighting, and data rekeying take over and the inefficiency takes hold.
But this is changing with the integration of SmartIQ forms and DocuSign.
Usage of SmartIQ and DocuSign provides the following benefits:
NoteYou must have a valid license key of the DocuSign Connector for the DocuSign tab to show up and for the connector to function. If you don’t have a license key, contact your SmartIQ representative.
- Immediate financial gains – By reducing the transaction time, organizations see needle-moving financial benefits in weeks rather than months or years.
- Transforms the customer experience – Instead of waiting days, week, or even months for transactions to be completed, progress can be made near instantly. This velocity delights external and internal customers and elevates the organization that provides the superior service.
- Readily demonstrates compliance – Every document has a readily accessible digital audit trail to making documenting compliance with industry laws and regulations fast and easy.
For more information, click here
Detailed Action Input DocumentationThe DocuSign connector offers a large number of inputs, reflecting the options available via DocuSign's REST API, which the connector interfaces with internally. Full documentation of the API is available for reference here
Upgrade noticeNote that if you upgrade to v12 of SmartIQ from an earlier version, and previously used the DocuSign connector, you will need a rebuilt copy of the connector. Storage of the connector's settings changed in v12 and requires a connector update.
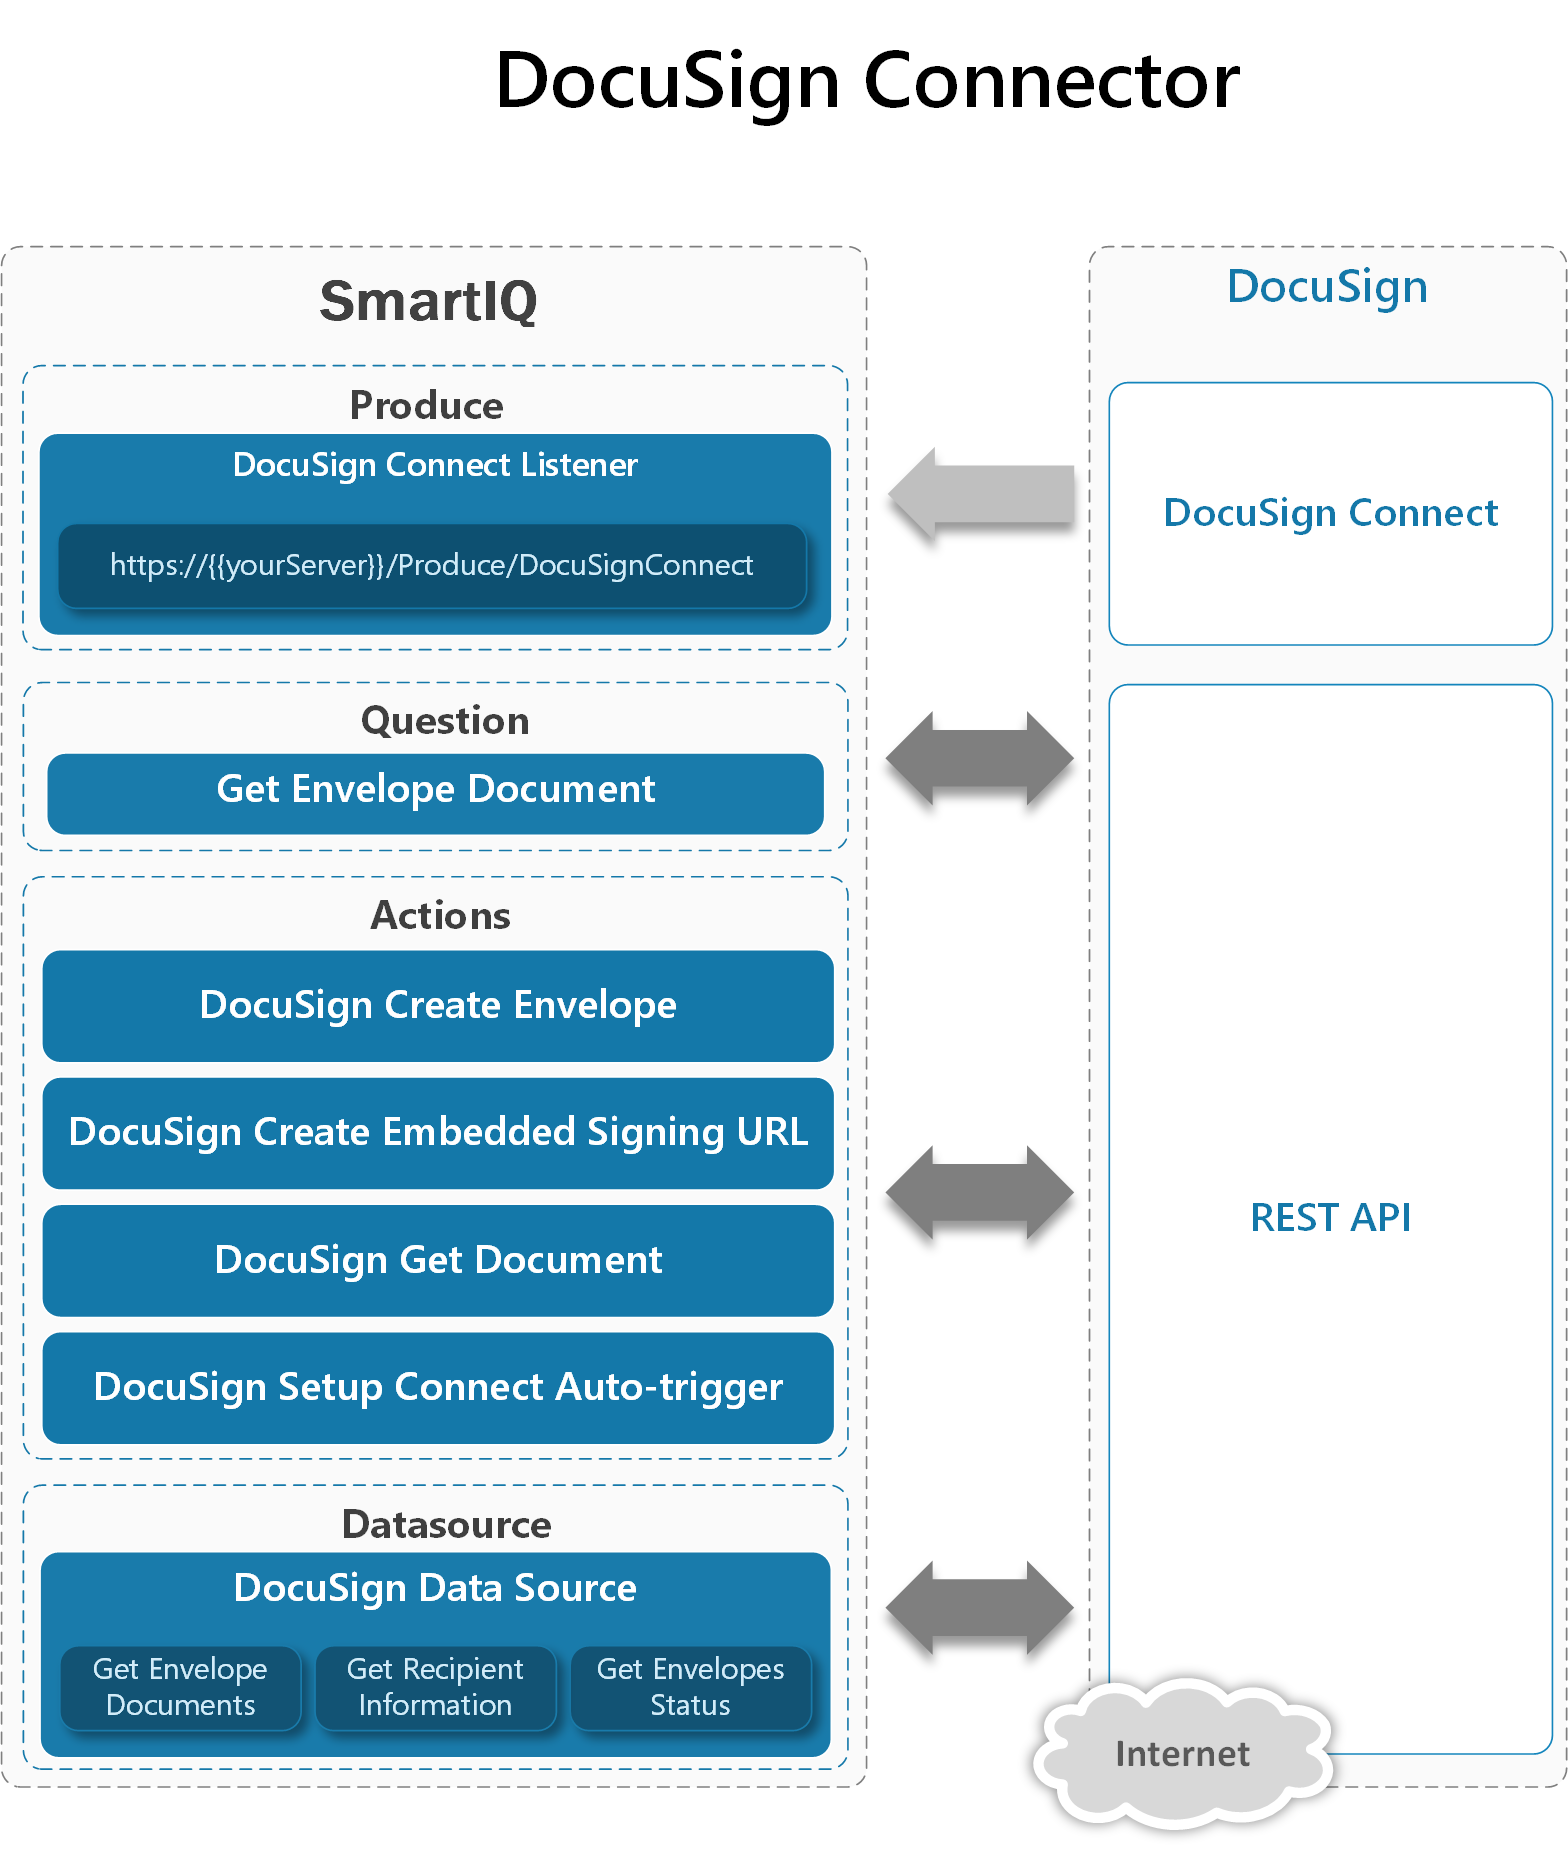
Connector Components
Action
- Create DocuSign Envelope
- Create DocuSign Embedded Signing URL
- Setup DocuSign Connect Auto-trigger
- Get DocuSign Document
- DocuSign Modify Envelope
Data Source
- Envelope Status
- Envelope Documents
- Recipient Information
Question Extension
- Download Documents
Creating a DocuSign Sandbox
You’ll require a dev sandbox to perform tests and build solutions using SmartIQ and DocuSign.
- Create a new free Dev sandbox account Click Here
- You'll receive a confirmation email, click "Verify Account".
- Change Password.
At this point, you have successfully created a Sandbox that you can be used to develop and test your SmartIQ projects.
- Navigate to the Admin Console clicking Go To Admin on the right top menu.
- Click API and Keys located on the left menu.
- Click Add APP / INTEGRATOR KEY button. A modal windows will pop-up; please provide the follwoing information:
- App Description: Name for this specific integration; e.g. `SmartIQ'
- Redirect URIs: Provide Produce URL, note that this value can be defined under Mange > Settings > DocuSign.
- On the same Window, click RSA Keypairs (ID) and then copy/paste this text into a local
.txtfile. Note that you must include -----BEGIN RSA PRIVATE KEY----- To -----END RSA PRIVATE KEY----- - Copy the Integrator Key guid as this value is required in DocuSign Properties in Mange > Settings > DocuSign.
At this we have all parameters required to configure DocuSign in SmartIQ Settings.
- Integrator Key
- RSA Kaypairs (ID)
- Redirect URI
NoteAdmin API Username Parameter can be found by navigating to the DocuSign Admin Console > Users. A valid Admin API Username to interact with the core DocuSign API service should be in Guid form, not as an email.
By default, DocuSign Connector will use <<productname>> Produce URL with a slash at the end. However, you can overrride it in Manage > Settings > DocuSign.
In most DocuSign Authentication workflows, SmartIQ will make API calls on behalf of a user, acting as them to create envelopes, add documents, and send these files out for signing. Each of these workflows requires that the user grant explicit consent for SmartIQ to act on their behalf. A Redirect URI is used for SmartIQ to request impersonation consent from an individual user by redirecting the user's browser to the authorization service URI and initiate the authorization process.
After being redirected to the service URI, the user will need to log in to their DocuSign account and be presented with a request to grant signature and impersonation permissions to SmartIQ as shown below:

Once a user has granted consent to an application by clicking the Accept button, they will then be redirected back to the defined Redirect URI. Users will no longer be prompted to do so again unless consent is revoked.
- Find the generated Integrator Key and click on the Integrator Key or in the Actions drop down select Edit.
- In the
Redirect URIssection, click Add. - Enter the new Redirect URI, this should be the
<<productname>> Produce URL.
Configuring the Connector Settings
-
In a web browser, navigate to the SmartIQ Manage application and log in. E.g.
http:\\serverName\Manage -
Navigate to Settings > DocuSign.
-
Review and update the settings as required each of the required settings are described in the table below.
-
Click the Save button at the top of the page once you have entered your organization's attributes.
Multiple DocuSign accountsClick the New Set button to create additional accounts. For example, Sandbox and Production. Additionally, click the Set as Default button to change the default connector set. If the previous Default was set in Design, SmartIQ will now use the new Default connector values.
Setting | Description |
|---|---|
Production Environment | This should be ticked if you are using a live production account.\nThis will determine the URL to make request to when retrieving account information needed to interact with the core DocuSign API service. https://account-d.docusign.com for the developer sandbox (Testing Environment) https://account.docusign.com for the live production system (Production Environment) |
Admin API Username | Specify the Organization Admin’s API Username. This can be found by navigating to the DocuSign Admin Console > Users. A valid Admin API Username to interact with the core DocuSign API service should be in Guid form, not as an email. |
Integrator Key | DocuSign API Integrator Key (Unique ID for each DocuSign integration). This key is retrieved from the DocuSign administration portal. |
RSA Private Key | Upload the text file that contains the RSA Private Key obtained from Installation and Configurations step. |
Embedded Signing Return Url | Specify the URL that the embedded signer’s browser will be re-directed to after the signer has finished. |
Log Mode | True/False This option allows or disables storing in the SmartIQ database all generated requests to DocuSign. To enable this capability, run the included SQL Script < This option is only recommended for customers that require local audit logs. DocuSign also stores successful requests in its user portal. |
Redirect URI | SmartIQ will automatically use the |
Debug Mode | If enabled, the connector will output information about the constructed payload in the project output messages (available in Manage > Management). This can be used to troubleshoot problems with the payload generation and/or DocuSign's behavior with the received payload. |
Private Information in Debug | If enabled, the Debug Mode information will include potentially-sensitive information such as the Admin API Username to assist with detailed troubleshooting. |
Connect HMAC Key | Provides another layer of security with HMAC with HMAC, an industry standard symmetric hashing system. For more information, refer to HMAC. |
Obtaining a DocuSign Admin Consent
Once the DocuSign Connector is installed successfully and the Connector Settings have been configured, SmartIQ will need to obtain consent from a DocuSign Admin user to make API calls on their behalf. SmartIQ will need to redirect the user to the Consent page, the user will need to log in to their DocuSign account and be presented with a request to grant signature and impersonation permissions to SmartIQ
To obtain a DocuSign Admin consent
- Create a new SmartIQ Project.
- Drag and Drop the "Create DocuSign Envelope" into the project.
- Add values to the mandatory inputs of the action, these are:
- Recipient Name
- Recipient Email
- Email Subject
- Email Blurb

NoteThese values could be anything for now since they would not be executed, at this stage we only run the action to obtain consent not to create an envelope.
- Publish and then Run the project.
- The user will be presented with a request to grant signature and impersonation permissions to SmartIQ
- Click Accept and the user should be redirected back to the SmartIQ Produce page.
Once a user has granted consent to an application, they will no longer be prompted to do so again unless consent is revoked.
If there’s a need to change the Admin API Username to another admin, this process would need to be done again to obtain consent for the new admin.
Architecture
Using the DocuSign Connector
For all the actions, there are two optional Account Settings inputs as follows:
| Name | Description |
|---|---|
| Account Id | Optional value, used where the default account id for the global Admin API Username is not the one needed for the project and an alternative account id is entered here. (Note that this needs to be a guid value (xxxxxxxx-xxxx-xxxx-xxxx-xxxxxxxxxxxx) rather than an integer ID.) |
| Admin API Username | Optional value, used where the default Admin API Username in the Global Connector Settings is not the one needed for the project, an alternative Admin API Username is entered here. If an Account Id is also supplied, it needs to be a valid account id for this User. This value will override the global Admin API Username only for this project. |
Action - Create DocuSign Envelope
DocuSign TemplatesIf you have the DocuSign Connector installed, a license for DocuSign in SmartIQ as well as an account in DocuSign, you can use DocuSign templates instead. This enables you to use existing templates and you will not have to use the Create DocuSign Envelope action to connect to the DocuSign template.
While the action extensions are installed, they will not be called until a project is set up in SmartIQ with one or more of the DocuSign actions, with action attributes that instruct the action providers on how to behave.
Action attributes can be set up with fixed values within Design, or they can be set up to refer to values collected via the question set during the generation process.
The Create DocuSign Envelope action supports most of the fields to create and send an envelope using the DocuSign REST API.
Note that since the structure of the action attributes are closely aligned with a DocuSign Create Envelope’s Json request or as when you use the DocuSign REST API Explorer, most of the action attributes’ definition can be found here.
Anchor TagsIf you use DocuSign Anchor Tags in your documents, the Tags must be unique across all documents as when anchor tabs are used, all documents in the envelope are searched by DocuSign for the AnchorTabString.
You can find SmartIQ sample projects Click Here
DocuSign NotarySmartIQ supports DocuSign Notary. This is done by providing the action input value on Recipient Type - Notary Recipient and Tab Type - Notary Seal in the Create Envelope action. However, the signing recipient must have a Client User Id.
Things to note:
- DocuSign Notary is a feature that might not be available for all customers. Contact DocuSign support for more information.
- The following should be set up in DocuSign:
- The user defined in "Admin Api Username" must have organization_read, notary_read, and notary_write permissions, in addition to the existing signature, and impersonation permissions.
- There should be existing organisations, notaries, and organisational invites and already set up.
- The first notary signing request should have been performed and tested on the DocuSign site.
Action - Create DocuSign Embedded Signing URL
Once you’ve added the Create DocuSign Embedded Signing URL action to your project, either on the Finish page or on a workflow transition, use the following table to configure any action attributes that you require.
If you use DocuSign Templates, you can use this action to enable users to complete the workflow in DocuSign without waiting for an email/document to sign.
| Name | Description |
|---|---|
| Envelope Id | Id of an existing Envelope. This could be retrieved from the Create DocuSign Envelope action output. |
| Client User Id | To perform embedded signing ceremony, the Create DocuSign Embedded Signing URL action requires that you specify which person will be signing by provide the Client User Id that uniquely identify that person. Note: The Client User Id provided in this action must be the exact same as what you used in the Create DocuSign Envelope action. |
| Return Url | The URL that the signer’s browser will be re-directed to after the signer has finished. This value could also be set globally across all projects in the DocuSign Connector Settings. |
Client User IDWhen using a DocuSign Template, the Client User ID input can be omitted, as SmartIQ will automatically retrieve the Client User ID value that was mapped to the template. For this reason the action input is not marked as mandatory - but it still must be supplied if the Embedded Signing URL action is used in conjunction with the Create Envelope Action.
Once all the action attributes are configured, the Create DocuSign Embedded Signing URL action will create an embedded signing URL and immediately redirect the user to that URL to perform a signing ceremony.
Action - Get DocuSign Document
There's a new action included with DocuSign Connector that allows to include DocuSign Documents into SmartIQ in other words, it will allow to include signed documents (individually selected or combined) and the certificate of completion in subsequent Actions and Connectors, for example, storing those documents into Microsoft SharePoint.
Action Inputs
| Input | Description |
|---|---|
| Envelope Id | Id of an existing Envelope. This could be retrieved from the Create DocuSign Envelope action output. |
| Document Id | The ID of the document being accessed. You can query this value using the Connector Datasource Get Envelope Documents. If no document ID is provided, the action will default to combined option, where all DocuSign Documents included in the envelope are stitched and returned as a PDF. |
| Document Display Name | Name of the downloaded document, this value will be used by SmartIQ. |
| Certificate Language | Specifies the language for the Certificate of Completion in the response. The supported languages, with the language value shown in parenthesis, are: Chinese Simplified, Chinese Traditional, Dutch, English US, French, German, Italian, Japanese, Korean, Portuguese, Portuguese (Brazil), Russian, Spanish. |
| Include Certificate | Includes the Certificate page with the documents retrieved from DocuSign. The default value is True. |
| Show Changes | When set to true, any changed fields for the returned PDF are highlighted in yellow and optional signatures or initials outlined in red. |
| Watermark | When set to true, the account has the watermark feature enabled, and the envelope is not complete, the watermark for the account is added to the PDF documents. This option can remove the watermark. |
NoteOne action per document downloaded is required.
Action – DocuSign Modify Envelope
Allows a user to perform the following actions on an envelope:
- Modify a particular signer’s name or email address
- Resend the envelope to all recipients
- Void Envelope
NoteModification to signer’s name or email will automatically notify the recipient that was modified, however you can also include the Resend Envelope flag to resend the envelope to all signers, not just the ones that had to be modified. However, if an envelope has to be voided, the action needs to be done by itself.
Action Inputs
Input | Description |
|---|---|
Envelope Id (required) | Id of an existing Envelope. This could be retrieved from the Create DocuSign Envelope action output. |
Recipient Email, Name, Recipient Id | The Email, Name or recipient id that needs to be modified. |
Resend Envelope | Resends the envelope to all recipients. Can be used independently if you need to notify all recipients, or along with modifications to recipients names or email addresses to include notifying the other recipients that were not modified. |
Void Envelope (Yes/No) | Cancels all signing activities. A Void Reason must be provided. Note: Voiding the envelope has to be done by itself, without modifications to user email or name, or resend envelope. |
Void Reason | Provide a reason why the signing activities for the envelope must be cancelled. |
Action - Setup DocuSign Connect Auto-trigger
This action can be used to setup the DocuSign connect auto triggering parameters after the envelope is created. For example, if multiple signers are required but a review process is required in between,
this can be used to change what DocuSign Connect triggers after the second signature is completed.
| Name | Description |
|---|---|
| Envelope Id (required) | Id of an existing Envelope. This could be retrieved from the Create DocuSign Envelope action output. |
| DocuSign Connect | This hierarchical input then allows the user to setup the Submit Workflow, Generate or Prepare form instructions. See the relevant sections below for documentation regarding these parameters and what combination to use for each trigger type. |
If this action is dragged onto a workflow transition, the next stage guid is automatically updated in the envelope.
ImportantThis action will reset the Docusign Connect specific fields (those available as inputs of this action under the Docusign Connect input) in the envelope.
If the action to be triggered by Connect is the same as setup in the original envelope, the parameters that specify this action must be setup in this action again.
Set-up DocuSign Datasource and its parameters
To be able to fully utilize all the DocuSign features there are a couple of other configurations that are required to make this all work.
View/Modify Datasource settings inSmartIQ
-
In a web browser, navigate to the SmartIQ Manage application and log in. E.g.
http:\\serverName\manage -
Click on Data Connections on the left panel.
-
Click the New Data Connection button (top left)
-
Select the Connection type as DocuSign Data Source and then fill in the following settings panels.
| Setting | Description |
|---|---|
| Data Source Name | Any relevant name. |
| Connection Type | DocuSignDataSource |
| Connection String | Any relevant name, E.g. DocuSign |
| Credentials | No Credential Required |

Add New Data Connection in SmartIQ Manage
-
Click Save to commit the changes.
-
Click Test Connection. You should get a message “Connection Successful”. If you have an error, check your credential and integrator key provided in the Connector Settings.
-
Click on the Data Objects button (top) and add the following objects:
| Display Name | Object Type | Filter Fields |
|---|---|---|
| Get Envelope Documents | Method | envelopeId |
| Get Envelopes Status | Method | envelopId, fromDate and status |
| Get Recipient Information | Method | envelopeId |

Data Objects in SmartIQ Manage
Custom Question - DocuSign
The DocuSign Custom Question allows you to have a button in SmartIQ form that once clicked a PDF that contains the combined content of all documents will be downloaded
Once you’ve added the DocuSign custom question to your project use the following table to configure any custom question attributes that you require.
| Name | Description |
|---|---|
| Document Url | URL to the PDF that contains the combined content of all documents in an envelope. This URL can be retrieved from using the DocuSign Data Source Get Envelope Status method – documentsCombinedUri column. |
Once all the custom question attributes are configured, the DocuSign custom question allows you to have a “Get” button in your SmartIQ form. When this button is clicked a PDF containing the combined content of all documents in an envelope will be downloaded.
DocuSign Templates
SmartIQ can leverage the existing configuration and investment in DocuSign Templates by mapping the tabs, recipient structure and documents from existing templates in a drag and drop fashion. SmartIQ will populate the tabs and recipient information at runtime instead of recreating the entire process from scratch.
For more information, refer to Template - DocuSign.
DocuSign Connect
Is a fully automated way to get Documents and Data from DocuSign into SmartIQ, allowing to create near-real-time solutions based on events like:
Envelope Events:
- Envelope Sent
- Envelope Delivered
- Envelope Signed/Completed
- Envelope Declined
- Envelope Voided
Recipient Events:
- Recipient Sent
- Recipient Delivery Failed
- Recipient Delivered
- Recipient Signed/Completed
- Recipient Declined
- Recipient Authentication Failure
In order to enable this capability, you will need to:
- Create a service account in SmartIQ that will be exclusively used by DocuSign Connect.
- Enable Connect in your DocuSign Account.
- Define the events you are subscribed to (either directly in the DocuSign admin console or per Envelope using the appropriate Action Inputs in Create Envelope Action.
DocuSign Service Account
You will need to create an SmartIQ user account to be used as a "Service Account" by DocuSign Connect. Ensure that this account has the correct permissions to access forms adding it to the appropriate SmartIQ groups and that Impersonate Users permission is enabled. Here some simple steps to demonstrate the creation of this account:
-
Create a new DocuSign Role (Manage > Roles > New Role) where:
Role Name: docusign and the PermissionImpersonate Usersis selected. This option is required to prepare forms on behalf other users. -
Click Save.
-
Create a new SmartIQ User (Manage > Users > New User) where:
User Name: docusign
Password: yourPassword -
Click Save.
-
Click Security and select the relevant Groups to ensure the service account has access to all relevant forms and that the new
docusignrole is selected.
Enable Connect in DocuSign Admin Console
-
Navigate to your DocuSign Account using your preferred browser and click on Go To Admin on the upper-right menu.
-
Click Connect option under INTEGRATIONS in the left side menu.
-
Click ENABLE CONNECT button.
-
Click Custom option under ADD CONFIGURATION button
-
Provide a meaningful Name, like: `SmartIQ'
-
Under URL to Publish (HTTPS required) provide the following URL:
<https://{{yourServer}}/Produce/DocuSignConnect> -
Under Event Settings select Legacy from the Data Format dropdown list and Aggregate from the Event Message Delivery Mode dropdown list.
-
Under Trigger Events select the events required to trigger the callback to the URL set in URL to Publish. Depending on your configuration in SmartIQ you will probably want Envelope Signed/Completed OR Recipient Signed/Completed.
-
Click Include Basic Authentication Header and provide SmartIQ Service account Username and password. Note that this account needs to have appropriate permissions to perform SmartIQ operations on those projects that will be automated with DocuSign Connect.
-
Enable further options as required.
-
Click Save.
SmartIQ Configuration
DocuSign Connect can be used in one of these three main scenarios:
- Generate Form
- Prepare Form
- Submit Workflow
All three use cases require to include an XML Datasource that will process the metadata returned by DocuSign Connect. Download the XML Schema and default data: Download
NoteAll sample projects used in this guide include the default XML datasource and will be imported automatically with the sample project. There's no need to perform the following steps unless you want to modify it
-
Go to SmartIQ Manage.
-
Click on Data Connections > New Data Connection.
-
Define following options:
- Data Connection Name: DocuSign Connect
- Connection Type: XML
- Schema: Upload DocuSign Connect Schema.xsd
- Default Data: Upload DocuSign Connect Default Data.xml
-
Click Data Objects > New Data Object.
-
Provide the following option values:
- Object Type: Hierarchical XPath
- Data Object Name / Definition: DocuSignEnvelopeInformation
- Display Name: DocuSignEnvelopeInformation
- Select all available Filter and Display Fields.
Make sure you include this Data Connection in the form that will be used by DocuSign Connect adding the root data source with following parameters:
- Data Source: DocuSign Connect
- Table/View: DocuSignEnvelopeInformation
- Non Visible
- Selection: Single Row
- Unique Field: (None)
- Default Type: Default Index
- Default Index: 1
A hierarchical data connection can be added pointing to previous data connection, allowing to map and use:
- CustomFields
- RecipientStatus
- TabStatus
- Fields
NoteMore information can be found in official DocuSign Web Page.
Here a brief description of hierarchical datasource configuration:
- Data Source: Root Datasource, for example:
(Question)DocuSign Connect - DocuSign EnvelopeInformation - Table/View: Hierarchical entry, for example:
EnvelopeStatus\RecipientStatuses\RecipientStatus - Non Visible
- Selection: Single Row
- Unique Field: (None)
- Default Type: Default Index
- Default Index: 1
Configuring these datasources, allows SmartIQ Designers to access data sent by DocuSign Connect to the form.
Generate Form
This scenario allows to automatically run an SmartIQ Form based on a DocuSign Connect Event, allowing to use information sent by DocuSign Connect and perform subsequent Actions. Ensure the DocuSign Service Account is assigned to the correct folder to run this form.
Here a high-level overview of the process
- Form A: Creates DocuSign Envelope, you need to include the following parameters:
DocuSign Connect Operation: Generate Form <<productname>> Data Service Guid: "XML Data Source Guid" <<productname>> Generate Form Guid: "Form B Guid" - Form B: Executed automatically once DocuSign Event is triggered. You will need to include the XML Datasource described above.
You can use the following sample projects to see this scenario in action:
- Form A:
DocuSign Connect - Create Envelope (Generate Form)Download - Form B:
DocuSign Connect - Generate FormDownload
Prepare Form
This scenario allows to pre-fill a Form using data provided by DocuSign Connect once configured event is triggered.
Here a high-level overview of the process
- Form A: Creates DocuSign Envelope, you need to include the following parameters:
DocuSign Connect
    Operation: Prepare Form
    <<productname>> Data Service Guid: "XML Data Source Guid"
    <<productname>> Generate Form Guid: "Form C Guid"
    <<productname>>  Prepare Form Guid: "Form B Guid"
    <<productname>> Prepare Form Label: "prepareformurl"
    <<productname>>  Prepare Create In Progress: "True|False"
    <<productname>> Prepare Form Description: "In-Progress Description"
    <<productname>> Prepare Form Impersonate User: "User Details (GUID or UserName)" (ONLY AVAILABE ON INFINITI 11.0.5 onwards)
NoteSmartIQ Prepare Create In Progress, SmartIQ Prepare Form Description and SmartIQ Prepare Form Impersonate User are optional parameters.
-
Form B: Form to be pre-filled using data provided by DocuSign Connect. You will need to include the XML Datasource described above.
-
Form C: Used to get the Url of recently pre-filled Form. You will need to create a Label and modify
Answer File PropertiestoSave by unique labeland set it toprepareformurl, note that this value is the same specified in<<productname>> Prepare Form LabelAction Property. -
Impersonating User details: This is the Username or User GUID of the user that will be impersonated by the DocuSign Connect service account to prepare the form. Please note that the service account that calls the
prepare form must have the 'Impersonate Users' permission set in Manage to be allowed to make this call.
You can use the following sample projects to see this scenario in action:
- Form A:
DocuSign Connect - Create Envelope (Prepare Form)Download - Form B:
DocuSign Connect - Prepare FormDownload - Form C:
DocuSign Connect - Prepare Form UrlDownload
Submit Workflow
This scenario allows to move an SmartIQ Workflow to a temporary Workflow State waiting for DocuSign Connect to transition it to the next State based on a configured event. Note that the Envelope needs to be created immediately before this "Temporary state" and that is assigned to the DocuSign Service account.
Here a high-level overview of the process
- Form A: Creates DocuSign Envelope, you need to include the following parameters:
DocuSign Connect
    Operation: Submit Workflow
    <<productname>> Data Service Guid: "XML Data Source Guid"
You can use the following sample projects to see this scenario in action:
- Form A:
DocuSign Connect - Create Envelope (Submit Workflow)Download
Troubleshooting
Consider turning on Troubleshooting mode Mode to troubleshoot problems you experience when running the DocuSign Actions.
Once Troubleshooting Mode has been enabled, SmartIQ will display logging messages of the Action in Management Console.

Workflow Webhook Receiver
This debug option will enable receiving event notifications from third-party senders to help progress workflows and identify issues that occur in your environments. The Workflow Webhook Receiver option is independent of Troubleshooting Mode.
Once the Workflow Webhook Receiver option has been enabled, SmartIQ will display logging messages in Manage > Event Log.

To enable this option:
-
In Manage, go to Settings > Security.
-
Select the Workflow Webhook Receiver option.

- Click Save.
Updated about 1 year ago