Transitions
A transition is the link between the end of one state and the beginning of another, creating forward (and backward) paths within a workflow. Transitions allow configuration of who the state will be assigned to, the correspondence that they will receive, along with some finer look-and-feel elements of the workflow.
Transitions display as as a connecting line, beginning with a circle from the outbound (from) state, and terminating with an arrow at the inbound (to) state. The line's appearance can vary depending on the type of transition, as follows:
- Grey unbroken line – Normal transition between two states
- Green unbroken line – Approved path transition from an Approval to another state
- Red broken line – Rejected path transition from an Approval to another state

Adding a Transition
There are several ways to add Transitions:
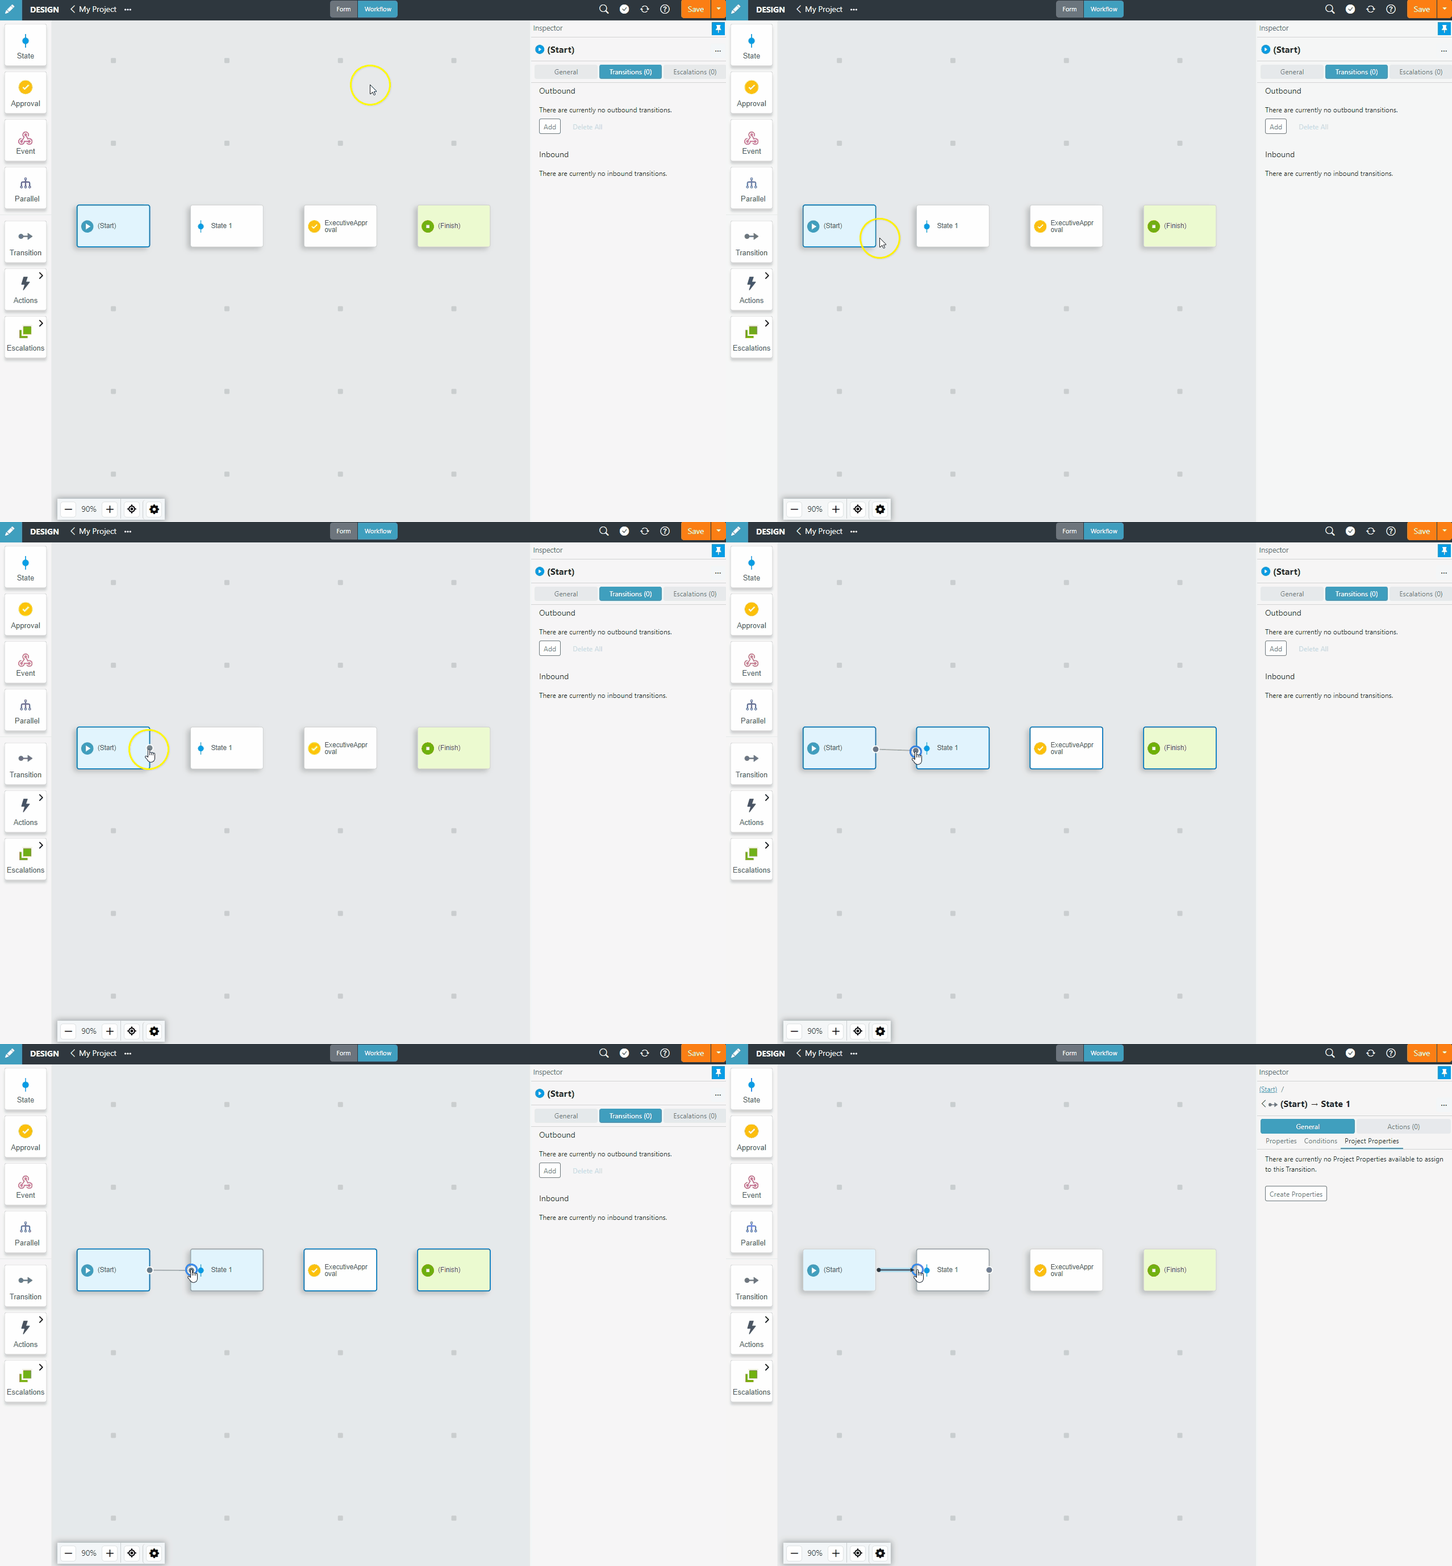
Option 1: On the workflow canvas, drag a transition between two states.
To initiate, hover over the source state to reveal a grey transition creation handle or, in the case of Approval states, there are green and red transition creation handles representing approved and rejected paths. Click and drag from the handle and release when the target state is highlighted.
If your target state is within a Parallel section, you can drag to the Parallel and the Create Transition dialog will display allowing you to select or create a state within that Parallel section.
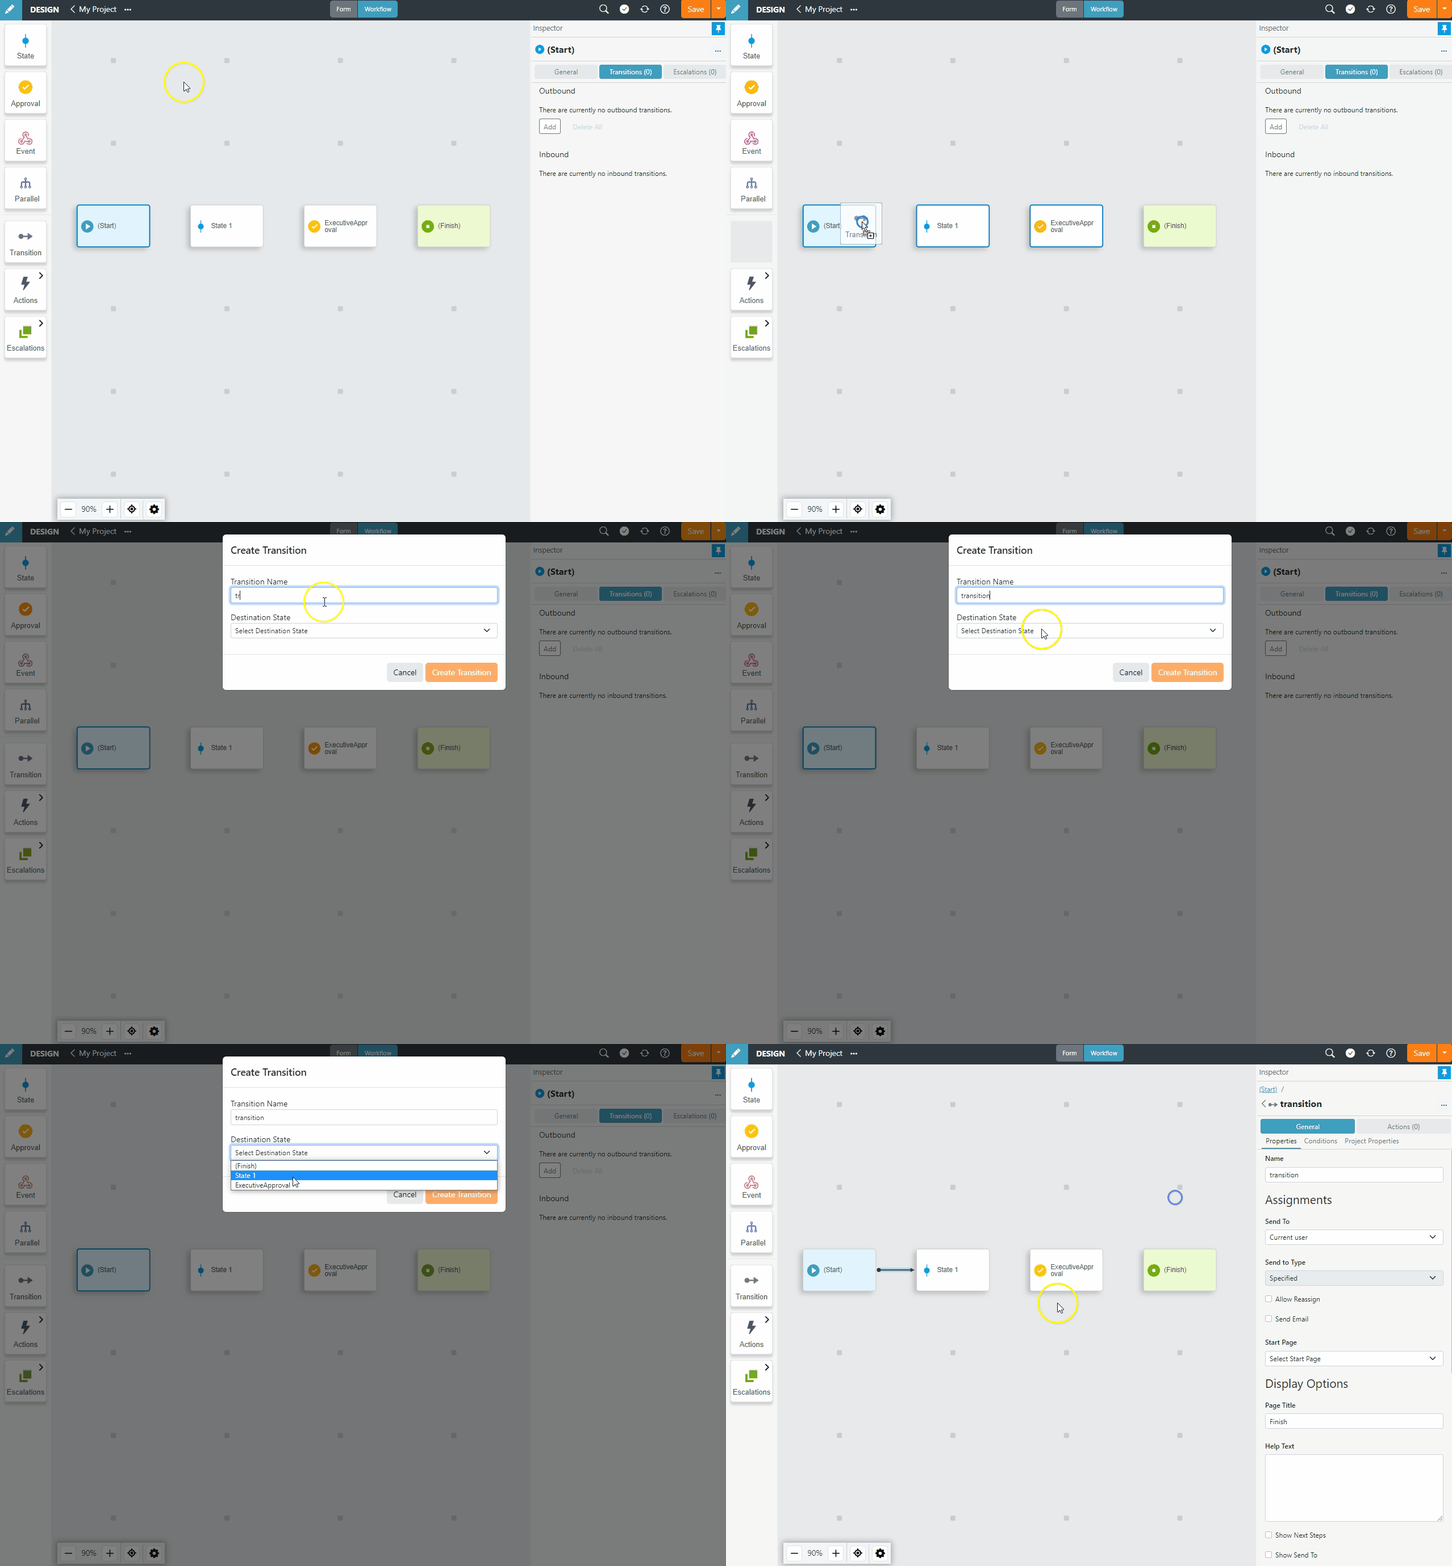
Option 2: Drag and drop a Transition from the left panel.
To complete this method, click and drag the Transition block from the left panel and drag onto the source/starting state. The Create Transition dialog will display allowing you to select a destination state to complete the transition creation.
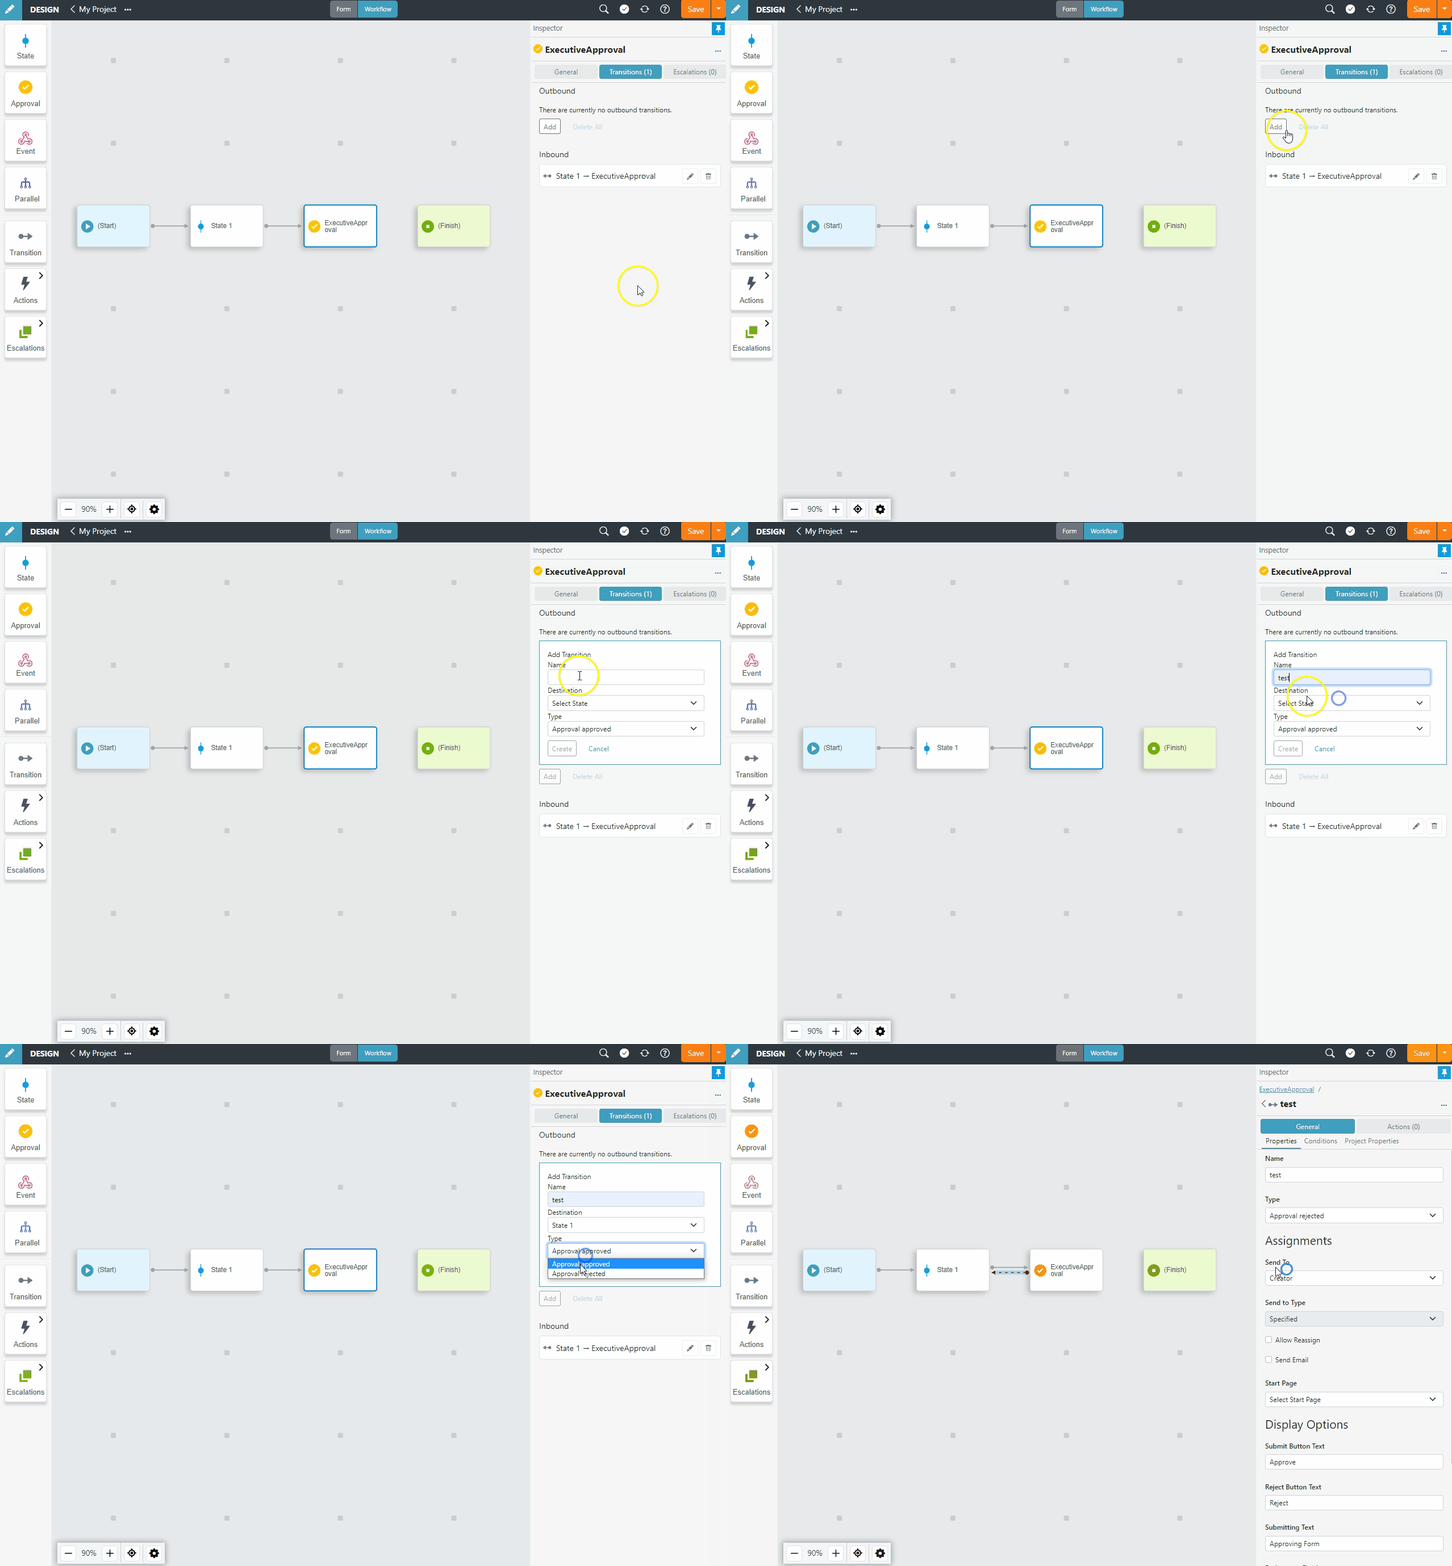
Option 3: Add a Transition from the Transitions tab of the source state.
Click to select the source/starting state for the transition, then click the Transitions tab. Under the Outbound section, click Add to reveal the Add Transition panel. Provide an optional name, and select the destination state, then click Create.
The new transition will be automatically selected to allow you to configure its properties in the Inspector panel.
Transition Properties
General Tab
Type
Appears only when the transition is leaving an approval state and defines whether the transition applies if the approval is approved/rejected. Default is approved.
NoteApproved/Rejected transitions will appear with a green/red dot respectively.
Assignments
This section defines who the next state will be assigned to.
Send To
- Creator – Assign the state to the user who originally created the workflow.
- Current User – Assign the state to the user who is completing the current state, which creates a chain of states that need to be completed by a single user. This is often used to break bigger workflows into smaller chunks (part A, part B, etc.)
- Previous – Assign the state to the owner of the previous state, useful for returning workflows for edits.
- User – Assign the workflow to a specific User.
- Group – Assign the workflow to a specific Group.
- Unlock on Exit – When workflows states are assigned to a group, only one person can work on the form at a time. This means that when a user opens a workflow, this user locks the form to themselves. If the user does not complete the workflow in one session, this option, on by default, ensures that the workflow will be unlocked when the user leaves the forms enabling someone else in the group to continue working on the form.
- Temporary user – Assign the workflow to Guest or Anonymous users. For more information, refer to Temporary Users.
Send to Type
Send to Type only applies to user and group assignments and defines how the specific recipient should be selected.
- Specified – Pre-assign the workflow state to a particular user or group.
- Search – Provides an option where the user completing a form can search for a user or group of their choice.
- Question Reference – Links to a question reference that resolves to a named user or group to assign the workflow to. For example, a data connection could be used to determine an appropriate manager. References must resolve exactly to a specific username or group name.
Allow Reassign
Allows an in-progress workflow to be reassigned. When selected, select who will be given reassign rights:
- By Current Assignee – (Default) The person currently assigned to the workflow. This user can click the Reassign button from the Home page or a Dashboard.

- By Creator – Whoever submitted the first form
- By Previous Assignee – The person who assigned the workflow to the current assignee
The Creator and Previous Assignee user types can reassign from Produce > Form Activity for a workflow that they have are a part of.
Send Email
Defines whether to send a notification email to alert the recipient that a workflow has been transitioned to them.
- Send Email (ON by default) – This will send an email to whoever the state is assigned to.
- Email Subject/Body – Content of the email
Communication Template SubjectIf selecting an Email Communication Template for the Assignment email, the Email Subject on this screen will override the Subject on the Communication Template. To use the Communication Template Subject, remove the contents of the Email Subject option on this screen.
The Email Subject and Email Body have defaults that are the same as what currently gets sent for transitions. It also supports Question References as well as some keyword references. Here are some examples:
[ProjectLink]– Puts in a link to the task in Produce[Comments]– The comments added before submission[ProjectName]– Name of the Project[StateName]– Name of the State that has been transitioned to
Start Page
Allows the designer to specify on which particular page the form will be loaded, often used for skipping content that is generally not relevant because it has been completed by another user, while still allowing the user to navigate back to said content.
Display Options
- Page Title – Title of the page where the user decides assignment for next state.
- Help Text – Help Text displayed on the final page where the assignment is defined by the user.
- Show Next Steps – Displays Name of next State.
- Show Comment – Default comment, which may contain question refences, included in comments textbox..
- Comment Mandatory – Enforces user to provide a comment.
- Default Comment – Default comment included in comments textbox.
- Submit Button Text – Button Text.
- Submitting Text – Text displayed while a form is submitting.
- Redirect on Finish – When selected will prompt whether to go back to the home page or a particular form or URL after finishing the form.
- When redirecting to a URL, the particular URL will need to be specified whereas for redirecting to a project, properties can be specified (optional). See Project Properties for more information.
- When redirecting to Home, a message can be optionally displayed to the user to confirm their submission.
Generate
Allows the designer to specify documents to be available to be downloaded when the transition is triggered.

The document is only required to be selected here if the user will download it. Actions requiring the document to be generated are specified on the Action Documents tab of the Action itself.
Transition Conditions
In some cases, a state may have multiple transitions to other states. For example, if the workflow is an approval process and the workflow is approved, it will go to one state. If the approver doesn't approve, it may go to another state. This can be defined within the transition conditions.
Transition conditions work the same as all other conditions within SmartIQ. However, the only available condition type is Answer Value.
Adding Actions to Workflow Transitions
Actions can be added to transitions in a workflow by dragging an action from the left panel to the transition.
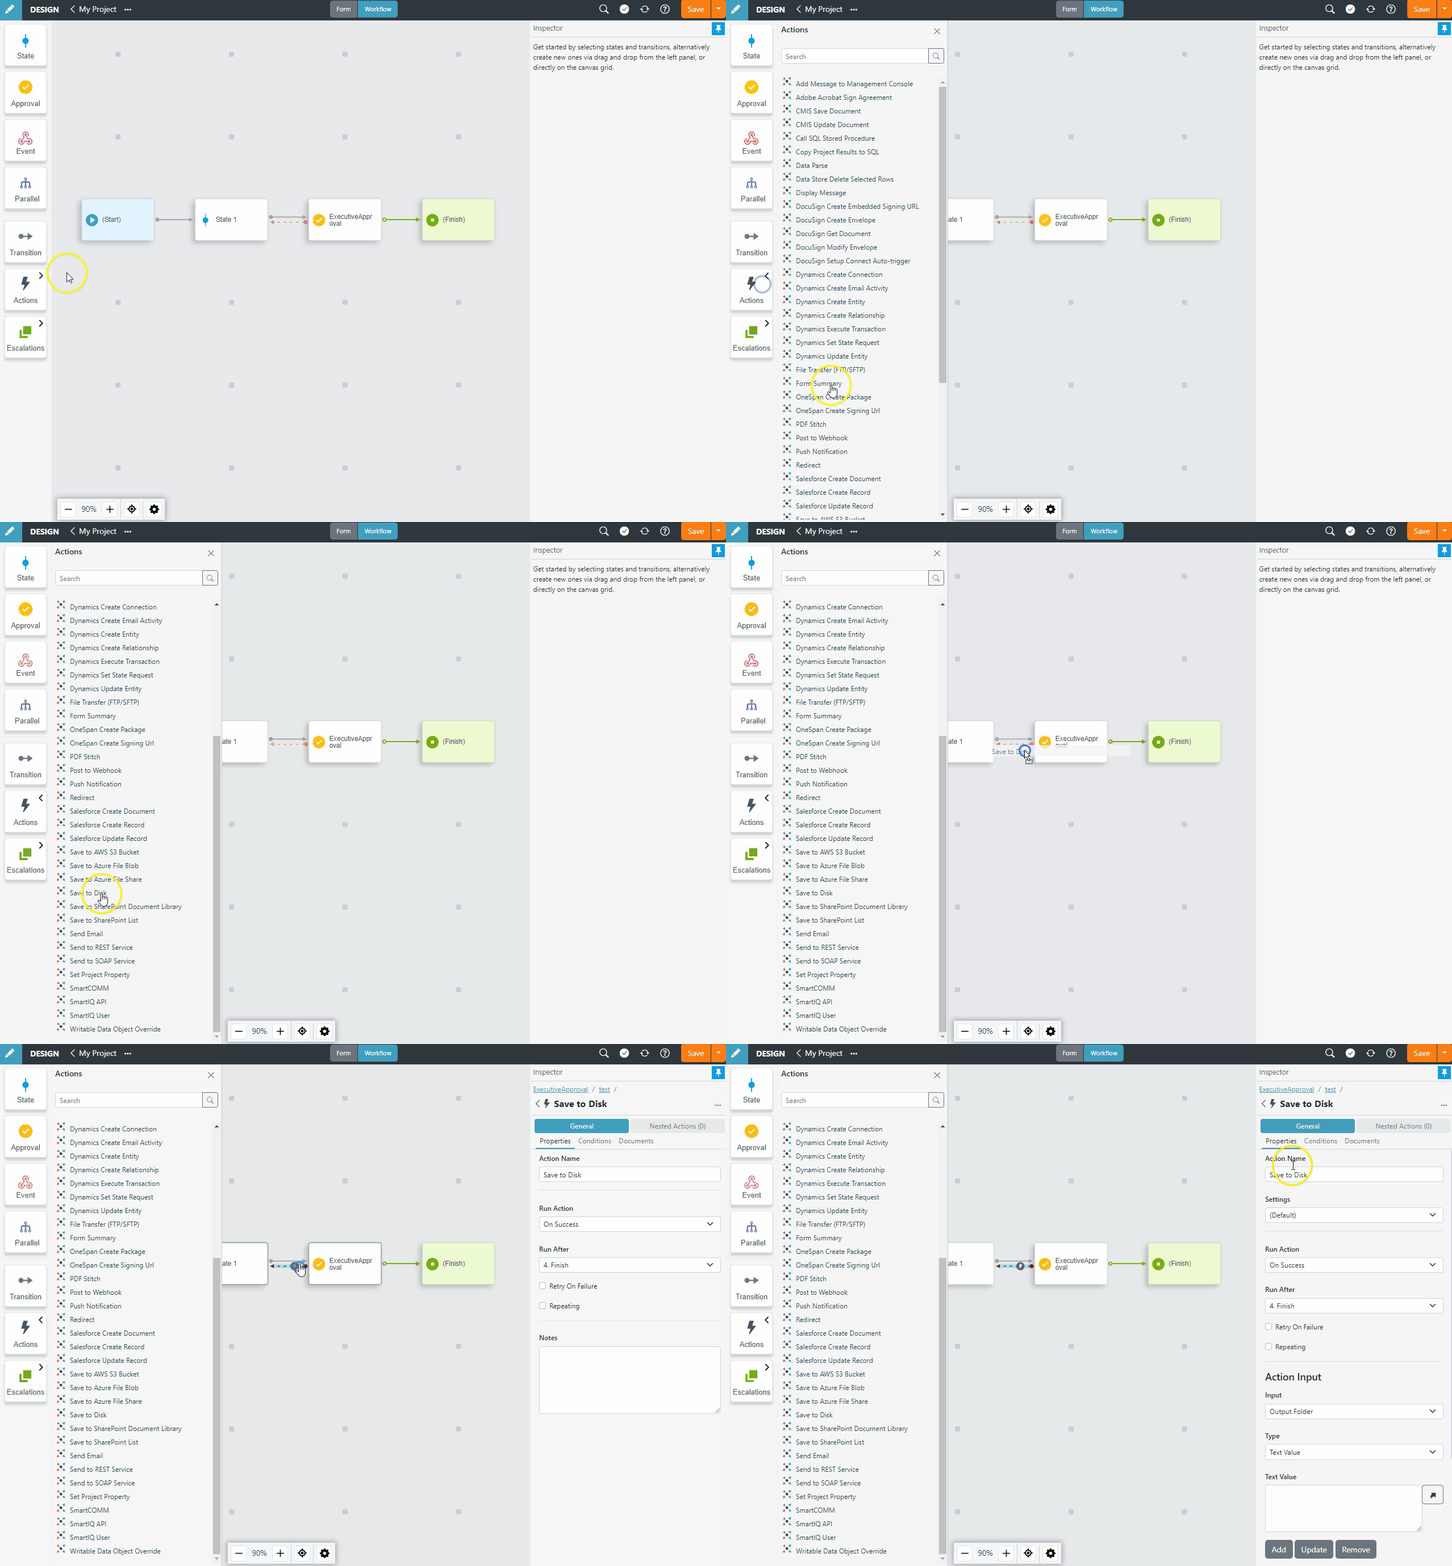
Alternatively:
- Open the workflow canvas in Design.
- Select the workflow transition where one or more Action needs to occur.
- Click the Actions tab on the Inspector Panel.
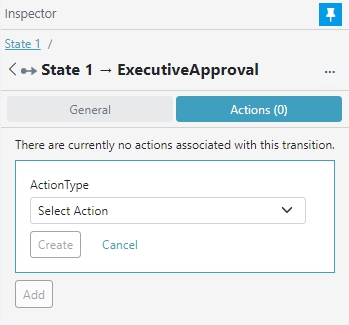
- Select an action from the drop-down list.
- Click Create. The Action Properties are displayed.
Reordering Actions
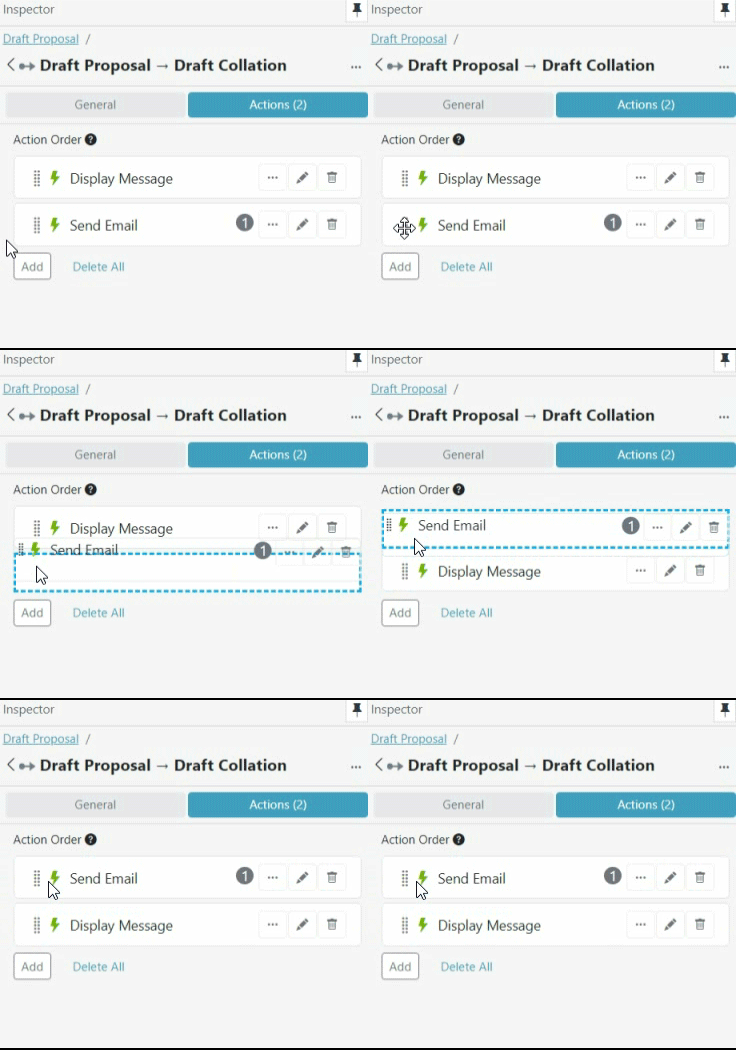
Actions can be easily re-ordered via drag and drop, or using the Move Up and Move Down options in the More Options (...) menu. You can also copy Actions from the current transition to another one in the project using the More Options (...) menu.
Workflow Transition Sequence
When a workflow transitions between states, a number of operations are performed in order. These operations are separated into stages to allow for control over the ordering of Actions which are associated with the state.
The sequence of a workflow transition is as follows:
- Actions set to "Run After Submit" are executed
- Data stores are executed
- Documents are generated
- Actions set to "Run After Document Generation" are executed
- Next workflow state is created
- If the task is to be assigned to a Temporary User, the user is created
- Actions set to "Run After Workflow Assignment" are executed
- Notification of the workflow task is sent to the assigned user/group
- Escalations are generated and stored
- Actions set to "Run After Finish" are executed
The main stage of interest is usually Document Generation; Actions which run before this stage are unable to use generated documents but are able to generate documents for use by later actions. Actions which run after Document Generation are unable to have their documents used by other actions, but can make use of documents generated by Actions which ran earlier.
See the Actions Overview page for details of how to set an Action to run at a specific stage of the workflow generation.
Updated 9 months ago
