
JSON Data Connector
It is possible to pull data from a local JSON file (accessible by SmartIQ Web App Server) and use it within an SmartIQ Project.
Key Concepts
JSON (JavaScript Object Notation) is a lightweight data-interchange format. It is easy for humans to read and write. It is easy for machines to parse and generate. It is based on a subset of the JavaScript Programming Language, Standard ECMA-262 3rd Edition - December 1999. JSON is a text format that is completely language independent but uses conventions that are familiar to programmers of the C-family of languages, including C, C++, C#, Java, JavaScript, Perl, Python, and many others. These properties make JSON an ideal data-interchange language.
JSON Schema is a vocabulary that allows you to annotate and validate JSON documents.
1. Create JSON and Schema files
SmartIQ JSON Data Source requires two files, create and save these files in SmartIQ App Server.
JSON: File with data to be used within SmartIQ
{
    "person":[
        {
            "name": "John Doe",
            "dateOfBirth": "29/06/1985",
            "eMail": "[email protected]",
            "assets": [
                {
                    "type": "Car",
                    "value": "7000",
                    "description": "Jeep Grand Cherokee"
                },
                {
                    "type": "Car",
                    "value": "15000",
                    "description": "Hyundai - i30"
                },
                {
                    "type": "House",
                    "value": "400000",
                    "description": "Sydney - Australia"
                }
            ]
        },
        {
            "name": "Steven Smith",
            "dateOfBirth": "15/06/1950",
            "eMail": "[email protected]",
            "assets": [
                {
                    "type": "Apartment",
                    "value": "500000",
                    "description": "By the lake - Melbourne - Australia"
                }
            ]
        },
        {
            "name": "Rose Mathews",
            "dateOfBirth": "15/04/1931",
            "eMail": "[email protected]",
            "assets": [
                {
                    "type": "Apartment",
                    "value": "1000000",
                    "description": "Brisbane"
                },
                {
                    "type": "Apartment",
                    "value": "650000",
                    "description": "Canberra"
                },
                {
                    "type": "House",
                    "value": "720000",
                    "description": "Perth"
                },
                {
                    "type": "Car",
                    "value": "34000",
                    "description": "Audi - t3"
                }
            ]
        }
    ]
}
JSON Schema: Definition that specifies filter and display fields used in Data Object.
{
    "$schema": "http://json-schema.org/draft-04/schema#",
    "definitions": {},
    "id": "Infiniti",
    "properties": {
        "person": {
            "id": "/properties/person",
            "items": {
                "id": "/properties/person/items",
                "properties": {
                    "assets": {
                        "id": "/properties/person/items/properties/assets",
                        "items": {
                            "id": "/properties/person/items/properties/assets/items",
                            "properties": {
                                "description": {
                                    "id": "/properties/person/items/properties/assets/items/properties/description",
                                    "type": "string"
                                },
                                "type": {
                                    "id": "/properties/person/items/properties/assets/items/properties/type",
                                    "type": "string"
                                },
                                "value": {
                                    "id": "/properties/person/items/properties/assets/items/properties/value",
                                    "type": "string"
                                }
                            },
                            "type": "object"
                        },
                        "type": "array"
                    },
                    "dateOfBirth": {
                        "id": "/properties/person/items/properties/dateOfBirth",
                        "type": "string"
                    },
                    "eMail": {
                        "id": "/properties/person/items/properties/eMail",
                        "type": "string"
                    },
                    "name": {
                        "id": "/properties/person/items/properties/name",
                        "type": "string"
                    }
                },
                "type": "object"
            },
            "type": "array"
        }
    },
    "type": "object"
}
2. Create a SmartIQ JSON Data Source in Manage
Navigate to SmartIQ Manage and click on Data Sources in the right side menu.
- Change Data Source Name to "JSON Datasource".
- Select Connection Type as JSON.
- Upload the schema and default data files; OR
- Connection string can to reference both path files if they are located at a suitable url, using the key words: schema and json
schema=http://[jsonserverurl]/example.schema.json;json=http://[jsonserverurl]example.json- Click "Test Connection" to validate SmartIQ is able to establish connection with json and schema files.
- Click "Save".
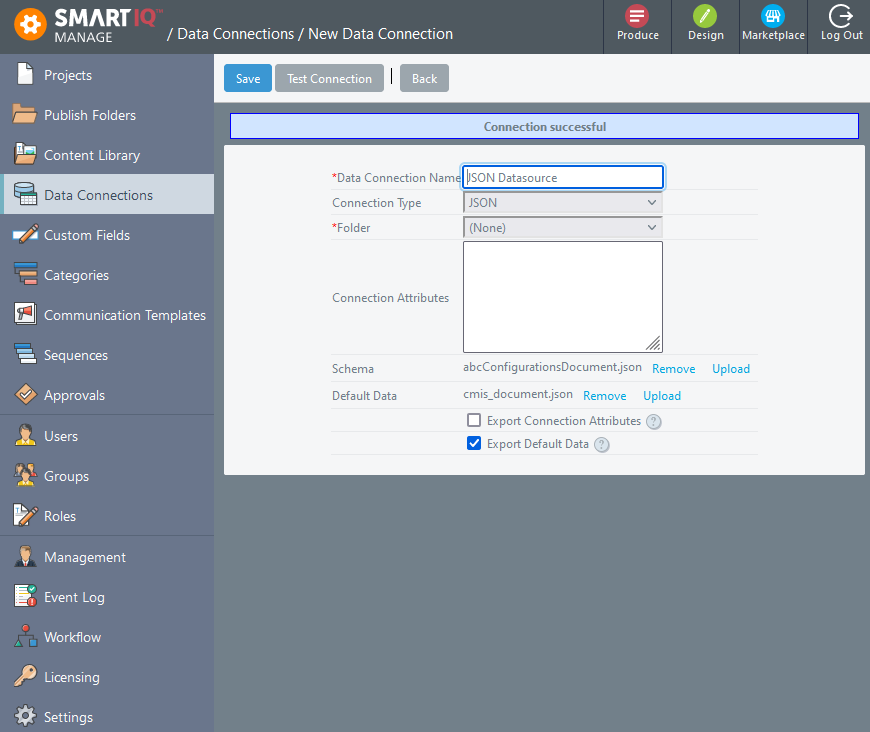

Good PracticeIt is recommended to enable "Allow Connection Export" or "Export Default Data" depending on the setup, as it will make the data source part of a project definition allowing to import it in a different environment.
3. Create JSON Data Object
After saving JSON Data Source in Manage, click on "Data Objects" button. This will bring a new window with all available Data Objects for this particular Data Source.
-
Click on **"New Data Object". Provide following information:
Object Type: File
Data Object Name / Definition: Assets
Display Name: Assets -
Add all filter fields clicking on "Add All >>" button.
-
Click "Save" button.

Setting up a JSON data source
JSON datasources are often hierarchical.
See here for an example
In this example the root array in this schema is a named object (students). students is considered a property of the root. There may be multiple properties on the root (even though there isn't in this case). For this reason, the SmartIQ platform has to treat this datasource as hierarchical.
When configuring this datasource in Design, there has to be a datasource that points to the root, which just has one property (students). There's no way to display that data on the form, however, a hierarchical child datasource can get the properties of the individual items in the data source.
The link above explains how to configure a hierarchical datasource.
Legacy JSON Date Handling
In versions prior to v11, Infiniti always handled any data from a JSON or REST data source that looked like a date as a date, regardless of the underlying data type. This sometimes caused issues where values that were intended to remain as strings were being interpreted incorrectly.
Infiniti v11 introduces a new way of handling dates, where the data type must be defined as 'date-time' before treating a value as a date. Strings will be treated just as strings, reducing the issues associated with incorrectly applying date formatting. Further, if you wish to treat a string as a date you will need to apply a format to it, e.g. 'yyyy-MM-ddThh:mm:ss.fffffff'.
This feature also provides a backwards compatibility mode through a new connection string attribute - 'datemode=v10'. This attribute is automatically added to existing JSON and REST data sources for environments upgraded from earlier versions, to reduce the likelihood of introducing upgrade related issues. Any new data source added will not include this attribute automatically, so to apply simply add 'datemode=v10' into the relevant data source connection string in Manage.
Updated about 1 year ago