OneSpan Connector
OneSpan ModuleContact your sales representative if you are interested in obtaining a license for the OneSpan module for your SmartIQ instance.
Overview
SmartIQ integrates with OneSpan Sign to provide the option of electronically signing documents for end to end digital transactions.
Actions
The connector consists of the following actions:
Connector Settings
- Obtain a license for the OneSpan Module and open the SmartIQ Manage application and log in as an Administrator with Change settings permission.
- Configure the default values in Settings > OneSpan.
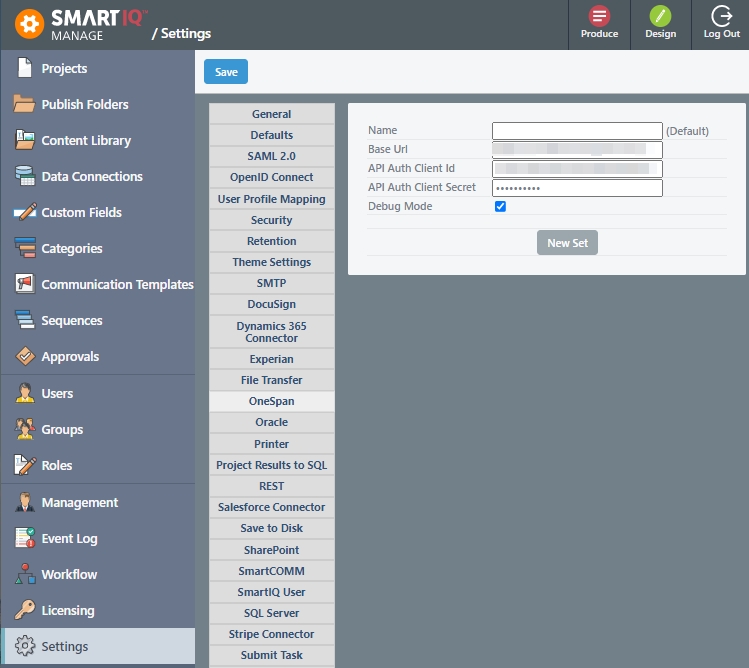
| Setting | Description |
|---|---|
| Name | Specify a name. |
| Base URL | Specify the URL of the OneSpan Sign environment. |
| API Auth Client Id | Enter the OneSpan Client Id that will be used for authentication. |
| API Auth Client Secret | Enter the OneSpan Client Secret that will be used for authentication. |
| Debug | If enabled, will log additional information that can be found in Manage > Management. |
-
(Optional) For multiple OneSpan accounts:
- Click the New Set button to create additional accounts. For example, Sandbox and Production.
- Click the Set as Default button to change the default connector set. If the previous Default was set in Design, SmartIQ will now use the new Default connector values.
-
Click Save.
OneSpan Create Package Action
OneSpan Create Package Action supports sending OneSpan packages with multiple documents for one or more users to sign. This action also provides the ability to specify the order of signage. For example, the Manager (1) signs then the Executive (2) signs and then the CEO (3), etc.
The packages can be sent via "Draft or Sent" mode, with the ability to require signatures via either:
-
Positional Placement – Add a signature input using a page number as well as left and top co-ordinates on where the signature will be placed. For example, page 2, left 100, top 200. For more information, refer to this article.
-
Text Anchors – Add a signature input using an instance of an anchor keyword. For example, Add a signature after the text "Please sign here". For more information, refer to this article.
-
Text Tags – A OneSpan convention to populate the document with signature inputs using the convention {{esl:roleName:fieldType}}. For more information, refer to this article.
-
Accept Only – No specific signature input needed on the document but the user needs to click the "Accept" button to accept the whole document.
Authenticating Signers
Verify the identity of signers to add an extra layer of security to your online transactions. With the OneSpan Connector, there are several ways of verifying the identity of a package recipient before they are permitted to access the transaction's documents. These are:
- Knowledge-Based Authentication (KBA) – This option relies on a third-party KBA provider to verify a recipient's identity by asking them a series of questions about their personal credit report. That provider is either Equifax US or Equifax Canada.
KBA should be considered when it's important to reduce the risk of identity fraud, or when a signer is unknown (for example, opening a new account). For more information, refer to OneSpan Advanced Functionalities
PrerequisiteTo be able to use this feature, Equifax US and/or Equifax Canada should be enabled on your OneSpan account. If not, contact your OneSpan Support Team.
- SMS Authentication – OneSpan utilizes the given phone number to send the signer a single-use code through SMS when they access the package.
- General Authentication – Involves providing a series of question-and-answer values, which the signer has to answer when accessing the package. The mask input provides the option to hide or show the user's input (similar to passwords).
ImportantIt is possible to use Equifax KBA with either SMS Authentication or General Authentication, but it is NOT possible to use both SMS Authentication and General Authentication simultaneously.
Creating the OneSpan Package
-
In Design, open a project and create a form.
-
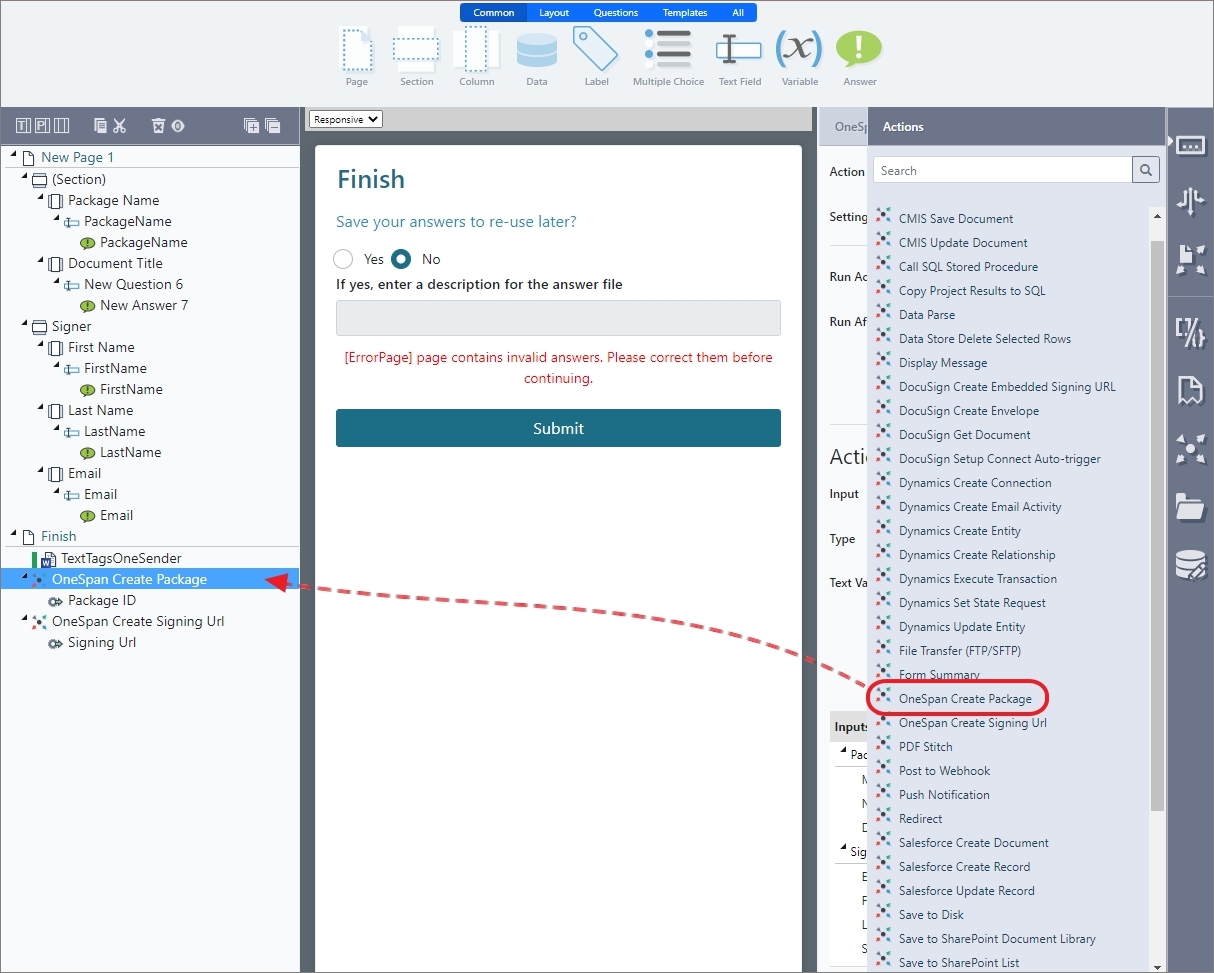
Drag and drop the OneSpan Create Package action onto the finish section.
NoteIf the OneSpan Create Package action is not in the list of available actions, contact your sales representative to obtain a license for your SmartIQ instance.
- Once added, configure the default action inputs.
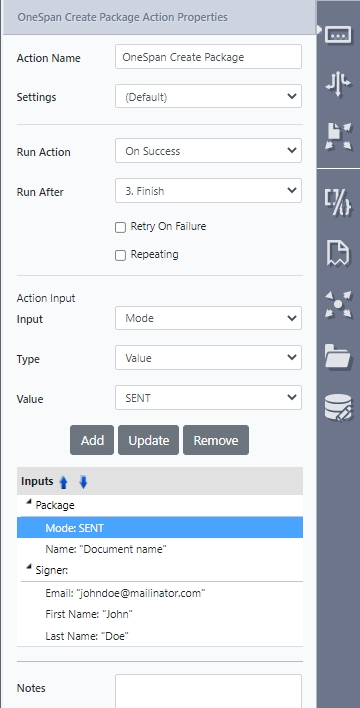
Action Inputs
Input | Description |
|---|---|
Package | The following inputs are required to send a OneSpan package:
They are detailed below. |
| There are two values available:
|
| Package name |
| Use if you do not explicitly specify signatures within documents as inputs.
|
| The email address of the OneSpan Sender account that the recipients will see as the sender of the emails. If left blank, the sender will default to the owner account. |
Carbon-Copy Recipient | A carbon-copy recipient (also known as a CC recipient) is someone who receives a copy of a completed and signed document without being an active participant in the signing process. This is often used in situations where someone needs to be kept in the loop about the signing process but does not need to sign the document themselves. The following inputs are required to receive a copy of the completed and signed document:
If these inputs are specified, a recipient or group of recipients will be created wherein:
Once the document package is complete, all recipients will receive an email. However, because of a limitation in OneSpan, the carbon-copy recipient will also receive an additional an email inviting them to sign the documents. |
Reminders | Set package reminders for the users to sign if they haven't. Reminders are optional. If configuring Reminders, OneSpan needs all Action Inputs to be provided. If an Action Input is not provided, the default value will be sent to OneSpan. |
| Waits a certain amount of days before sending the first reminder. Defaults to 1. |
| Number of times the reminder will be repeated after the initial reminder. Defaults to 0 with a maximum of 5. |
| Frequency of the reminders. Defaults to 1. |
Signer | Each signer is required to provide the following:
|
| Provide a series of question-and-answer values, which the signer will have to answer when accessing the package.
|
| Use if there is a text-tag document with specific roles defined. Otherwise, leave this option blank and the signers will be created as Signer1, Signer2, Signer3,... |
| Use if the signing ceremony has be done in sequential order. For example, if the signing order has been set as Signer1=1 and Signer2=2, If the signing order has been set as Signer1=1, Signer2=1 and Signer3=2, Signer3 will only receive the notification to sign after Signer1 and Signer 2 have finished. |
| Use to add more content to the message that gets sent with the email. |
| If true, will email the signed documents as an attachment after the signing ceremony have completed. If false or not specified, will email the signer with a link to view or download the documents. |
| If true, will set a permission on the Package enabling additional features within OneSpan to delegate/reassign a signing task to another OneSpan user |
Document | Use only if there is a need to define specific signatures. |
| Used if you don't explicitly specify signatures within this document and have specified text tags in the document or just want to offer the signer the ACCEPT_ONLY option for this document. Use if you do not explicitly specify signatures within this document as inputs.
|
| Document name |
Signature | A signature input is required if you want to define the signature.
|
| Required, if defining a signature.
|
| Use to define signature locations on a position.
**Note:**OneSpan documentation uses 0 to mean the first page. However the connector uses 1 to display as the first page.
|
|
**Note:**The text is case sensitive and the action will fail if the document is unable to find the specified text.
|
Knowledge-Based Authentication | Knowledge-Based Authentication (KBA) asks a signer dynamically generated questions based on information in the signer's personal Credit Report. Once a signer has answered all KBA questions correctly, they can click Submit to begin signing documents. |
| Include the following credit history-related questions for signers when adding them via KBA authentication using Equifax USA:
|
| Include the following credit history-related questions for signers when adding them via KBA authentication using Equifax Canada:
|
SMS Authentication phone number | To enable SMS authentication, OneSpan will utilize this input to send a unique code via text message to the signer when they attempt to access the package. |
OneSpan Create Signing Url
The OneSpan Create Signing Url Action takes a created OneSpan package and returns a Uri, which can be used with the SmartIQ Redirect Action to take the end user from the SmartIQ submission page, directly into the package signing ceremony for the given signer id.
Using the Action
-
Drag and drop the OneSpan Create Signing Url Action onto the finish section.
-
Add the following inputs:
| Input | Descriptions |
|---|---|
| Package Id | The signing ceremony unique identifier, usually mapped from the OneSpan Create Package Action Package Id Output |
| Signer Id | Unique identifier of the signer who the url is being retrieved for. The OneSpan Create Signing Url Action will check if the Signer Id is valid for the given package prior to attempting to retrieve the signing url. |
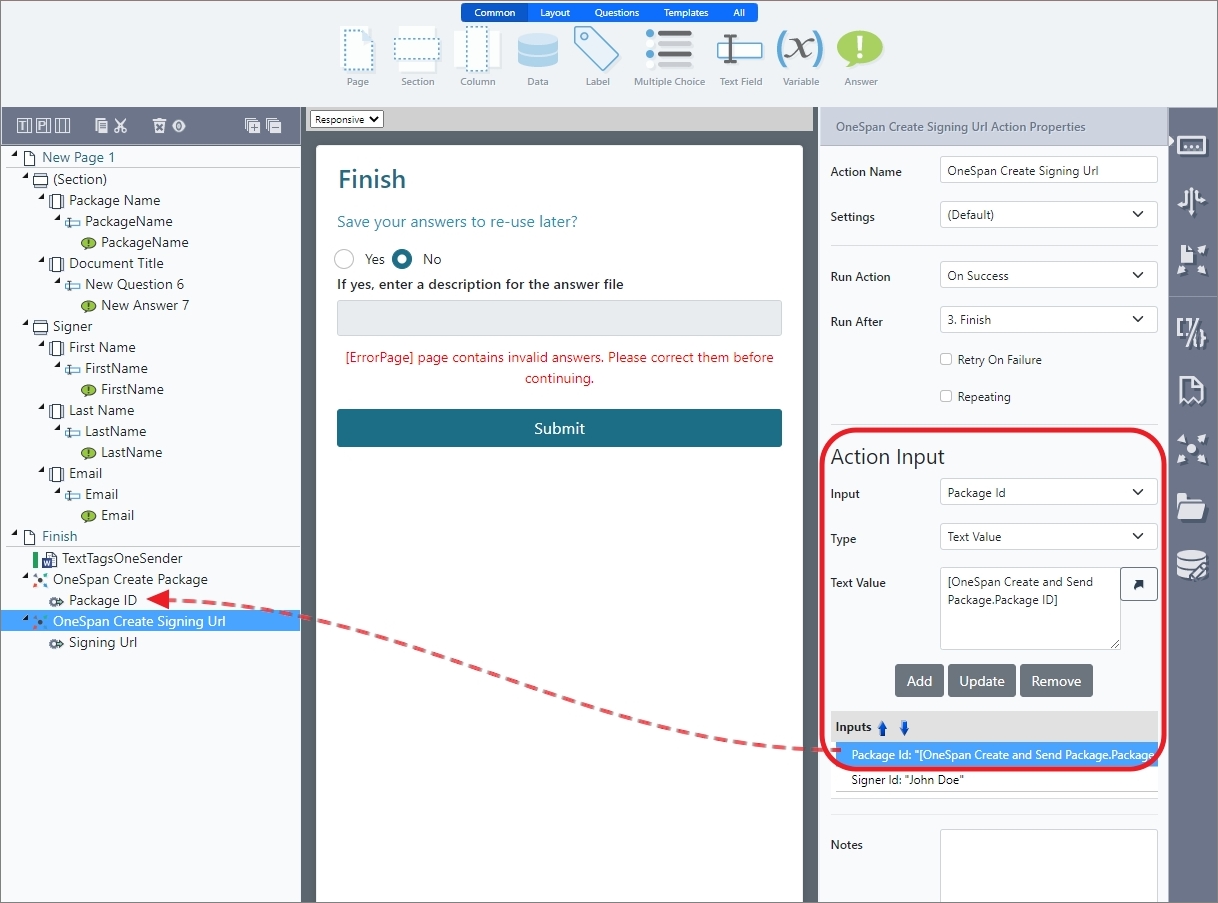
- Optionally, Add a Redirect Action] and map the URL to the Signing Url Output.
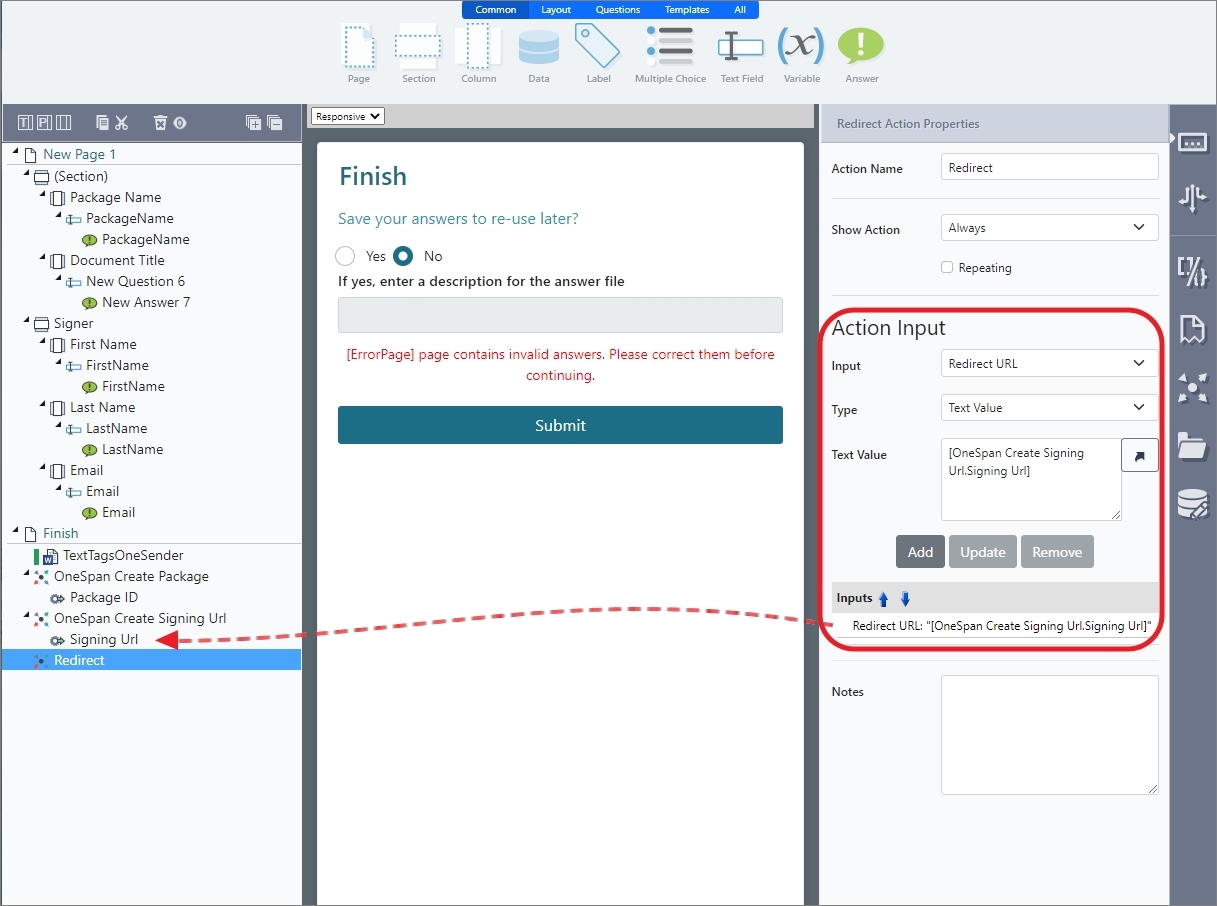
- Save the project.
OneSpan Update Package
The OneSpan Update Package action allows the designer to perform basic alterations on OneSpan packages, like:
- Trashing (soft-deleting) a package
- Changing a package's status
- Re-send package notification(s) to recipient(s)
- Add a signer to the package
- Remove a signer from the package
- Remove a document from the package
NoteTrashing the package, changing its status, or re-sending notifications CANNOT be done in conjunction with other operations, while Adding a signer, removing a signer, or removing a document can all be done in conjunction with another operation, as necessary.
Input | Descriptions |
|---|---|
Package Id (Required) | The signing ceremony unique identifier, usually mapped from the OneSpan Create Package Action Package Id Output |
Trash Package | True/False
Note: No action is taken if the package is already in the requested state. |
Change Status | Changes the status to Sent, Draft, or Expired. For more information, refer to Package lifecycle. Note: No action is taken if the package is already in the requested state. |
Resend Notifications | Re-sends the notifications to package recipients Note: No action is taken if the specified recipient(s) is/are not found in the package. |
| The email address of the recipient to re-notify. The notification is skipped if the given recipient email does not exist in the package. |
| The message to send to the recipient. |
Add Signer | Adds a signer to the package. |
| Whether or not to deliver documents to the signer by email |
| The signer's email address |
| The message to send to the signer |
| The signer's first name |
| The signer's last name |
| The order to put the signer in |
Remove Signer | Removing a signer from the package. Note: No action is taken if the specified signer is not found in the package. |
| True/False Whether to match the signer by name or email when finding them in the package. Defaults to false (name) if not supplied. |
| The Signer name or email |
Remove Documents | Removes a document from the package. Note: No action is taken if the specified document is not found in the package. |
| Name of the document |
OneSpan Download Document
This action allows the download of one or all documents associated with a OneSpan package as well as an audit trail.
The document retrieve must happen after the signing ceremony for the package has already been completed.
Action Inputs
Input | Use |
|---|---|
Package ID | The ID of the OneSpan Package generated when passing the OneSpan create package action |
Document Display Name | The file name for the downloaded document |
Download | the type of document to be downloaded: Single Document - Download a single document associated with the Package Zip - Download a zip containing all documents associated with the Package Audit Trail - Download the OneSpan PDF Audit Trail document Zip with Audit Trail - Download the zip contain all documents associated with the Package including the Audit Trail |
Document ID | The Document ID is retrievable from the OneSpan API using a REST data connection |
Updated 9 months ago
