Approvals Manage
An Approval is a step in a workflow where the responses provided in the form thus far can be reviewed and commented on in produce by the assigned approvers before progressing. Commenting on a question is only available where the Question comments are enabled.
Approvals are managed centrally and can be reused across multiple Workflow Approvals. Approvals must be created in Manage before they can be added to a workflow.

If appropriate Communication Templates have been configured, Approvals automatically send email notifications when new requests are submitted, comments are provided etc.
Only the requester can make changes to the form questions
The requester is the user that actioned the form setting-off the conditions for transition to approval.
Approvers can only approve and make comments.
Approval Clause Builder
The clause builder allows managers to explicitly define the logic chain of approval required for form sign-off. Parties required for the approval within the logic can be defined on a group or individual user basis.
For group clauses, you can indicate how many members of that group need to approve to satisfy the clause and select from one of the following:
- Specified – Lets you select from the drop-down list of available user groups.
- Reference – Lets you specify a Reference Tag name that can later be mapped to a data source in the form. For example, a ‘Manager’ clause might be mapped to a data question that is configured to retrieve the requester’s manager from the HR System or from referenced question and answer values.
User clauses require a Reference Tag name that can later be mapped to a data source in the form. For example, a ‘supervisor’ clause might be mapped to a data question that is configured to retrieve the requester’s supervisor from the HR System.
If you are editing an existing approval, click the Update button before saving.
All Of, Any Of and Then Clauses
There are three clause group types:
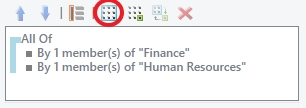
All Of – All clauses within the group have to be met in any order. In the example below, the Finance and Human Resource groups have to approve. Who approves first is not important as long as both approve.
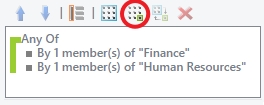
Any Of – Any Of groups need only one individual clause to be met. In the example below, the first member of Finance or Human Resources to approve will progress the entire approval.
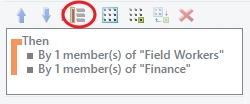
Then – Sub clauses need to be met in order. Members of the later sub clauses will not be able to approve before preceding sub clauses are met. Useful for situations where layers of approvals should occur. For example, do not bother the CEO until branch feedback/approvals have been actioned. In the example below, the Field Worker clause has to be met before the Approval can proceed to Finance. Finance will not be notified of the approval until the “Field Worker” clause has been met.
You can also change the following:
- Convert state by selecting the state you want to change and click the Convert state button to change from All Of to Any Of or vice versa.
- Change order of priority by selecting the clause and then clicking the up and down arrows to move a clause up or down.
Nesting Then, All Of and Any Of Groups
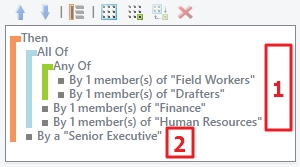
In the example below, All Of and Any Of are nested within a Then. SmartIQ will process the clauses sequentially, starting with number 1 and will only proceed to the next clause if the previous clause has been satisfied. The last Approver would be number 4, or an Executive.
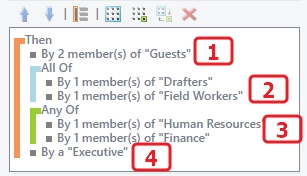
The second example is where Any Of is nested within All Of, which is then nested within Then. All of number 1 has to be satisfied before it proceeds to number 2.
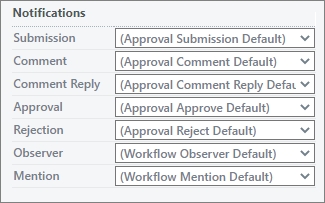
Notifications
Specify Communication Templates for notifications when specific events occur
| Event | Description |
|---|---|
| Submission | The Requester receives the notification after submitting or starting a form |
| Comment | Only the Requester receives a notification if someone commented on the form |
| Comment Reply | The Requester as well as other active users will receive the notification if someone replied to the comment on the form |
| Approval | Only the Requester receives a notification if the form has been approved |
| Rejection | Only the Requester receives a notification if the form has been rejected |
| Observer | Users and groups designated as Observers will receive a notification with a link to the project |
| Mention | Any user mentioned in an Approval state will receive a notification with a link to the project |
After setting up the Approvals, the following buttons will also appear:
-
Version History button to check any changes that have been made and by whom. There is also a Restore link that will appear next to a version if there are more than two changes that have been made. Restoring discards any changes that have been made after that date.
-
Related Projects to see any projects that use this Approval. These are projects that will be affected if you make changes to this Approval.
Approval View Types
Select a View type which will define how the approval is displayed and actioned in produce
| Display Type | |
|---|---|
| Form | The form is displayed using pages and the Approver will have to use the next and back buttons to view the request. |
| Summary | Shows all the fields on one page using a form summary view. Useful for small-medium sized forms, where the request can be displayed without too much scrolling. Collapsible pages Group pages in an accordion style tab group, Include all multiple choice answers Displays all the answers and highlights the selected answer, and answered questions only Only include questions that have been answered. |
| Mentions | Gives the option to engage additional users or invite them to a workflow by mentioning them in a comment by using the ‘@’ syntax. Any user mentioned will receive an email notification with a link to the state or comment. |
Email Approval
Sometimes there is the desire for a simple decision to be made on a form that doesn’t warrant loading the whole form. An example might be an approval step… Sometimes the approver may just want to approve the work without viewing it, perhaps because the work came from a trusted source.
SmartIQ allows the definition of an “email approval” or “choice” in this kind of scenario. A designer can define that an email (or other HTML producing action) can contain this choice, either as a button or a link. When that button/link is clicked, SmartIQwill take the same action as if the person had logged into SmartIQ loaded the form in Produce, made the appropriate action (such as ticked “approve”) and submitted the form.
Safe Links will prevent the proper use of this feature
Microsoft Outlook's anti-phishing "feature" effectively clicks on every link it finds in an email to check it's safe and SmartIQ has no way to know that the click that comes from Safe Links is not a user. Other email programs or security software may implement similar safe links features.
This will result in the following message: This task has not been found. It may have already been actioned when the email recipient attempts to click on any of the "choice" links in their email.
For this reason, if your users are likely to be using Outlook or have this sort of security enabled on their email, the use of "choice" links is not recommended.
Usage
A choice is defined by a special style of question reference that takes the following form:
[Choice.q1.1]
Where q1.1 is a reference to a multiple choice answer in the form.
This question reference will resolve itself to a button that will have text equal to the display text of the multiple choice answer.
This button can be included in an email or any other action. When clicked, a link behind the button will call SmartIQ and SmartIQ will, behind the scenes, load up the form in its current state, select the reference multiple choice answer and then attempt to “submit” the form.
Therefore, if Conditions that reference the multiple choice answer control workflow from that state, then the form will be moved to that next state without the person who received the email having to interact with SmartIQ at all.
Options
A few options can be used to customise the appearance of a Choice reference. These are applied by adding | separated values to the reference. For example, the following reference will display as a link instead of a button and will have the text “Approve Now” instead of the display text of q1.1:
[Choice.q1.1|type=link|text=Approve Now]
The following options are available:
| Name | Description |
|---|---|
| Type | Default: buttonValid Types:
|
| Text | Applies only to button and link typeAllows the definition of the text that should be displayed on the button/link |
| Commenting | True/FalseDefault: TrueDefines whether or not a comment can be defined for the workflow transition that will occur when the receiver makes a decision. Currently, the comment can only be defined by being passed in on the URL of the link. This is a query string parameter in the form of “comment=XXXX”. |
Example using URLOnly Type
Following sample code can be added to the Label to format button
<table width="100%" border="0" cellspacing="0">
<tbody>
<tr>
<td>
<table border="0" cellspacing="0">
<tbody>
<tr><!--Approve-->
<td style="background-color: #4ecdc4; border-color: #4c5764; border: 2px solid #45b7af; padding: 10px; text-align: center;"><a style="display: block; color: #ffffff; font-size: 12px; text-decoration: none; text-transform: uppercase;" href="[Choice.q2.2|type=UrlOnly]&comment=Approved" target="_blank">Approve Request</a></td>
<td></td>
<!--Reject-->
<td style="background-color: #dd5a5a; border-color: #4c5764; border: 2px solid #a03d3d; padding: 10px; text-align: center;"><a style="display: block; color: #ffffff; font-size: 12px; text-decoration: none; text-transform: uppercase;" href="[Choice.q2.3|type=UrlOnly]&comment=Rejected" target="_blank">Reject Request</a></td>
<td></td>
<!--Return-->
<td style="background-color: #e8b04a; border-color: #4c5764; border: 2px solid #a57d35; padding: 10px; text-align: center;"><a style="display: block; color: #ffffff; font-size: 12px; text-decoration: none; text-transform: uppercase;" href="[Choice.q2.4|type=UrlOnly]&comment=Returned" target="_blank">Return to Travel Requester</a></td>
</tr>
</tbody>
</table>
</td>
</tr>
</tbody>
</table>
Adding Project Property values
The URLOnly type (or an external integration) can pass query parameters to the URL to set Project Properties in the target form. These can be added in the same format as the comment mentioned above:
[Choice.q2.2|type=UrlOnly]&Property1=value1
The above would set the value of "Property1" to "value1" when running the form, which can drive additional logic.

Ability to Customise Email Approval Features
Approval by emails are now accepting customisable message to be added to the the choice parameters. The Standard format is:
[Choice.{question reference}|type={button, link or urlonly}|message={inline message or question reference}]

Example:
[Choice.q1.1|type=urlonly|message=the request is approved]
[Choice.q1.1|type=link|message=[q2]]
Within the message parameter it is possible to use the special value {{message}} which will be replaced by the contents of the Email Approval Template defined in Communication Templates, if set. If the template is blank, the choice message will be displayed as it is.
Security Implications
Any unauthenticated person can call the URL contained in the email. This will trigger the execution of that choice regardless of who calls it. Therefore the use of this feature has to take into account the security implications.
SmartIQ minimises the security risk by ensuring that there is an id in the URL that cannot be guessed and is unique for each choice, for each form, for each person receiving it. For example, if the same multiple choice reference is used twice in the same action, there will be two different ids, even if both will do the same thing.
All URLs for a particular workflow state will cease to work once one of them has been actioned (or the form submitted via a different means – such as submitting via Produce).
Updated 3 months ago
