
REST Connector
The rest connector is for connecting to, and retrieving data from, REST API endpoints, supporting POST and GET methods.
Relevant
Connector Set-Up
See the REST Configuration Settings to set up the global connection settings. You will need to upload the APIs schema (swagger) JSON file to the connection, or set the swagger attribute to point to the swagger url, as JSON Data Connections require defined available filter and display fields. You are required to create a new Data Connection per Method.
Smart IQ supports OpenAPI 3.0 (sometimes mistakenly called swagger 3.0) and Swagger 2.0.
Read and Write API Support
In order to write data back to an API, only JSON Schema is supported. You can use OpenAPI to read and JSON Schema to write, but you will have to write and maintain two different schema definitions.
How to create a JSON Schema?
The easiest way to generate a JSON schema is taking a sample JSON response from the API and create a schema based on it.
There are a good number of online free tools and Integrated Development Environment (IDE) add-ons.
A straightforward way to test you have the correct endpoint, copy/paste the complete URL into a new tab in your browser, you should get a JSON response.
Swagger
Swagger Specification (OpenAPI) defines a standard, language-agnostic interface to RESTful APIs which allows both humans and computers to discover and understand the capabilities of the service without access to source code, documentation, or through network traffic inspection. When properly defined, a consumer can understand and interact with the remote service with a minimal amount of implementation logic.
An OpenAPI definition can then be used by documentation generation tools to display the API, code generation tools to generate servers and clients in various programming languages, testing tools, and many other use cases.
For more information, refer to Swagger (OpenAPI) Specification.
Swagger Definition Example
{
"swagger": "2.0",
"info": {
"description": "This is a sample server Petstore server. You can find out more about Swagger at [http://swagger.io](http://swagger.io) or on [irc.freenode.net, #swagger](http://swagger.io/irc/). For this sample, you can use the api key `special-key` to test the authorization filters.",
"version": "1.0.0",
"title": "Swagger Petstore",
"termsOfService": "http://swagger.io/terms/",
"contact": { "email": "[email protected]" },
"license": {
"name": "Apache 2.0",
"url": "http://www.apache.org/licenses/LICENSE-2.0.html"
}
},
"host": "petstore.swagger.io",
"basePath": "/v2",
"tags": [
{
"name": "pet",
"description": "Everything about your Pets",
"externalDocs": {
"description": "Find out more",
"url": "http://swagger.io"
}
},
{
"name": "store",
"description": "Access to Petstore orders"
},
{
"name": "user",
"description": "Operations about user",
"externalDocs": {
"description": "Find out more about our store",
"url": "http://swagger.io"
}
}
],
"schemes": [ "http" ],
"paths": {
"/pet": {
"post": {
"tags": [ "pet" ],
"summary": "Add a new pet to the store",
"description": "",
"operationId": "addPet",
"consumes": [ "application/json", "application/xml" ],
"produces": [ "application/xml", "application/json" ],
"parameters": [
{
"in": "body",
"name": "body",
"description": "Pet object that needs to be added to the store",
"required": true,
"schema": { "$ref": "#/definitions/Pet" }
}
],
"responses": { "405": { "description": "Invalid input" } }
},
"put": {
"tags": [ "pet" ],
"summary": "Update an existing pet",
"description": "",
"operationId": "updatePet",
"consumes": [ "application/json", "application/xml" ],
"produces": [ "application/xml", "application/json" ],
"parameters": [
{
"in": "body",
"name": "body",
"description": "Pet object that needs to be added to the store",
"required": true,
"schema": { "$ref": "#/definitions/Pet" }
}
],
"responses": {
"400": { "description": "Invalid ID supplied" },
"404": { "description": "Pet not found" },
"405": { "description": "Validation exception" }
}
}
},
"/pet/findByStatus": {
"get": {
"tags": [ "pet" ],
"summary": "Finds Pets by status",
"description": "Multiple status values can be provided with comma separated strings",
"operationId": "findPetsByStatus",
"produces": [ "application/xml", "application/json" ],
"parameters": [
{
"name": "status",
"in": "query",
"description": "Status values that need to be considered for filter",
"required": true,
"type": "array",
"items": {
"type": "string",
"enum": [ "available", "pending", "sold" ],
"default": "available"
},
"collectionFormat": "multi"
}
],
"responses": {
"200": {
"description": "successful operation",
"schema": {
"type": "array",
"items": { "$ref": "#/definitions/Pet" }
}
},
"400": { "description": "Invalid status value" }
}
}
},
"/pet/findByTags": {
"get": {
"tags": [ "pet" ],
"summary": "Finds Pets by tags",
"description": "Muliple tags can be provided with comma separated strings. Use tag1, tag2, tag3 for testing.",
"operationId": "findPetsByTags",
"produces": [ "application/xml", "application/json" ],
"parameters": [
{
"name": "tags",
"in": "query",
"description": "Tags to filter by",
"required": true,
"type": "array",
"items": { "type": "string" },
"collectionFormat": "multi"
}
],
"responses": {
"200": {
"description": "successful operation",
"schema": {
"type": "array",
"items": { "$ref": "#/definitions/Pet" }
}
},
"400": { "description": "Invalid tag value" }
},
"deprecated": true
}
},
"/pet/{petId}": {
"get": {
"tags": [ "pet" ],
"summary": "Find pet by ID",
"description": "Returns a single pet",
"operationId": "getPetById",
"produces": [ "application/xml", "application/json" ],
"parameters": [
{
"name": "petId",
"in": "path",
"description": "ID of pet to return",
"required": true,
"type": "integer",
"format": "int64"
}
],
"responses": {
"200": {
"description": "successful operation",
"schema": { "$ref": "#/definitions/Pet" }
},
"400": { "description": "Invalid ID supplied" },
"404": { "description": "Pet not found" }
},
"security": [ { "api_key": [ ] } ]
},
"post": {
"tags": [ "pet" ],
"summary": "Updates a pet in the store with form data",
"description": "",
"operationId": "updatePetWithForm",
"consumes": [ "application/x-www-form-urlencoded" ],
"produces": [ "application/xml", "application/json" ],
"parameters": [
{
"name": "petId",
"in": "path",
"description": "ID of pet that needs to be updated",
"required": true,
"type": "integer",
"format": "int64"
},
{
"name": "name",
"in": "formData",
"description": "Updated name of the pet",
"required": false,
"type": "string"
},
{
"name": "status",
"in": "formData",
"description": "Updated status of the pet",
"required": false,
"type": "string"
}
],
"responses": { "405": { "description": "Invalid input" } }
},
"delete": {
"tags": [ "pet" ],
"summary": "Deletes a pet",
"description": "",
"operationId": "deletePet",
"produces": [ "application/xml", "application/json" ],
"parameters": [
{
"name": "api_key",
"in": "header",
"required": false,
"type": "string"
},
{
"name": "petId",
"in": "path",
"description": "Pet id to delete",
"required": true,
"type": "integer",
"format": "int64"
}
],
"responses": {
"400": { "description": "Invalid ID supplied" },
"404": { "description": "Pet not found" }
}
}
},
"/pet/{petId}/uploadImage": {
"post": {
"tags": [ "pet" ],
"summary": "uploads an image",
"description": "",
"operationId": "uploadFile",
"consumes": [ "multipart/form-data" ],
"produces": [ "application/json" ],
"parameters": [
{
"name": "petId",
"in": "path",
"description": "ID of pet to update",
"required": true,
"type": "integer",
"format": "int64"
},
{
"name": "additionalMetadata",
"in": "formData",
"description": "Additional data to pass to server",
"required": false,
"type": "string"
},
{
"name": "file",
"in": "formData",
"description": "file to upload",
"required": false,
"type": "file"
}
],
"responses": {
"200": {
"description": "successful operation",
"schema": { "$ref": "#/definitions/ApiResponse" }
}
}
}
},
"/store/inventory": {
"get": {
"tags": [ "store" ],
"summary": "Returns pet inventories by status",
"description": "Returns a map of status codes to quantities",
"operationId": "getInventory",
"produces": [ "application/json" ],
"parameters": [ ],
"responses": {
"200": {
"description": "successful operation",
"schema": {
"type": "object",
"additionalProperties": {
"type": "integer",
"format": "int32"
}
}
}
},
"security": [ { "api_key": [ ] } ]
}
},
"/store/order": {
"post": {
"tags": [ "store" ],
"summary": "Place an order for a pet",
"description": "",
"operationId": "placeOrder",
"produces": [ "application/xml", "application/json" ],
"parameters": [
{
"in": "body",
"name": "body",
"description": "order placed for purchasing the pet",
"required": true,
"schema": { "$ref": "#/definitions/Order" }
}
],
"responses": {
"200": {
"description": "successful operation",
"schema": { "$ref": "#/definitions/Order" }
},
"400": { "description": "Invalid Order" }
}
}
},
"/store/order/{orderId}": {
"get": {
"tags": [ "store" ],
"summary": "Find purchase order by ID",
"description": "For valid response try integer IDs with value >= 1 and <= 10. Other values will generated exceptions",
"operationId": "getOrderById",
"produces": [ "application/xml", "application/json" ],
"parameters": [
{
"name": "orderId",
"in": "path",
"description": "ID of pet that needs to be fetched",
"required": true,
"type": "integer",
"maximum": 10.0,
"minimum": 1.0,
"format": "int64"
}
],
"responses": {
"200": {
"description": "successful operation",
"schema": { "$ref": "#/definitions/Order" }
},
"400": { "description": "Invalid ID supplied" },
"404": { "description": "Order not found" }
}
},
"delete": {
"tags": [ "store" ],
"summary": "Delete purchase order by ID",
"description": "For valid response try integer IDs with positive integer value. Negative or non-integer values will generate API errors",
"operationId": "deleteOrder",
"produces": [ "application/xml", "application/json" ],
"parameters": [
{
"name": "orderId",
"in": "path",
"description": "ID of the order that needs to be deleted",
"required": true,
"type": "integer",
"minimum": 1.0,
"format": "int64"
}
],
"responses": {
"400": { "description": "Invalid ID supplied" },
"404": { "description": "Order not found" }
}
}
},
"/user": {
"post": {
"tags": [ "user" ],
"summary": "Create user",
"description": "This can only be done by the logged in user.",
"operationId": "createUser",
"produces": [ "application/xml", "application/json" ],
"parameters": [
{
"in": "body",
"name": "body",
"description": "Created user object",
"required": true,
"schema": { "$ref": "#/definitions/User" }
}
],
"responses": { "default": { "description": "successful operation" } }
}
},
"/user/createWithArray": {
"post": {
"tags": [ "user" ],
"summary": "Creates list of users with given input array",
"description": "",
"operationId": "createUsersWithArrayInput",
"produces": [ "application/xml", "application/json" ],
"parameters": [
{
"in": "body",
"name": "body",
"description": "List of user object",
"required": true,
"schema": {
"type": "array",
"items": { "$ref": "#/definitions/User" }
}
}
],
"responses": { "default": { "description": "successful operation" } }
}
},
"/user/createWithList": {
"post": {
"tags": [ "user" ],
"summary": "Creates list of users with given input array",
"description": "",
"operationId": "createUsersWithListInput",
"produces": [ "application/xml", "application/json" ],
"parameters": [
{
"in": "body",
"name": "body",
"description": "List of user object",
"required": true,
"schema": {
"type": "array",
"items": { "$ref": "#/definitions/User" }
}
}
],
"responses": { "default": { "description": "successful operation" } }
}
},
"/user/login": {
"get": {
"tags": [ "user" ],
"summary": "Logs user into the system",
"description": "",
"operationId": "loginUser",
"produces": [ "application/xml", "application/json" ],
"parameters": [
{
"name": "username",
"in": "query",
"description": "The user name for login",
"required": true,
"type": "string"
},
{
"name": "password",
"in": "query",
"description": "The password for login in clear text",
"required": true,
"type": "string"
}
],
"responses": {
"200": {
"description": "successful operation",
"schema": { "type": "string" },
"headers": {
"X-Rate-Limit": {
"type": "integer",
"format": "int32",
"description": "calls per hour allowed by the user"
},
"X-Expires-After": {
"type": "string",
"format": "date-time",
"description": "date in UTC when token expires"
}
}
},
"400": { "description": "Invalid username/password supplied" }
}
}
},
"/user/logout": {
"get": {
"tags": [ "user" ],
"summary": "Logs out current logged in user session",
"description": "",
"operationId": "logoutUser",
"produces": [ "application/xml", "application/json" ],
"parameters": [ ],
"responses": { "default": { "description": "successful operation" } }
}
},
"/user/{username}": {
"get": {
"tags": [ "user" ],
"summary": "Get user by user name",
"description": "",
"operationId": "getUserByName",
"produces": [ "application/xml", "application/json" ],
"parameters": [
{
"name": "username",
"in": "path",
"description": "The name that needs to be fetched. Use user1 for testing. ",
"required": true,
"type": "string"
}
],
"responses": {
"200": {
"description": "successful operation",
"schema": { "$ref": "#/definitions/User" }
},
"400": { "description": "Invalid username supplied" },
"404": { "description": "User not found" }
}
},
"put": {
"tags": [ "user" ],
"summary": "Updated user",
"description": "This can only be done by the logged in user.",
"operationId": "updateUser",
"produces": [ "application/xml", "application/json" ],
"parameters": [
{
"name": "username",
"in": "path",
"description": "name that need to be updated",
"required": true,
"type": "string"
},
{
"in": "body",
"name": "body",
"description": "Updated user object",
"required": true,
"schema": { "$ref": "#/definitions/User" }
}
],
"responses": {
"400": { "description": "Invalid user supplied" },
"404": { "description": "User not found" }
}
},
"delete": {
"tags": [ "user" ],
"summary": "Delete user",
"description": "This can only be done by the logged in user.",
"operationId": "deleteUser",
"produces": [ "application/xml", "application/json" ],
"parameters": [
{
"name": "username",
"in": "path",
"description": "The name that needs to be deleted",
"required": true,
"type": "string"
}
],
"responses": {
"400": { "description": "Invalid username supplied" },
"404": { "description": "User not found" }
}
}
}
},
"securityDefinitions": {
"api_key": {
"type": "apiKey",
"name": "api_key",
"in": "header"
}
},
"definitions": {
"Order": {
"type": "object",
"properties": {
"id": {
"type": "integer",
"format": "int64"
},
"petId": {
"type": "integer",
"format": "int64"
},
"quantity": {
"type": "integer",
"format": "int32"
},
"shipDate": {
"type": "string",
"format": "date-time"
},
"status": {
"type": "string",
"description": "Order Status",
"enum": [ "placed", "approved", "delivered" ]
},
"complete": {
"type": "boolean",
"default": false
}
},
"xml": { "name": "Order" }
},
"User": {
"type": "object",
"properties": {
"id": {
"type": "integer",
"format": "int64"
},
"username": { "type": "string" },
"firstName": { "type": "string" },
"lastName": { "type": "string" },
"email": { "type": "string" },
"password": { "type": "string" },
"phone": { "type": "string" },
"userStatus": {
"type": "integer",
"format": "int32",
"description": "User Status"
}
},
"xml": { "name": "User" }
},
"Category": {
"type": "object",
"properties": {
"id": {
"type": "integer",
"format": "int64"
},
"name": { "type": "string" }
},
"xml": { "name": "Category" }
},
"Tag": {
"type": "object",
"properties": {
"id": {
"type": "integer",
"format": "int64"
},
"name": { "type": "string" }
},
"xml": { "name": "Tag" }
},
"ApiResponse": {
"type": "object",
"properties": {
"code": {
"type": "integer",
"format": "int32"
},
"type": { "type": "string" },
"message": { "type": "string" }
}
},
"Pet": {
"type": "object",
"required": [ "name", "photoUrls" ],
"properties": {
"id": {
"type": "integer",
"format": "int64"
},
"category": { "$ref": "#/definitions/Category" },
"name": {
"type": "string",
"example": "doggie"
},
"photoUrls": {
"type": "array",
"xml": {
"name": "photoUrl",
"wrapped": true
},
"items": { "type": "string" }
},
"tags": {
"type": "array",
"xml": {
"name": "tag",
"wrapped": true
},
"items": { "$ref": "#/definitions/Tag" }
},
"status": {
"type": "string",
"description": "pet status in the store",
"enum": [ "available", "pending", "sold" ]
}
},
"xml": { "name": "Pet" }
}
},
"externalDocs": {
"description": "Find out more about Swagger",
"url": "http://swagger.io"
}
}
Connection Attributes
| Attribute | Description |
|---|---|
| swagger | URL of Swagger/OpenAPI definition of the REST service |
| baseUrl | optional override for the base URL (endpoint paths will be adjusted to use the base URL if supplied) |
| postschema | URL of the schema to use for basic POST requests (without a swagger definition) |
| oauthTokenUrl | URL for the connection to request OAuth tokens from, in non-swagger mode. Custom request header values can be supplied with the header name in square brackets and the value separated by an equals sign: [header]=value |
swagger=https://petstore.swagger.io/v2/swagger.json;baseurl=http://petstore.swagger.io/v2
Connection URL Overrides
The swagger is always exported if it exists in the source environment. The swagger also gets overwritten if it exists in the package being imported.
The base URL for the REST connection can be defined in the uploaded schema or can be overridden in the Connection Attributes by using baseUrl= and the API url.
Data Objects
When setting up the data objects after completing the connection setup, typing / will provide a list of GET endpoints. endpoints with curly brackets indicate a predefined filter-field {field}, and the display fields will be automatically determined.
A data object name is the rest of the API URL api/{username}/invoice?id={invoiceid}. Key fields are extracted from the URL, template fields and display fields are read from the schema file.
For hierarchical REST datasources, the schema must be supplied in Swagger format.
Custom Headers
Custom Headers can be used with any of the REST Data Connector authentication types. Header values can be supplied by the use of a custom filter field or from the connection string.
When creating a new custom filter on a Data Object, names that are surrounded by square brackets are treated as headers and are added to the request.
The connection string [Authorization]= and the field reference will generate the header of '[Authorization]' for the specific field.
Array Data Filter - POST data from repeater
Using a Data Question and Repeating Section you can generate JSON arrays with the form results to send through the REST connection.
Create a repeating section and add within it the questions for the child fields. In the data question add the parent filter field as repeating data filter with the repeater as the source, then add the child data filters.
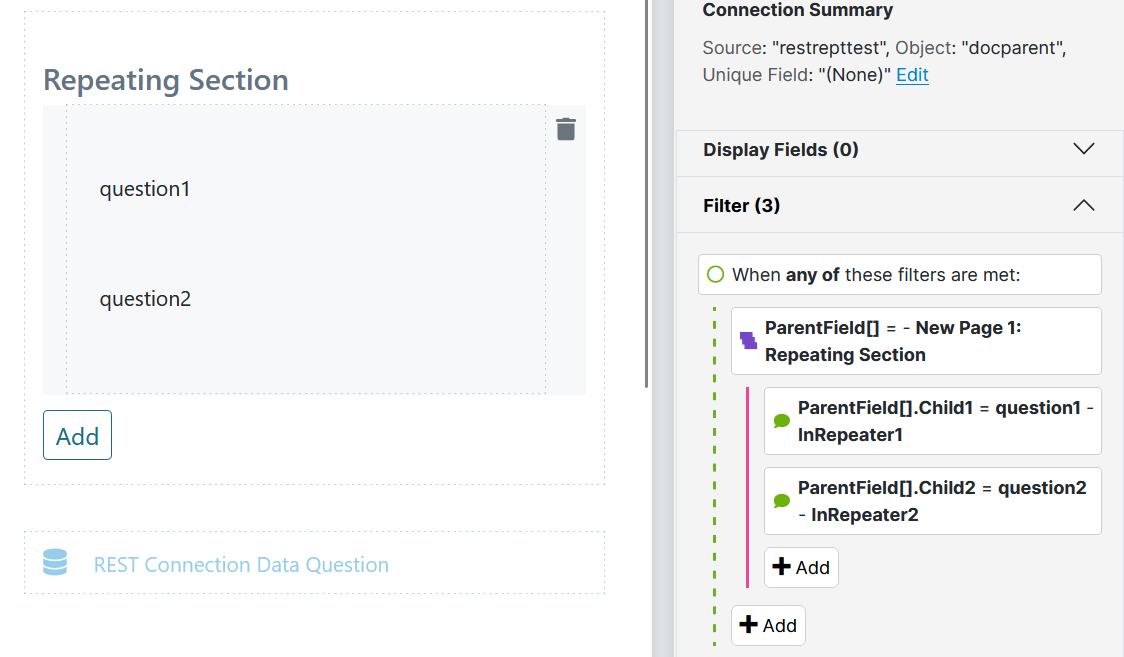
This will generate a JSON POST array following the parent child object structure.
{
    "ParentField":[
        {
            "Child1": "question1 answer",
            "Child2": "question2 answer"
        }
    ]
}
Troubleshooting
The 'Enable advanced results display in Troubleshooting Mode' should be enabled as well as Troubleshooting Mode when troubleshooting a REST connection issues.
Updated about 1 month ago