Dynamics 365
Contact your sales representative if you are interested in obtaining a license for the Microsoft Dynamics Connector Module for your SmartIQ environment.
The MS Dynamics 365 Connector has been developed to provide an integrated experience for customers by integrating SmartIQ with MS Dynamics 365 using the Dynamics actions. The SmartIQ Connectors for Dynamics 365 include several integration components which support Data Connections. This enables pulling data from Dynamics to consume in SmartIQ forms and Actions which provide the functionality to push data from SmartIQ forms to MS Dynamics 365.
The MS Dynamics 365 Data Source for SmartIQ is used to read data from the MS Dynamics365 environment. This is useful for bringing back entity records, such as contacts, to populate drop-down lists in an SmartIQ web form, or to populate a web form with the specific entity information from MS Dynamics 365. It can also be used to make decisions dynamically based on data in MS Dynamics 365. For example, based on the contact type in MS Dynamics365, you may wish to ask additional questions in the web form.
The data source can also be used to automatically fill entity data in generated document outputs from SmartIQ such as Word or PDF documents, emails and other communications. You can easily read data from multiple related entity records and can add as many data questions to a SmartIQ project as needed. You can also read data from custom entity types you may have added to your MS Dynamics 365 environment. The MS Dynamics 365 Data Source also allows you to read data from Option Sets in your MS Dynamics 365 environment. This is often useful for automatically populating drop-down lists in the SmartIQ form for user selection.
Understanding the Dynamics Data model
A useful resource for information about your MS Dynamics 365 environment can be found in the Customize the System menu of Dynamics own Settings. This displays all components in your MS Dynamics 365 environment, including Entities, Relationships, Fields and Option Sets that can be extremely useful in configuring both the Data Source and Actions for MS Dynamics 365 within the SmartIQ system.
Relevant Links
Connector Set-Up
Configuration requires setting the global Dynamics 365 Connector Settings to inform SmartIQ where and how to connect.
Connection Attributes
Data Objects
There are two data object types 'Entity' and 'Option Set'
Best Practice
To enhance performance, it is best practice to specify the fields of an entity which are to be pulled from Dynamics.
For example, you can specify the
contact [contactid|firstname|lastname|telephone1|emailaddress1|address1_line1|address1_line2|address1_line3]in theData Object Name / Definitionand this data source will only pull the data from specified fields from Dynamics.
A custom display field for Dynamics Data Connections can be defined in the Data Object Definition using the following syntax:entityname [fieldname|ConcatField:static text {fieldname} {fieldname}]


Troubleshooting
MS Dynamics 365 connections can fail due to a number of reasons. Some of the common issues for failure include:
- Invalid connection strings.
- Data integrity issues in passed data in actions. For example, not passing mandatory fields when creating an entity.
- Network issues between SmartIQ server and the Dynamics instance.
Best Practice
Whenever you are debugging, make sure that you have set the
Debug Mode [true|false]to true in the connector settings in Manage. This will result in detailed logging of the action execution.
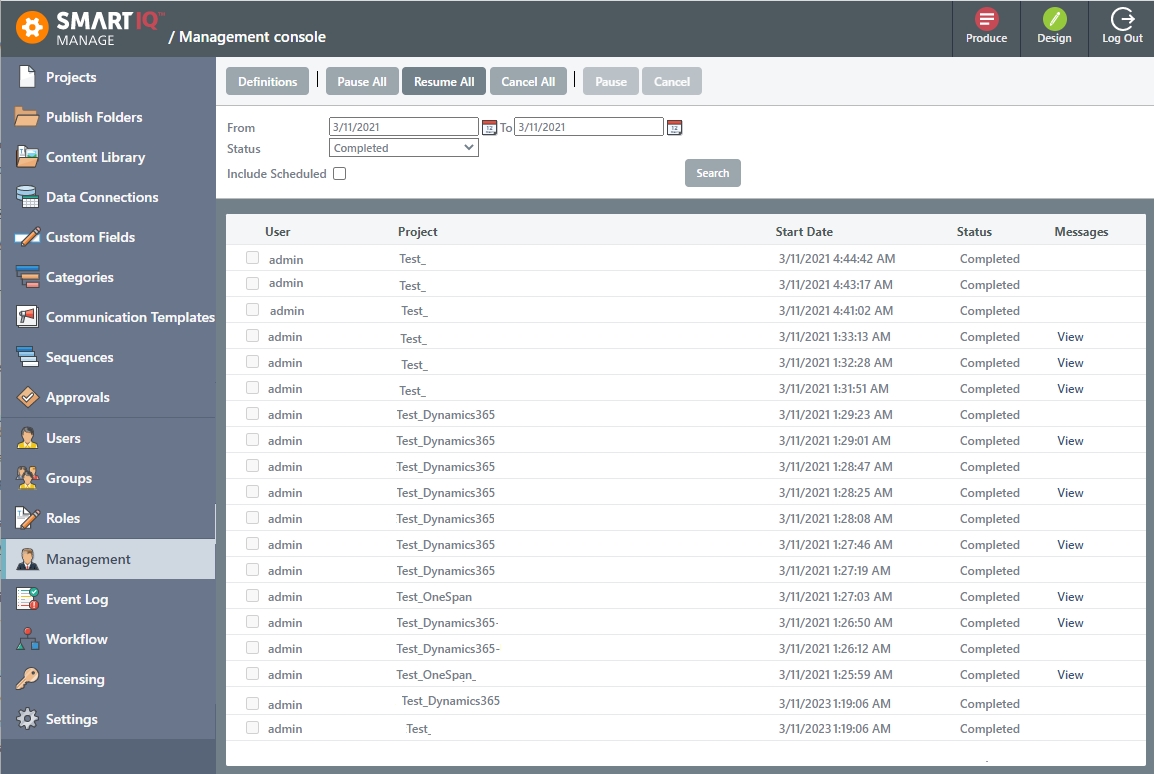
The first place to investigate is the Management tab of SmartIQ Manage if you encounter issues when using the Dynamics connector. You will see the record for your execution.
For example, in the below screenshot you can see a project 'Testing Dynamics Connection' is executed by user 'admin' and the status is 'Completed'.

To see the logs for this execution, click View, where you will see the logs for this execution as shown in the below screenshot. You will see the Level as 'Warning' for error. Read the Description to know the reason for this error.
Updated about 1 month ago
