
DocuSign Data Source
Contact your sales representative if you are interested in obtaining a license for the DocuSign Connector Module for your SmartIQ environment.
DocuSign is a digital document signing solution, that can be sent documents generated in SmartIQ using the DocuSign Actions, or generate documents using its own native templates.
SmartIQ supports both v1 (DS "Legacy connect") and v2 of the DocuSign connect API, but v1 only supports XML formatting.
- v1 is the manual integration
- v2 is automatic
If a manual schema implementation via data questions is required, only use the v1 api implementation setting the DocuSign side to "legacy mode" which only uses XML.
The v2 integration of DocuSign which uses JSON formatting by default, supports XML, and is integrated into the external events capability.
Relevant Links
Connector Set-up
In DocuSign Authentication workflows, SmartIQ makes API calls on behalf of a user, acting as them to create envelopes, add documents, and send these files out for signing. Each of these workflows requires that the user grant explicit consent for SmartIQ to act on their behalf. A Redirect URI is used for SmartIQ to request impersonation consent from an individual user, by redirecting the user's browser to the authorization service URI and initiating the authorization process.
After being redirected to the service URI, the user will need to log in to their DocuSign account and grant signature and impersonation permissions to SmartIQ.
You’ll require a dev sandbox and service account to perform tests and build solutions using DocuSign.
Service Account
You will need to create a new SmartIQ User and grant it a Role with impersonate users permissions, this will be the DocuSign service account. Also, add the user to all the relevant Groups to ensure the service account has access to all relevant forms.
DocuSign side
In the sandbox you should navigate to the Add APP / INTEGRATOR KEY button and provide DocuSign an App Description (The name for your specific integration; e.g. "SmartIQ") and the Redirect URI (should be the Produce URL). By default, DocuSign Connector will use <<productname>> Produce URL with a slash at the end as the Redirect URI, but can be defined in DocuSign Configuration Settings. In the same Window copy/past text from the RSA Keypairs (ID) button into a local .txt file (You must include the strings -----BEGIN RSA PRIVATE KEY----- To -----END RSA PRIVATE KEY-----). The Integrator Key guid value is also required in DocuSign Configuration Settings.
Find the 'Admin API Username' Parameter, a GUID, by navigating to 'Users' in the DocuSign Admin Console. This is needed to interact with the core DocuSign API service and needs to be defined in the DocuSign Configuration Settings. This must be in Guid form, not as an email.
In 'add custom configuration'; set the 'URL to Publish' to https://{{yourServer}}/Produce/Webhooks/DocuSign and the trigger events to envelope-completed, envelope-declined, envelope-voided, envelope-deleted, and envelope-discard. Select Include Basic Authentication Header and add the SmartIQ Service account username and password.
SmartIQ side
Create a 'DocuSign Data Source' data connection.
To allow the service account signing permissions on DocuSign's side, setup a project and run the "Create DocuSign Envelope" action with the authorization service URI as the Redirect URI. The envelope values can be anything since they are not being executed. SmartIQ will redirect the user to a Consent page, the user will need to log in to the DocuSign account that will be used for signatures and will be presented with a request to grant signature and impersonation permissions to SmartIQ. Accept the impersonation request and the user should be redirected back to the SmartIQ Produce page.
Make sure to reset the Redirect URI to the default <<productname>> Produce URL after providing impersonation permissions.
Once the user has granted consent to an application, they will no longer be prompted to do so again unless consent is revoked. If there’s a need to change the Admin API Username to another admin, the process would need to be done again to obtain consent for the new admin.
Data Objects
There is only one data object, Method, which appears after a docusign envelope has been submitted. This data object will contain information relating to a specific envelope.
| Name | Filter Fields |
|---|---|
| Get Envelope Documents | envelopeId |
| Get Envelopes Status | envelopId, fromDate and status |
| Get Recipient Information | envelopeId |
| Get Envelope Log |
DocuSign Templates
SmartIQ can leverage the existing configuration and investment in DocuSign Templates by mapping the tabs, recipient structure and documents from existing templates in a drag and drop fashion. SmartIQ will populate the tabs and recipient information at runtime instead of recreating the entire process from scratch.
DocuSign Connect
DocuSign allows data to be collected in a SmartIQ form/PDF document and sent to DocuSign for signatures.
DocuSign External State
We recommend using the DocuSign External State, which is the state wherein SmartIQ waits for the signature process to complete and DocuSign sends the result back to SmartIQ so the workflow can be continued or finalized.
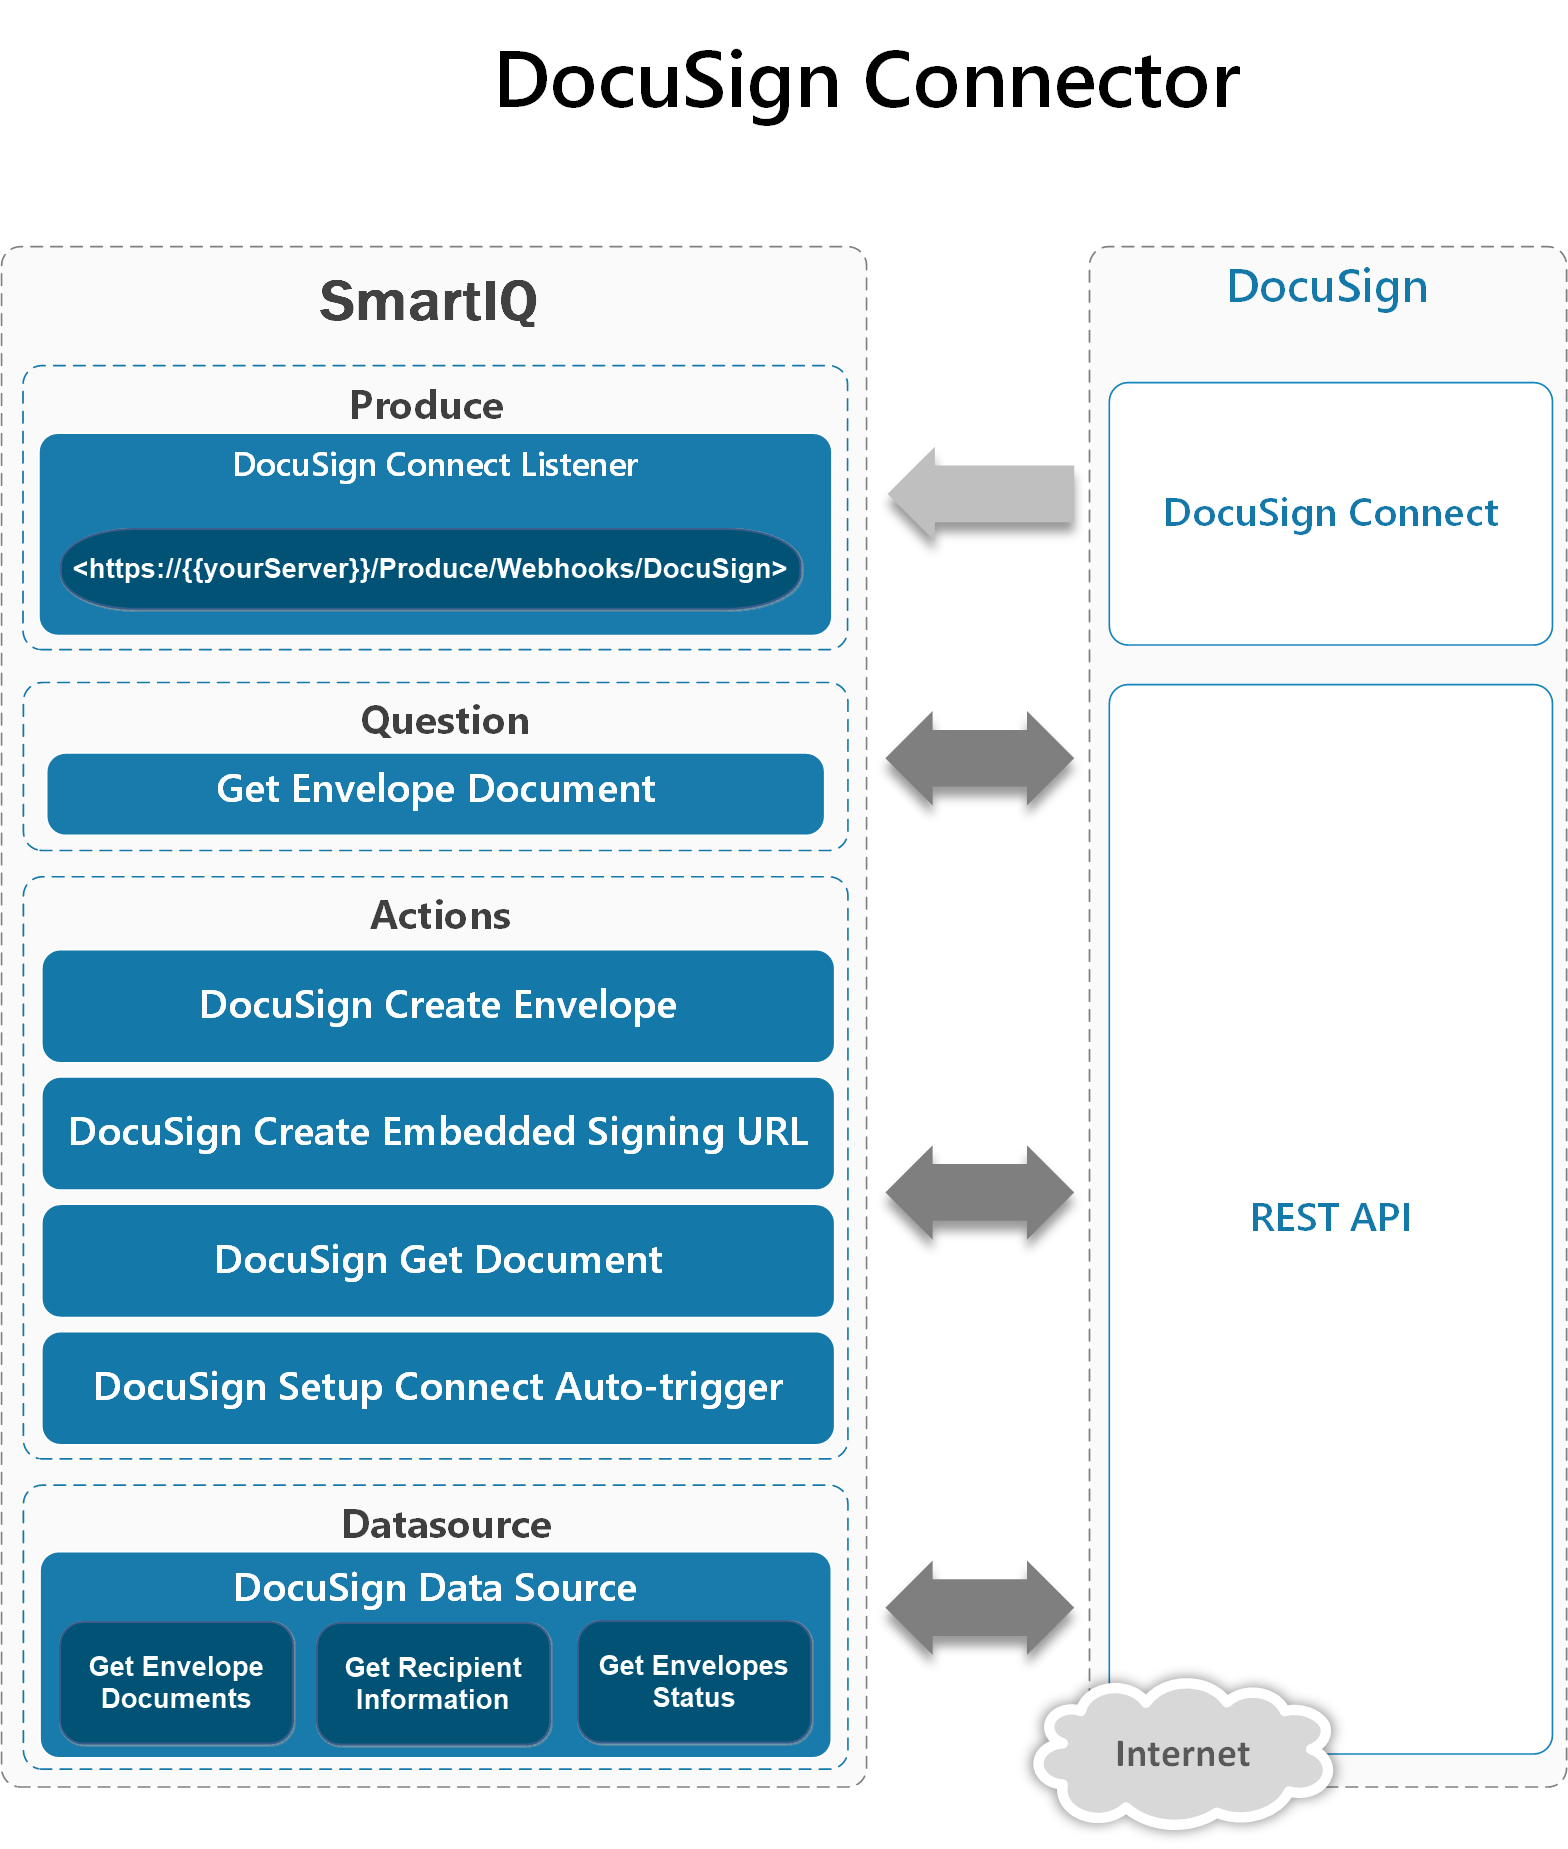
Architecture
Troubleshooting
If you experience problems, consider turning on Troubleshooting Mode to troubleshoot problems you experience when running the DocuSign Actions.
Updated about 1 month ago